Pages

Showing posts with label not edible. Show all posts

Tuesday, December 11, 2012

Gift Suggestion: Birchbox Home

I have to share this wonderful gift idea... if you're looking for a great gift for someone that loves trying new things in the kitchen, the Birchbox Home box is a great idea. If you haven't heard of Birchbox yet - go check it out at www.birchbox.com. A typical Birchbox subscription provides you with monthly samples tailored to the things you like - it's a great way to try new beauty products (which are also available for purchase in full-size versions on their website). But the company recently came out with this super cool Birchbox Home edition. I signed up to buy one for myself right away... I was so excited!

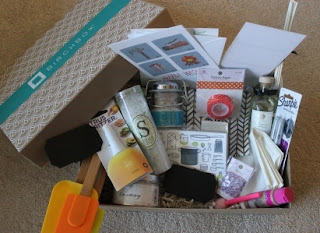
 It comes to your door in this pretty box. Seriously - I've never seen a plain cardboard box look so cute.

 It's filled with fun cards that explain exactly what's in the box and suggests uses for each one, directions for the cool do-it-yourself napkin designs included, recipes, trendy holiday cards... I love that they don't just send you "stuff," but they tell you how to use it. (they always do this with the sample beauty products they send in subscriptions each month)

Check out all the amazing things in this box! Cards, supplies for a fun DIY project, cute cocktail napkins, truffle sea salt, sugar sprinkles, rosemary from Dean& Deluca, recipe cards (with some recipes included), a citrus spitzer, and mini chalkboard placecards.

Buy for yourself or a friend - I hope you'll enjoy it as much as I did.

Wednesday, October 24, 2012

Do-It-Yourself Cork Board

I first saw a corkboard made from real wine corks in Cambria, California. It's this great little town on the central coast. It's quaint, quiet, and just darling - and has some fantastic restaurants. Inland from Cambria is the Paso Robles area full of beautiful vineyards and wineries. It's definitely in my top 5 of favorite vacation spots. Ahhhh... wishing I were there right now! But back to the cork board... Cambria had a very large cork board like this in the middle of town as a "community board" for people to post fliers and pictures and such. Here's how you can make one for yourself at home.

First you must collect enough corks to fill the size of board you want to have. Drink lots of wine, ask friends to help you save corks, and always keep the cork if you order a bottle of wine at a restaurant. Each cork in your board will hold a special memory of when you enjoyed each bottle of wine.

For your frame, you can just repurpose an old frame (or make one like Mark did for me out of some molding from Home Depot). If the frame doesn't have a back already, add a thin piece of word or sturdy cardboard to the back of the frame.  That's what the corks will stick to in order to create the cork board. I used some craft glue. Just spread some around the board inside the frame.

The trick is to select sets of two corks and alternate their direction. It's like doing a giant puzzle. I recommend arranging all of the corks inside of your frame BEFORE gluing them down. Then carefully move them all outside of your frame, keeping the same arrangement. Begin gluing the corks two-by-two like you see below until you've filled your frame. 
Allow the glue to dry for 24 hours before hanging your cork board. You can also place a few heavy books on top of the corks while it's laying flat on a table or floor to keep any corks from popping out of place as they dry.
Hang your board in the perfect place in your home. Hang some favorite photos or memories and enjoy!

Friday, July 20, 2012

Kool-Aide... not just for drinking

I remember kool-aide as one of my favorite drinks as a kid. I think my mom might have even had a pitcher or plastic cups that looked like the "kool-aide" man that was on TV. Kool-aide was fun because it came in all kinds of flavors - yum! Now that I'm grown up, I realize it's just water, flavoring, and lots of sugar (one time my aunt mistakenly added salt instead of sugar - oh that was nasty).

Did you know it's also a rather effective hair coloring product. So if you want to have some fun with color in your hair, try this non-permanent technique. My friend Karly showed me how to do it recently. We colored sections of full strands in our hair. But you could also use the same process to just color the tips if you like. Here's the end result.


First pick a color. Kool-aide comes in so many flavors and colors! Karly and I used cherry. If you have dark hair, be sure to choose a bold /dark color - reds work very well... yellow wouldn't. If you have blonde hair, be very careful... the kool-aide may last for quite a long time (maybe months). I have a different less permanent option for all you blondes out there coming soon.

Boil a saucepan about half full of water. Add one packet of kool-aide and mix. Carefully pour the kool-aide mixture into a tall glass, filling it as high as possible so you can get the color close to your roots.


Select a section of hair to color, separate it from the rest of your hair, and pull or pin the rest of your hair out of the way. Dip the section of hair into the glass, trying to get the kool-aide mixture as close to your scalp as possible.

Hold  your hair in the glass for about 10 minutes. Less time will result in a lighter color... more time will result in a stronger color.

Remove hair from the glass and dry with a towel. Dry completely and style as you normally would.
Karly suggests waiting a day to wash your hair, allowing the color time to set.

  
Try lots of colors! Enjoy and have fun!!!

Monday, July 9, 2012

Polka-dot Gradient Manicure

I want to share this simple, yet fun manicure. If you don't want to go for a bold color on your nails, try this nude polish. The polka-dots add some fun without being too wacky.


Here's the polish I used... Start with Essie "First Base" base coat. Follow with two coats of Essie "Sand Tropez." Follow with polka-dots in OPI "Alpine Snow." Finish with your favorite top coat (I use CND "Super Glossy"). If you haven't tried drying drops, yet - go get some! I used Essie drying drops, but OPI also makes a similar product. One drop on each nail after polishing dries nails in about 5 minutes... perfect for people like me that can't sit still long enough to allow their manicure to dry completely.


 I used a small dot painting tool to create the polka-dots. You can get one at a beauty supply store or even a craft store. But you could also use a toothpick.


Start out with just a few polka dots at the tips of your nails. Then gradually add more to about half-way down your nail. Add the most near the tip, and only a few small dots as you move toward the middle of your nail.


Try it with any color combination you like! Have fun!!


Saturday, June 30, 2012

Chalkboard Paint

I just love chalkboard paint. It's so simple and you can really creat some cute stuff with it. I've seen entire walls painted with chalkboard paint - SO FUN! What kid wouldn't want that in their room? I think grown-ups could have fun with it too. Here's one of my recent chalkboard paint uses. This was actually my husband's idea - flour storage/organization.

If you read this blog often, you know I often create gluten-free meals, desserts, snacks. I've been through much trial and error when it comes to using gluten-free flours, trying to get the perfect blend for texture and taste. With a little chalkboard paint and some glass mason jars, I got all of those little bags tossed on a shelf in my pantry neatly organized.


You could use this same technique for any type of storage you need. Simply brush a square (I did it just free-hand, but you could tape it off if you want to be exact) with the chalkboard paint using horizontal strokes. Let it dry for about 30 minutes. Then brush a second coat over the share using vertical strokes. Allow to dry completely for 24 hours and label with chalk or a chalkpen.

Have fun!

P.S. You can get the chalkboard paint and chalkboard pens at Hobby Lobby (or probably any craft store).

Wednesday, May 2, 2012

Drive-Thru Zoo

It seems like everything in Oklahoma has a drive-thru. Once we saw a man on his horse going through the McDonald's drive-thru - of course it was captured on the iphone camera and texted to all of our friends. We also recently experienced another drive-thru event.... Drive-Thru Zoo! And snapped many photos...

This is Arbuckle Wilderness in Davis, Oklahoma (between Oklahoma City and Dallas, Texas). Let me set the stage... I did not have high expectations of this drive-thru zoo and I was quite worried that the whole event would be a flop. First of all, we had to drive about 2 hours from our house to get there. We made sure we had a movie for Emily and her friend, Kayla, to watch in the car during the drive. Appropriately, the girls picked "We Bought a Zoo." Another point of concern - many of the reviews from the internet were not very positive... claiming not enough animals, not the right kind of animals, sick-looking animals. But some friends had been to the zoo last year and they said it was good.

So we packed up and headed to Arbuckle Wilderness (I think the name is kind of funny... hahaha)

The sign is a bit deceiving... we actually didn't see any tigers or lions at this drive-thru zoo.
Some important advice before entering the wilderness (where the animals live)
This is the emu that greeted us (I think this it's an emu anyway). It stuck its head right in the window! This resulted in the first screams of the day, followed immediately by a huge erruption of laughter. It was so funny! At this moment, I knew the 2-hour drive was worth it even if we didn't see another animal all day. Oh but the fun didn't stop here... there were many more "greeters."

The Pepsi cup in Emily's hand was purchased at the shop located at the entrance of the zoo. There is a charge for driving through the zoo and also for each cup of food. We had 4 cups of food (one cup for each of us), but we easily could have used double that to feed the number of animals that came near the car.
The llamas were friendly (and hungry). Look how they just come right to the window!
Definitely some more screaming and laughing now.
This is me feeding this little animal (maybe it's a llama?)

This guy... "Hey! Excuse me! Can I get some of that snack?"
The little donkeys were so hungry.
They have very straight teeth!
They all look like they've had braces.

Here's Emily feeding one of the donkeys. This part of the zoo was a little more calm because the donkeys couldn't reach their heads into the car window... so less screaming...

These huge bison did not come near the car (thankfully)! But we kept the windows rolled up in this area just in case.

The rhinos were behind a fence but still close enough for a great photo.

The drive-thru zoo had some great views of the surrounding hills too. Who knew Oklahoma had some mini mountains?! The trees and hills were very pretty - reminded me a little of Pennsylvania.
I think this is my favorite picture. It captures the fun of this up close and personal drive-thru zoo - literally.

So if you are in Oklahoma and have a little extra time, I recommend checking out this drive-thru zoo. We didn't see any "typical" zoo animals like elephants, giraffes, tigers, lions. But interacting with the emus, ostriches, llamas, and donkeys was loads of fun.

http://www.arbucklewilderness.com/

Sunday, March 18, 2012

Magnetic Nail Polish

I'm always excited to try new things... recently I tested out magnetic nail polish. If you haven't seen it yet, here's what it looks like.


It's super simple actually... You paint it on like normal nail polish (and you only use one coat)! The tricky part is you have to hold the magnet over each nail right after you paint it. You don't want it to start drying before you hold the magnet over it.

Here's the brand I used - Layla. I got it at Ulta. I think that China Glaze brand also makes a magnetic polish. This brand comes in about 5 different colors. I chose the color called "gun metal."

Paint one nail then hold the magnet that's on top of the cap (it's the little black layer you see right on top of the cap in the picture above) directly over your nail (as close as you can without touching your nail). Hold it there as still as possible for about 10 seconds. Magically you nail will go from this...


to this...
Hope you try it out! You can experiment with the way you hold the magnet over your nail to get different designs. Have fun!

Thursday, March 15, 2012

Nail Polish Strips Really Work

So I got these fun nail polish strips at Christmas, but was a little skeptical that they'd really turn out well. I have to say that they were much easier to apply than I expected. Here's how I did it followed by status of how they survived on my fingers... for two weeks!

I used Sally Hansen nail strips, but I would expect that most other brands would work the same way. The kit comes with several sizes of nail strips, an orange stick, and a file/buffer. I also used an Essie clear top coat to give my nails a little extra protection.
 Here's the How-To:

Start with clean, dry nails. Use a napkin or paper towel with some nail polish remover on each nail to make sure they have no oils. This is important to help the strips stick. (This is actually a step I always take when I'm painting my nails too. The polish adheres to the nail better and doesn't chip as quickly.)
 Next select the right size strip for each finger nail and lay them out so you don't get confused as you're applying. (You can see mine in the background of the picture below.
 Then simply remove the backing and line up the strip at your cuticle. Stick in to your nail and press firmly all over to make sure it's completely stuck on the whole nail. You'll have a big long strip hanging off the end of your nail depending on the length of your nail.
 Using the file/buffer that was included in the kit with the nail strips, carefully rub it at the edge of your nail and you'll notice the excess strip start to pull away from your nail. Carefully remove it and discard it.
 

Here's the first one I applied.
 Here's the finished product. I think they look fun and really were easy to use.

The best part is that these nail polish strips honestly lasted 2 weeks on my nails. This is no small task! My nails take a beating every day! I'm in the kitchen cooking and baking as much as possible, then cleaning up. A normal manicure usually only lasts me a maximum of 3 days before it starts chipping.

The picture above was the day I first applied the strips. The pictures below show you how great they still looked days later...
6 days later

10 days later

14 days later
A few very small chips by the end and of course the gap that forms near the cuticles from my nails growing. They could have lasted even longer than 2 weeks, but I just got bored and ready for a change. I hope you give them a try!

Tuesday, March 13, 2012

How to line the bottom of a round pan

Here's a cool trick... cake recipes will often call for lining a round cake pan or round springform pan with parchment paper. Parchment paper (or waxed paper) doesn't come in nice circular pieces. So here's how you create one with just a few clever folds and a pair of scissors.

Start with a square piece of parchment paper.
 If you don't have a square, fold your rectangle into a triangle like the picture below by folding the bottom left corner up to the top edge.
 Cut off the extra edge, unfold... and you have a perfect square.
 Fold the square in half - bottom edge up to the top edge so the seam is on the bottom and the opening on the top.
 Fold in half again. This time taking the left edge onto the right edge.
 Next fold into a triangle by bringing the top left corner down to be on top of the bottom right corner.
 Fold into a smaller triangle by bringing the diagonal edge down to be on top of the bottom edge.
 Hold the folded paper over your pan so that the point is in the middle of the pan.
 Cut the triangle along the curve of the pan side.
 Open the cut, folded paper and you have a perfect circle! Ta-Da!
 Place the circle of parchment paper in the pan. Grease if directed by your recipe. Fill with your batter.
 

Enjoy!