Pages

Friday, November 30, 2012

Happy Birthday Deanna

Today's cake is for my sister Deanna on her birthday. She's a wonderful sister and friend - always supportive, always loving, always there when I need her. I miss her terribly living half-way across the country from her. But happy I could make this cake in her very favorite color. Happy Birthday!


Now for a little bad news... I'm having some technical difficulties with the Luscious Confections blog. So please don't be discouraged if you don't see any new posts for a week or so while I work out the "bugs." I promise to be back as soon as possible with lots of yummy recipes to share. Thanks for understanding! Check back often.

Monday, November 26, 2012

Pumpkin Cake for Emily

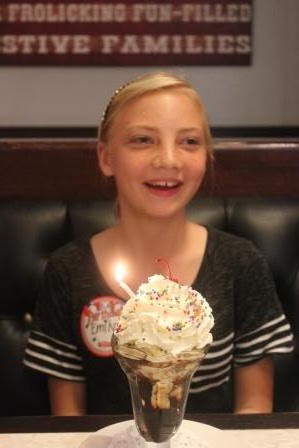
Today is a very special day - Happy 13th Birthday, Emily!!!!!! Emily's birthday is so close to Thanksgiving that we always include a little birthday celebration as part of Thanksgiving dinner with the family. It's quite fitting that one of Emily's favorite desserts is pumpkin pie (or just about anything pumpkin flavored). This cake is so moist and rich, it reminds me of a flourless cake - in pumpkin. Topped with cinnamon maple cream cheese frosting, it truly is luscious.


Pumpkin Cake with Cinnamon Maple Cream Cheese Frosting
for the cake...
1 1/2 cups flour
3/4 teaspoon baking soda
1/4 teaspoon salt
6 tablespoons butter, softened
1 cup sugar
2 eggs
1/2 tablespoon vanilla extract
1/2 (15 oz) can pumpkin
1 tablespoons vegetable oil
1/2 cup milk (I used almond milk)

for the frosting...
6 oz  cream cheese, softened
6 tablespoons butter, softened
1 1/2 tablespoons maple syrup
1 teaspoon vanilla extract
2 teaspoons cinnamon
3 cups powdered sugar

make the cake...
Preheat your oven to 350 degrees. Prepare two 6-inch round cake pans with non-stick cooking spray.

In a medium bowl, mix flour, baking soda, and salt.

In a large bowl using an electric mixer or stand mixer, cream butter and sugar together until light and fluffy. Beat in eggs, then add vanilla, pumpkin and vegetable oil. Beat in the flour mixture alternately with the milk.

Divide the batter evenly into prepared pans. Bake for 30 to 35 minutes, or until a toothpick inserted into the center of the cake comes out clean. Remove pans from oven and immediately place in freezer for 45 minutes. (Thenovicechefblog advises doing this. I believe this trick is what gives this cake is super moist texture.)

While the cakes are cooling, make the frosting...
In a large bowl, cream the butter and cream cheese until smooth. Beat in maple syrup, vanilla and cinnamon. Add powdered sugar and beat on low speed until combined, then on high until frosting is smooth.

Remove cakes from the freezer and from the pans. Place the first cake on a cake plate and top with a thick layer of the frosting. Top with the second cake and cover sides and top with remaining frosting. Decorate as desired. I added a "Happy Birthday" flag banner. It's easy to make - just take two wooden kitchen skewers, some string or twine, and some heavy card stock in your favorite color or colors. Cut small triangles from the card stock. String the triangles together using a large needle and the string or twine. Tie each end to the skewers and insert into the cake at an angle.


Store the cake in the refrigerator until ready to serve.

Enjoy every moment of being 13, Emily!!


recipe adapted from thenovicechefblog.com

Saturday, November 24, 2012

Basil Butter Shrimp

This shrimp has just been declared the best shrimp ever in our house. I kind of threw it together at the last minute loosely based on a grilled shrimp recipe from a Tyler Florence cookbook. It is so simple, but extremely delicious. You can prepare it in about 15 minutes, so it's a great weeknight protein paired with a simple salad and some crusty bread (for soaking up the left over basil butter). Yum!


Basil Butter Shrimp
10 to 12 large raw shrimp, peeled & tails removed
3 tablespoons butter, softened
juice of 1 lemon
large handful of basil leaves, chopped + additional for garnish
salt & pepper to taste
1 tablespoon white wine

In a medium bowl, combine the butter, lemon juice, basil leaves, and salt & pepper. Toss shrimp in the butter mixture to coat. Heat a large skillet over medium heat. Toss the shrimp and all of the butter mixture into the skillet. Cook shrimp, stirring occasionally and turning over half-way through cooking, for about 7 to 10 minutes or until pink in color and cooked through. Add white wine and cook for 1 minute longer. Remove from heat and transfer to a warm plate or shallow bowl. Sprinkle with chopped basil leaves for garnish.

Enjoy!

Sunday, November 18, 2012

Mini Almond Pies

I'm trying to get everything out of my refrigerator to make room for all the deliciousness of Thanksgiving (which we are hosting this year). I had an extra store-bought pie crust in the refrigerator, so I decided to experiment a little... the result was soooooo delicious and sooooo easy! I had to share it. Seriously, you can whip up these tasty little pies in just a few minutes. You could use any filling you like. I used almond (which remind me of little bear claws), but apple, strawberry, nutella, or even cinnamon & brown sugar would all be yummy.

Mini Almond Pies
1 store bought pie dough (or a home made pie dough)
1 egg
1 teaspoon water
1 can almond pie filling (or other filling of your choice)
1/4 cup slivered almonds
1/4 cup powdered sugar
1/2 teaspoon almond extract (or vanilla)
1 teaspoon water

Preheat your oven to 350 degrees.

Remove pie from the refrigerator and allow to rest at room temperature for about 15 minutes. Dust a flat work surface with flour and roll the pie crust to about 1/8 inch thickness on the prepared surface. Cut approximately 8 rectangles from the dough (making sure they are all about the same size). You could also use a cookie cutter to cut shapes - just make sure you have two of each (a top crust and a bottom crust).

Place one rectangle on a cookie sheet. Top with about a tablespoon (or more depending on the size of your rectangle) of pie filling. Top with another piece of dough, crimp the edges with a fork, and make a few small cuts in the top dough with a sharp knife. Repeat the process with the remaining dough and filling. Brush the tops of the mini pies with egg wash (1 egg mixed with 1 teaspoon water). Sprinkle with a few slivered almonds. Bake for 20 minutes or until golden brown.

Cool mini pies on a wire rack. While they cool, mix up a little glaze. Stir together the powdered sugar, almond extract, and water until smooth. Add more water as needed to thin. Drizzle cooled pies with the glaze. Enjoy!

Tuesday, November 13, 2012

Breakfast Crepes

The number one requested breakfast in our house is definitely breakfast crepes. If you haven't had crepes before, they are a traditional French recipe (kind of like a very, very thin pancake). Sometimes crepes are filled with savory items like chicken, mushrooms, cheese, or spinach. Our family's favorite would include some sweet fillings such as fruit, whipped cream, and chocolate. Creating different filling combinations is fun for everyone. We fill the center of our table with lots of different options, prepare the crepes in a large batch, and all sit down to enjoy them together. It takes a little work to put it all together, but your family will love it. Thanksgiving weekend provides the perfect long weekend to take the extra time and enjoy some crepes.

Breakfast Crepes
3 eggs
2/3 cup whole milk*
1/2 cup water*
3/4 cup flour
1 teaspoon sugar
1/2 teaspoon salt
1 tablespoon butter, melted, plus more for brushing
1 tablespoon canola oil
various fillings - Nutella, strawberries, orange slices, banana, slivered almonds, honey, sugar, cinnamon, etc... the possibilities are endless!

*If I don't have whole milk (and I usually don't), I use 2/3 + 1/2 cup of 1% or 2% milk, eliminating the water.

To make the batter, in a bowl, whisk together the eggs, milk, and water. Whisk in the flour, sugar, salt, 1 tablespoon melted butter, and canola oil, whisking to remove as many lumps as possible. Let the batter rest for 30 minutes at room temperature.


While the batter is resting, prepare your toppings in the middle of your table so that everyone has easy access to them.  

Place a small, nonstick frying pan with low sides over medium heat. Heat the pan until quite hot (I use two small pans so that I can make two crepes at the same time and get them to the table faster). Lightly brush the pan with melted butter. Ladle about 3 tablespoons (just shy of 1/4 cup) into the pan and immediately swirl the pan around so the batter spreads into a thin layer covering the bottom, then pour any excess back into the bowl. Cook until the bottom of the crepe is lightly browned in sponts and the edges pull away slightly from the pan sides, about 2 minutes. Using a spatula, carefully turn and cook for about 30 seconds on the second side. Turn the crepe out onto a plate.
     

Notes: The crepes are extremely thin so be extra careful when you're turning them to the second side. You may rip a few, but after a little practice, you'll be able to flip them without any trouble. I like to make all of the crepes before calling the family to the table. (That way we all get to enjoy them together). Put your oven on low and place a large plate on the middle rack. As you cook each crepe turn it out on the plate in the oven. Stack the crepes on the plate, keeping them covered with a damp paper towel so they don't dry out.

Repeat the whole process with the remaining batter, stacking the crepes as you go and brushing the hot pan with melted butter between crepes.


 Fill each crepe as desired and gently roll to contain fillings.


Favorite cominations in our house include butter sprinkled with granulated sugar, slivered almonds drizzled with honey, a squirt of lemon juice with a dusting of powdered sugar, sliced strawberries, Nutella, and whipped cream. You could even try crumbled bacon drizzled with maple syrup. Experiment with your favorites! Enjoy!


Basic recipe from Williams-Sonoma Paris cookbook

Monday, November 12, 2012

Brown Sugar Sauce

Today is my Dad's birthday and I've been traveling lately (so you've probably noticed I've been slacking a little on the Luscious Confections blog). I'd been thinking about what I could make to shrare for my Dad's birthday that he would enjoy and that also could be put together relatively easily since I didn't have much time in the kitchen. Ice cream! Of course! My Dad's favorite! I'm pretty sure he eats a little ice cream almost every day. And he makes the perfect scoops of ice cream for an ice cream cone. I don't, so I opted for a cute little dish.

Dad likes chocolate ice cream - the darker, the better. Today, for his birthday, I topped chocolate ice cream with a delicious brown sugar sauce and sprinkled on some toffee chips (like the middle of a Heath bar - which I know he likes). It's a simple, yet decadent dessert.

Brown Sugar Sauce
1/4 stick butter
3/4 cup brown sugar
2 teaspoons vanilla
2 teaspoons cinnamon

Combine all four ingredients in a small saucepan and melt over medium-low heat just until it starts to bubble. Drizzle over ice cream. Enjoy!

In the summer we often use this sauce on grilled pears or pineapple. Just grill half of a pear or a slice of cored pineapple over medium-high heat on the grill until you get nice grill marks. Top with vanilla ice cream, and drizzle with brown sugar sauce. Delicious!

I'd love to hear your ideas for other yummy desserts to drizzle with brown butter sauce.

Happy Birthday Dad!!!
Love this picture of my dad. He's having so much fun (me too obviously) - he loves dancing.

Wednesday, November 7, 2012

Soft Sugar Cookies with Vanilla Buttercream Frosting

So I was looking for a reason to use up some sour cream that was in our refrigerator. I didn't want it to go to waste and the expiration date was approaching. So, of course, I went searching for dessert that would use sour cream. I've never made a sour cream sugar cookie - I usually stick to my tried and true sugar cookie recipe. My go-to "Perfect Sugar Cookie" recipe is still my personal favorite. These sour cream sugar cookies are completely different, but still luscious and delicious. They are soft, light, and remind me a little bit of cake. Try them - you won't be disappointed. And look at how fun they are with all those sprinkles!


Sour Cream Sugar Cookiesfor the cookies...
5 1/2 cups flour plus more for work surface
1 teaspoon baking soda
1 teaspoon baking powder
2 sticks butter, at room temperature
2 cups sugar
3 eggs
1 teaspoon vanilla
1 1/2 cups sour cream


for the vanilla buttercream frosting...
1 stick butter, at room temperature
2 cups powdered sugar
1 teaspoon vanilla
1/2 tablespoon water or milk

In the bowl of an electric stand mixer (or you can use a hand mixer), cream together the butter and sugar until light and fluffy (about 4 minutes). Scrape down the sides of the bowl and add the eggs, one at a time, incorporating each one. Continue to scrape down the bowl as needed. Add the vanilla and sour cream and beat at low speed until incorporated.

Slowly add in the flour, baking soda, and baking powder. Mix at slow speed until just combined.

Divide the dough into two sections, flatten each into a disk, dust with flour, and wrap separately in plastic wrap. Refrigerate the dough for at least two hours or overnight.

Prepare a baking sheet with parchment paper. Dust a flat, smooth work surface and a rolling pin generously with flour. Preheat your oven to 425 degrees.

Working with one of the refrigerated disks, roll the dough to about 1/4 inch thickness. Use a round, square, or whatever shape you like to cut out cookies. NOTE: this dough puffs up - so detailed cut-outs will get distorted. I recommend round, square, or flower shapes. Place each cookie on the prepared baking sheet. Bake for about 7 minutes, until just golden on the bottom. Remove from the oven and cool completely on a wire rack. Repeat the process with the remaining dough.

Cream together the butter, powdered sugar, vanilla, and water or milk. Beat with an electric mixer until light and fluffy.

Use a knife or spatula to top each cooled cookie with a generous layer of frosting. Decorate with sprinkles as desired. Enjoy!