Pages

Tuesday, February 28, 2012

Pork Tacos with Simply Perfect Guacamole

I'm sure you have shredded pork left over from those delicious Cuban sandwiches you made, right?! Hooray! That means an even easier meal the next day... pork tacos. The Cuban pork is already delicious, but when you add guacamole and cilantro... Mmmmmm.

My husband was born and raised in southern California. So (of course) he loves anything with avocado. He also happens to be a rather amazing chef. Here's his simply perfect recipe for guacamole. It's my favorite!

Simply Perfect Guacamole
5 ripe avocados
1/2 of a small yellow onion, finely chopped
1 1/2 jalapenos, seeded and finely chopped
juice of 1 lime (it helps to keep the avocados from turning brown)
about 2 teaspoons of salt plus more to taste

Cut each avocado in half and remove the pit by tapping it lightly with a sharp knife until the knife sticks in the pit. Twist gently and pull out the pit and discard. Use a spoon to scoop out the green flesh from the skin and add it to a medium bowl. Add the onion, jalapeno, lime juice and salt. Stir gently to combine being careful to leave some large chunks of avocado. Taste and add additional salt if needed.

Warm some flour or corn tortillas. Top with shredded pork, a heaping tablespoon of guacamole, fresh cilantro, and chopped red onion. Enjoy!

Monday, February 27, 2012

The Cuban Sandwich

The Cuban might just be my very favorite sandwich... It has so many flavors and I love each of them. Bonus - because you make the pork in the crock-pot, it's super easy to throw together. It's great for guests too! Just arrange all of the meats, cheese, and toppings so everyone can build their own sandwich.


The Cuban Sandwich
4 pounds pork loin, cut into 4 pieces
3/4 cup fresh orange juice (or OJ from a carton is fine too)
3/4 cup chicken broth
3 limes
3 tablespoons olive oil
8 garlic cloves, chopped
1 tablespoons dried oregano
2 tablespoons chopped parsley
1 bay leaf
1 teaspoon ground cumin
1 whole yellow onion, thinly sliced
1/4 cup chopped cilantro
1/2 red onion, thinly sliced
salt & pepper
yellow mustard (you could also use Dijon or spicy mustard if you like)
Black forest ham
sliced hard salami
sliced Swiss cheese
dill pickles, chopped

Pat the pork loin dry and season with salt & pepper. Brown the pork in a large frying pan over medium-high heat. Cook all sides until evenly browned (work in batches if necessary). Add the pork and the juices from the pan to the crock-pot.
Pour the orange juice and chicken broth over the pork in the crock-pot. Slice the limes in half, squeeze out the juice of each over the pork. After juicing the limes, throw them in on top of the meat. Add the garlic, oregano, parsley, cumin, bay leaf, and yellow onion. Cover and cook on the high-heat setting for 2 1/2 hours or the low setting for 5 to 6 hours.

Remove the lime halves and bay leaf. Shred the pork and stir to distribute the juices.
To make the sandwiches, spread mustard on a fresh roll, add some pork.  Top with a slice of ham, a slice of salami, a slice of Swiss cheese, some chopped pickles, red onion, and cilantro leaves. 

Enjoy!


Sunday, February 26, 2012

Chocolate Fallen Souffle Cake

I've made this dessert over and over again for years. It's great for a special occasion, but easy enough to make on any ordinary day. If you have a chocolate craving, give this souffle cake a try. The bittersweet chocolate makes it extra rich and perfect with a dollop of fresh whipped cream.


Tyson was my official taste tester when I made this recently. He approved!


Chocolate Fallen Souffle Cake
12 ounces (about 2 cups) bittersweet chocolate, chopped (I used Ghirardelli bittersweet chocolate chips)
1 1/2 sticks (3/4 cup) butter
1 1/2 teaspoons vanilla
1/4 teaspoon salt
3/4 cup sugar
5 eggs, separated and at room temperature
1/4 cup all purpose flour

whipped cream (1 cup whipping cream or heavy cream with 2 tablespoons powdered sugar - whip with an electric mixer until thick)

hot fudge sauce (optional)... I used Hershey's hot fudge.

Preheat oven to 350 degrees. Butter a 9-inch springform pan, line the bottom with a round piece of parchment paper, then butter the paper.

Melt the chocolate and butter in a large bowl set over a pot of barely boiling water. Stir frequently until melted.

Let cool. Whisk in vanilla, salt, and 6 tablespoons sugar. Add the egg yolks one at a time, whisking well after each addition. Whisk in the flour.

Beat the egg whites with a pinch of salt using an electric mixer until soft peaks form. Slowly add in 6 tablespoons of sugar and continue beating until stiff peaks form.

Whisk about 1/4 of the egg whites into the chocolate mixture to lighten it. Fold in the remaining egg whites gently. Pour batter into springform pan, spreading evenly.

Bake 30 to 35 minutes. The center will still be soft.

Remove from oven and cool in the pan. When cool, remove sides of pan and invert onto a plate. Remove the bottom of the pan and the parchment paper and invert onto a serving plate.

The cake will "fall" in the middle. So don't worry... it makes the center very very moist and decadent (like the gooey center of a souffle).

Serve with whipped cream and drizzle with hot fudge. Enjoy!


recipe from epicurious.com

Friday, February 24, 2012

Kale Chips

One day my husband saw a small bag of kale chips at Whole Foods, was just about to add it to our basket, then noticed that it cost about $6.00 and decided not to make that ridiculous purchase. As we left the market, he called Katie to tell her about this rather interesting experience and she said, "Oh! I love kale chips! They're sooooo good!"

Here's a great kale chip recipe that won't cost you a small fortune. I know it might sound strange, but trust me... they really are "sooooo good!" And very healthy. I made these on a Saturday afternoon and they were all gone in a flash. Everyone in the house loved them.


Kale Chips
1 large bunch kale
2 tablespoons olive oil
1/2 teaspoon salt

Preheat oven to 400 degrees.

This is the fresh kale - washed, dried, and ready to remove those tough white stems


Rinse kale leaves under cold running water and dry with a clean dish towel. Trim off and discard the tough stems. Coarsely chop the leaves. Place them in a large bowl and drizzle the olive oil over the leaves. Toss the leaves to coat and rub each leaf with olive oil if needed to get them all coated. 


Spread the chopped leaves on a baking sheet in a single layer and sprinkle with the salt (the picture above on the left shows the fresh kale just starting out in the oven & the picture on the right shows the kale fresh out of the oven and ready to eat).

Bake for 8 to 10 minutes, until the leaves are crisp. Serve immediately. Enjoy!!


recipe slightly adapted from Deliciously G-Free, by Elisabeth Hasselbeck

Thursday, February 23, 2012

Gluten-Free Blueberry & Raspberry Cobbler

In my quest to make delicious gluten-free food, I bought Elisabeth Hasselbeck's newest cook book, Deliciously G-Free. So far her recipes have not disappointed. This berry cobbler was excellent. No one could tell that it was gluten-free. Extra bonus - Katie often prefers fruit desserts over chocolate so it was a success. Served with vanilla ice cream made fresh locally by Braums, it was very delicious.


Gluten-Free Blueberry & Raspberry Cobbler
2 pints blueberries (fresh or thawed if frozen)
2 pints raspberries (fresh or thawed if frozen)
3/4 cup sugar
1/2 cup brown rice flour
1/4 cup sweet sorghum flour
1/4 cup coconut flour
1 teaspoon baking powder
1 teaspoon xanthan gum
1/4 teaspoon salt
3 tablespoons cold butter, cut into small pieces
1/2 cup milk

for the crunchy topping...
1 cup sugar
2 teaspoons cornstarch
1/4 teaspoon cinnamon
1 cup boiling water

Preheat oven to 350 degrees.
Layer the blueberries and raspberries in a buttered baking dish or pie plate.

Place the sugar, flours, baking powder, xanthan gum, and salt in a large bowl and stir to combine. Add the butter pieces and use your fingers or a pastry blender to mix the butter in until the mixture resembles a course meal. Stir in the milk until just combined. Spoon dollops of the dough over the berries.

In a medium bowl, combine the sugar, cornstarch, and cinnamon. Sprinkle the cinnamon-sugar over the biscuit topping. Drizzle the boiling water over the top.


Bake uncovered for 25 to 30 minutes until the crust is lightly browned and the edges are bubbly. 

Serve warm with vanilla ice cream. Enjoy!


recipe from Deliciously G-Free by Elisabeth Hasselbeck

Wednesday, February 22, 2012

Creole Shrimp & Grits

Here's a meal that comes together in no time and is full of flavor. It's perfect for a busy weeknight. We enjoyed this recipe for Mardi Gras last night in our house. You can adjust the spice level by changing the amount of Creole seasoning and cayenne pepper.


Creole Shrimp & Grits
1 cup quick-cooking grits
salt & pepper
1 1/2 cups sharp cheddar cheese, shredded
1/4 cup chives, minced
1/4 cup canola oil
2 large garlic cloves, minced
1 pound medium shrimp, shells & tails removed
1 tablespoon Creole seasoning
1/2 teaspoon cayenne pepper
2 teaspoons paprika
1/2 cup dry white wine

Prepare the grits...
Bring 4 cups of water to a boil in a medium pot. When the water is boiling, slowly add the grits and stir. Cover and boil on low heat, cover and cook for about 7 minutes. Stir the grits occasionally. Add the cheese, chives, and salt & pepper to taste and stir to mix and melt the cheese. Cover and keep warm until ready to serve.

Cook the shrimp...
Heat the olive oil in a large skillet over medium heat. Add the garlic, shrimp, and spices. Cook until the shrimp start to turn opaque (about 2 minutes). Add the wine and simmer for about 5 more minutes until sauce is reduced slightly and shrimp is thoroughly cooked.

Place a generous serving spoon full of grits in a bowl. Top with Creole shrimp and wine sauce.
Enjoy!


recipe adapted from Food & Wine Magazine, September 2010

Tuesday, February 21, 2012

King Cake for Mardi Gras

Our family is not French-Creole or from the south, but several years ago I started this tradition in our home to celebrate Mardi Gras anyway. Honestly, I just love any reason to celebrate and do something fun. Our celebration typically involves some type of Creole/Louisiana food (this year we had Creole shrimp and grits which I'll share in tomorrow's post), and it always includes king cake. 


King cake is actually more like a bread. I am seriously afraid of making bread. It always defeats me! My mom always makes the best bread - clover rolls, zucchini bread, banana bread, cinnamon bread. Mine never turns out that good... usually too doughy and never rises quite right so it doesn't get that light, fluffiness. Luckily, my king cake often turns out edible at least. So if you've got some bread baking skills, you'll probably make a mean king cake!
The extra fun in the king cake is the hidden baby. Traditionally a small plastic baby or bean is hidden inside the dough before the cake is baked. Whoever gets the baby in their piece of cake is "king" for the day or has to throw the next party or make the next cake. In our house it's just about being "the one" that gets the baby. Emily seems to get the piece of cake with the baby almost every year - lucky - maybe she should play the lottery.

King Cake
1/2 cup (1 stick) butter
1/2 cup evaporated milk
3/4 cup plus 1 teaspoon sugar
1 teaspoon salt
2 envelopes active dry yeast (I use rapid rise)
3 eggs
zest of 1 lemon
6 cups all-purpose flour
4 tablespoons butter, melted
1 egg white

for the cinnamon-sugar filling... mix together 3/4 cup sugar plus 2 to 3 tablespoons ground cinnamon (depending on how much cinnamon you like)

for the white icing... 2 cups powdered sugar mixed with 2 tablespoons water
yellow, green, and purple sugar (I used Wilton brand which is available at most craft stores)

Melt the butter in the microwave in a large mixing bowl. Add the evaporated milk, 3/4 cup of the sugar, and the salt. Whisk together until the sugar dissolves.

In a small bowl, dissolve the yeast in 1/4 cup warm water and stir in the teaspoon of sugar. Allow the mixture to sit for about 10 minutes, until foamy. Here's what "foamy" should look like.
  
Add the yeast mixture to the large mixing bowl that already has the butter, milk, sugar, and salt mixture. Add the eggs and lemon zest and whisk together until well blended.

Whisk in the flour 1 cup at a time, blending well between each addition. For the first three cups you can use the whisk, but then for the 4th and 5th cups you'll probably need to switch to a wooden spoon because it gets too thick for the whisk. By the 6th cup, you'll need to just use your clean, lightly floured hands to mix and knead until the dough is smooth and elastic.

Form the dough into a ball and place it in a large bowl that you've sprayed with cooking spray. Roll the dough around to get it coated in the spray. Cover the bowl with a clean kitchen towel and sit in a warm place until the dough is doubled (takes about an hour).

When the dough has doubled, remove it from the bowl, punch it down, and divide it into two equal halves. Roll each portion of dough into a large rectangle. Brush each rectangle with the melted butter and sprinkle with the cinnamon-sugar filling.
 
Roll each rectangle along the long side like a jelly roll. Seal the edges and ends (use a little water if you can't get it to stick). Twist the two long rolls together and bring the ends together to form a twisted circle. 
Place the dough on a greased cookie sheet and cover with a clean kitchen towel. Place in a warm place until doubled in size (takes about and hour to 90 minutes).

Preheat the oven to 350 degrees. Mix the egg white with a little water and brush it onto the top of the cake. Bake the cake for about 30 minutes or until browned.
       
Allow the cake to cool. Place on a large plate if desired. Drizzle the white icing over the cake, allowing it to run down the sides. Sprinkle the green, yellow, and purple sugar onto the cake. Slice and serve. Watch out for the baby! 

Enjoy!


Recipe from Paula Deen Celebrates

Monday, February 20, 2012

Gluten-Free Popovers

I made these simple popovers a while ago, but never shared the recipe. They are quite easy and quick to make. You could even whip them up for a weeknight dinner. You'll love their light, airy texture... eat two!


Gluten-Free Popovers
3 tablespoons melted butter
1 1/2 cups gluten-free all purpose flour
1 1/2 cups milk
4 eggs
1/2 teaspoon salt

Brush a 12-cup muffin tin with butter (or spray with non-stick cooking spray).

Whisk together the ingredients. The batter will be slightly lumpy. Be careful not to overmix or you'll get a tough texture.

Divide the batter among the muffin cups. I use an ice cream scoop to make sure each one gets the same amount. 

Bake in a 400 degree oven for about 30 to 35 minutes. DO NOT OPEN THE OVEN DOOR! Popovers puff up so beautifully and that gives them their light-as-air goodness, but if you open the oven too soon, they'll deflate.

Serve warm with butter. Enjoy!!

adapted from Real Simple, December 2011

Sunday, February 19, 2012

Gluten-Free Donut Holes

I made these donut holes gluten-free for Katie, but everyone loved them! Usually when I make something that's gluten-free, Katie enjoys it (and I do too). Everyone else in our family typically thinks whatever we're eating would be better with regular wheat flour. I was thrilled when I made these one morning and no one complained that they were gluten-free! They were gobbled up so fast. Hooray!! I love it when I can make something that everyone enjoys.

Gluten-Free Donut Holes
2 1/2 cups white rice flour
3/4 cup sugar
1/2 cup potato flour
1/3 cup tapioca flour
1 teaspoon baking soda
1 teaspoon baking powder
1 teaspoon salt
1 teaspoon xanthan gum
1/4 teaspoon nutmeg
1 cup buttermilk
2 large eggs
2 tablespoons melted butter
1/2 teaspoon lemon extract
vegetable oil (for frying)... i used canola

Toppings

Powdered Sugar --- roll donut holes in 1/2 cup powdered sugar to coat

Cinnamon Sugar --- mix 1/2 cup powdered sugar, 1/2 cup granulated sugar, and 2 tablespoons cinnamon in a bowl. Roll donut holes in the mixture to coat

Honey Glaze --- mix 1 cup powdered sugar, 1 tablespoon milk, 2 teaspoons honey. Coat donut holes with glaze using a spoon. Allow excess to drip off. Add sprinkles for fun!


I used my Kitchen-Aid stand mixer to do all of the mixing...

Using a stand mixer, combine the flours, baking soda, baking powder, salt, xanthan gum, and nutmeg. In a small bowl, whisk together the buttermilk, eggs, melted butter, vanilla, and lemon extracts. Add the milk mixture to the flours and mix with your stand mixer until smooth. Cover the dough with plastic wrap and let is sit for 15 minutes.


Heat oil to 375 degrees F. Form donut holes by rolling about 1 tablespoon of dough into a ball. I suggest rolling all of the dough into balls before you start frying (it just makes the process go more smoothly).

Once you have all of the dough formed into balls and the oil is heated, place 5 or 6 balls of dough into the oil. Cook until golden brown (it only takes 2 to 3 minutes). Remove from the oil using a slotted spoon. Place on a paper towel-lined plate. Repeat with remaining dough.
donut holes - still hot - waiting for their toppings
If you have some help in the kitchen, it's a best to add the powdered sugar and cinnamon sugar while the donut holes are still warm. For the glazed, it's good to let them cool a bit more before glazing. 
I had two helpers in the kitchen the morning that I made these donut holes.
Emily coated the powdered sugar and cinnamon sugar donuts.
Mark made sure the each donut had plenty of glaze (I added the sprinkles).


I hope you find this recipe to be a crowd-pleaser just like I did. Enjoy!


original recipe found on www.seriouseats.com

Friday, February 17, 2012

Chicken Laksa

Chicken Laksa is one of our favorite recipes. The great thing about it is that it can be a warm meal in the winter with plenty of coconut broth or very fresh in the summer with less broth and more fresh, crisp vegetables. The flavor is oooooh soooooo good. The broth is definitely what "makes" the dish, so be sure to taste it before you serve it and make sure it's to your liking. Adjust by adding extra coconut milk, soy sauce, or lime zest/juice.


Chicken Laksa
1 garlic clove
1 small onion
1/2 bunch fresh cilantro
2 Serrano chiles
1 teaspoon peanut oil*
1/2 teaspoon shrimp paste or anchovy paste
2 chicken breasts
1 package rice noodles
1 tablespoon sesame oil
1 tablespoon soy sauce (or you can use the "soy" sauce substitute from this blog... get it here)
3/4 cup coconut milk
1 1/4 cups chicken stock
2 limes
1 cup bean sprouts
1 red bell pepper, cut in small strips
2 green onions, sliced length-wise into small strips
1/4 red onion, sliced into small strips

*You can substitute sesame oil for the peanut oil in the cilantro paste.

Make the cilantro paste...
Peel and coarsely chop the garlic and small onion. Place them in a food processor. Pull a handful of cilantro leaves from the bunch and reserve them for later. Add the remainder of the cilantro leaves to the food processor. Halve the chiles, remove seeds, and add chiles to the food processor. Add the peanut oil and shrimp paste. Process to a fine paste. You can add a little extra oil if necessary to form the paste.

Prepare the chicken...
Rinse and dry the chicken breasts. Cut into smaller strips if desired. Add the chicken to a ziplock bag along with half of the cilantro paste. Seal the bag and knead to distribute the paste onto all of the chicken. Refrigerate for 3 to 4 hours.

Prepare the rice noodles...
Place one package of rice noodles in a large bowl. Pour boiling water over the noodles until they are completely covered. When the noodles begin to soften, cut them into shorter lengths with kitchen scissors. This makes them easier to handle when eating.

simple ingredients for this flavorful broth
Cook chicken & broth...
Heat the sesame oil in a large skillet. Add the chicken and brown on all sides. Add the remaining cilantro paste, soy sauce, coconut milk, and stock. Add the zest and juice of one lime to the skillet. Cook gently for about 10 minutes. Taste broth and adjust flavor to your liking (add soy sauce if it needs to be a bit more salty, add lime juice or zest if it needs more lime flavor, add coconut milk if it is too spicy). You can also increase the stock amount and coconut milk amount to have additional broth for a more "soup-like" dish in the winter.

To serve...
Add some noodles to a bowl. Spoon in some of the chicken and broth (as much as you like). Top with you favorite vegetables such as bean sprouts, snap peas, bell pepper, red and green onion, extra Serrano peppers for spice. Garnish with cilantro. Enjoy!!

Monday, February 13, 2012

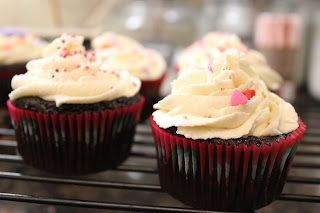
Gluten Free Vegan Chocolate Cupcakes

Katie made these gluten free vegan cupcakes today. Well, the frosting isn't totally vegan (it does have butter). But the cupcakes qualify. It seems to be impossible to make them vegan, gluten free, and soy free (all of the vegan butter I found uses soy). I have to say they were pretty yummy! Another successful dessert this weekend!


Gluten Free Vegan Chocolate Cupcakes
1 cup almond milk
1 teaspoon vinegar
3/4 cup sugar
1/3 cup canola oil
1 teaspoon vanilla extract
1/2 teaspoon almond extract
1/3 cup white rice flour
1/3 cup plus 2 tablespoons oat flour
1/3 cup almond flour
1 teaspoon xanthan gum
1/3 cup cocoa powder
3/4 teaspoon baking soda
1/2 teaspoon baking powder
1/4 teaspoon salt

Preheat the over to 350 degrees and line muffin pan with paper liners.

Whisk the milk and vinegar in a large bowl and allow to sit for a few minutes to curdle. Add the sugar, oil, and extracts and mix. Add the flours, xanthan gum, cocoa, baking soda, baking powder, and salt and mix until mostly smooth.

Pour into cupcake liners. (This batch made 7 regular-sized cupcakes and 12 mini cupcakes). Bake for 20 minutes or until a toothpick inserted into the center comes out clean. Cool completely.

Buttercream Frosting (not vegan)
1 stick butter
2 cups powdered sugar
1 teaspoon vanilla
2 tablespoons water
pinch salt
(1/4 cup oat flour or coconut flour - only if needed to reduce sweetness to your liking)

Combine ingredients in a large bowl. Use an electric mixer to beat until smooth and fluffy (about 5 minutes).

Frost cupcakes using a knife, spatula, or pastry bag.

Enjoy!

Sunday, February 12, 2012

Gluten Free Mac & Cheese

This was my attempt to make mac & cheese like "Stouffer's."  I honestly never even had that brand of mac & cheese until I met my husband. It's definitely his favorite kind and Katie really likes it too. So I made it gluten free. It was a hit!


Gluten Free Mac & Cheese
1 pound gluten free pasta (I used brown rice pasta)
1 stick butter
1 cup milk
2 cups cheddar cheese, shredded
1 cup gouda cheese, shredded
2 tablespoons cornstarch dissolved in about 2 tablespoons water
salt & pepper to taste

Boil pasta in a large pot until al dente. (I boiled mine for about 12 minutes.) Drain pasta.

In the large pot, melt the butter. Then add the milk, cheeses, and some salt & pepper. When the cheese is melted, stir in the cornstarch mixture. The sauce will begin to thicken. Add the pasta back to the pot and stir gently to get the pasta coated with the cheese.

Pour the mac & cheese into a greased casserole dish. Sprinkle with a little extra cheddar cheese. Bake at 350 degrees for 5 to 10 minutes (just long enough to get the cheese melted).

Enjoy!!

Saturday, February 11, 2012

Gluten Free Red Velvet Cheesecake Swirl Brownies

Emily found this recipe (in a full-of-gluten form) on a blog that she likes called thenovicechefblog.com  I've adapted it so that it is gluten free. It's almost Valentine's Day so this is perfect to share with Katie, Emily, Hannah, and Melissa this weekend. I am happy to report that they all thought these brownies were delicious - even though they are gluten free! Even Andrew thought they were good. Success!!


Gluten Free Red Velvet Swirl Brownies
For the red velvet part...
1 1/2 cups brown rice flour*
1 cup oat flour*
1/2 cup potato flour*
1/4 cup sweet sorghum flour*
1 teaspoon Xanthan gum*
2 1/4 cups sugar
3 tablespoons cocoa powder
1 teaspoon salt
1/2 teaspoon baking powder
3 eggs
1 cup vegetable oil
1 tablespoon vanilla
1 tablespoon red food coloring
2 teaspoons vinegar
3 tablespoons milk (I used almond milk)

* If you don't need to make these brownies gluten free, you can just substitute 3 1/4 cups of all-purpose flour for the flours above and eliminate the xanthan gum.

Mix all of the ingredients except for the milk together in a large bowl. It will be thick (more like a cookie dough than a cake batter). Remove about 3/4 cup of the dough and place in a small bowl. Add the 3 tablespoons milk to it and stir to thin the mixture. Set aside.

Grease a jelly roll pan (13 by 8 inches). Press the dough into the pan and use clean fingers or a spoon to smooth.


For the cheesecake part...
2 (8 ounce) packages cream cheese, softened
3/4 cup sugar
2 eggs
2 teaspoons vanilla

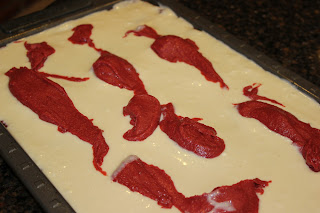
Mix the ingredients above until smooth. Pour on top of the red velvet. Drop spoonfuls of the reserved, thinned red velvet mixture onto the cheesecake layer. Use a knife to swirl.


Bake at 350 degrees for 30 minutes.

Allow to cool and use cookie cutters to create shapes or simply cut into squares. Enjoy!!


recipe adapted from thenovicechefblog.com