Pages

Thursday, January 31, 2013

Baked Herb Lemon Shrimp

We sent Pioneer Woman cookbooks to our family at Christmas this year. I thought it was kind of clever... the Pioneer Woman lives in Oklahoma, she blogs, she went to USC - we have a lot in common. I figured since I bought copies for our family on the east coast and the west coast, I should get copies for myself. I am so glad I did! I've tried a few recipes so far. Here's one that we will make again. We definitely liked this shrimp recipe. It's super fast to make. Pair it will a salad and some crusty bread for a fast and delicious weeknight meal.

Baked Herb Lemon Shrimp
1 pound raw shrimp, peeled with tails on
3/4 stick butter, softened
2 garlic cloves
1/2 cup parsley leaves
juice of 1 lemon
1 teaspoon crushed red pepper flakes
salt to taste

Preheat your oven to 375 degrees. Combine the butter, garlic, parsley, lemon juice, red pepper flakes, and salt in a food processor and pulse to combine. Arrange the shrimp in a single layer on a baking sheet. Dot the butter mixture on top of the shrimp. Bake the shrimp in the oven for about 20 minutes, or until cooked through.

Remove from oven and transfer shrimp to a large bowl. Pour any extra sauce over the shrimp. Garnish with chopped parsley and a few lemon slices. Serve with crusty bread for dipping in the extra butter sauce.

Enjoy!

recipe slightly adapted from The Pioneer Woman Cooks - Food From My Frontier

Wednesday, January 30, 2013

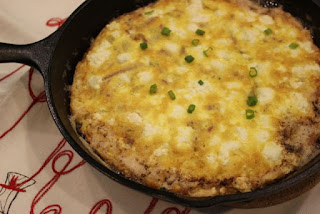
Potato, Salami, & Goat Cheese Frittata

I made this recently and was worried that some might thing the combination of potato, salami, and goat cheese is a little weird. I thought it was absolutely delicious, but my husband suggested that maybe I hold out on adding it to the blog. Well... Andrew and a friend tried a piece of the frittata the next day and they loved it! So here it is... confirmed as "delicious" by two 20-ish year old guys. I declare it a success! It's fast, easy, and yummy!

Potato, Salami, & Goat Cheese Frittata
2 tablespoons olive oil
1 1/2 cups baked potato (you can use the scooped out potato from potato skins)*
6 eggs
1/4 cup grated parmesan cheese
3 ounces salami, cut into strips
2 tablespoons butter
1/2 cup goat cheese, crumbled
salt & pepper to taste

*you could also use raw potato cut into 1/2 inch cubes


Heat a cast iron skillet over medium-high heat. Add the olive oil and potato to the cast iron skillet, sauté the potato until browned. Add salt & pepper to taste. When potatoes are browned, remove them from the skillet and set aside to cool slightly.

In a medium bowl, beat eggs. Stir in the parmesan, salt, and pepper. Add the salami strips and browned potatoes and stir to combine. 

Heat the butter in the same cast iron skillet over medium-high heat. Pour the egg mixture into the skillet and reduce the heat to low. Cook until the egg is almost set (about 7 to 10 minutes). Heat the oven to BROIL and place the skillet under the broiler for about 2 minutes or until just golden. 

Slice into pieces. Serve and Enjoy!

recipe slightly adapted from Foodandwine.com

Tuesday, January 29, 2013

Cream Cheese Fruit Dip

This is one of our family's favorites... cream cheese and whipped cream combined to make a delicious fruit dip. Katie often asks for this as her special birthday dessert - that's how good it is. It's easy to make, so you could make some now and enjoy it with some apples, berries, bananas, or any of your favorite fruits.


Cream Cheese Fruit Dip
1 (8 oz) package cream cheese, at room temperature
1/2 cup powdered sugar
1 cup whipping cream

In a large bowl, using either a stand mixer or hand-held electric mixer, whip the whipping cream until stiff peaks form. Set aside.

In another large bowl, whip together the cream cheese and powdered sugar until smooth and creamy.

Combine the whipped cream and cream cheese-sugar mixture using a spatula.

Serve with fresh fruits - strawberries, blackberries, apples, etc. Enjoy!!


Monday, January 28, 2013

A Personal Lemon Meringue Pie

Just a couple of days ago I shared a personal chocolate chip cookie that you could make in no time flat and eat all on your own... How about a lemon meringue pie that you could have all to yourself and not feel guilty? The perfect little bit of lemon meringue pie. Sign me up! I saw this idea on thenovicechefblog.com and knew I had to give it a try. I actually already had this yummy lemon curd in the refrigerator. All I need was to pick up some pastry shells and voila!... lemon meringue pie in just a few minutes. You could make a bunch of these as an easy, yet sophisticated dessert for your next party.


A Personal Lemon Meringue Pie
1 box pre-made mini philo cups
1 cup lemon curd (store bought is fine)
1 egg
1 1/2 tablespoons sugar

Preheat your oven to 350 degrees.

Place pastry cups on a baking sheet. Fill each cup with about 2 teaspoons lemon curd.


In a small bowl, whip the egg white using an electric mixer until foamy. Slowly add the sugar and whip on high speed until stiff peaks form.

Place meringue in a pastry bag fitted with a large star tip (or you can use a ziplock bag with a corner cut off). Pipe some meringue on top of each curd-filled pastry cup. Bake for about 7 minutes (or until the meringue is lightly browned. Cool and chill in the refrigerator until ready to serve.

Enjoy!

Recipe slightly adapted from thenovicechefblog.com

Sunday, January 27, 2013

Truffled Sweet Potato Fries

I don't know about you, but I love sweet potato fries. I might even love them a little more than regular ole fries (and they are healthier - especially if you bake them)... But I never seemed to be able to make them at home. They always seemed to be too soft and I never could get that crispy coating. One day I stumbled on this recipe and decided to give it a try. It worked!!! It worked very well. A big thanks to theartofdoingstuff.com for the guidance. I hope you'll enjoy these truffled sweet potato fries as much as I do. They are luscious.


Truffled Sweet Potato Fries
2 large sweet potatoes
2 to 3 tablespoons corn starch
2 tablespoons olive oil
truffled sea salt (or regular sea salt if you can't get truffled)

Peel sweet potatoes and cut into fries about 1/4 inch thick. Place the cut potatoes in a bowl and cover with water. Allow the potatoes to sit for 1 to 2 hours.

Preheat your oven to 425 degrees.

Add corn starch to a large plastic bag (I used a gallon ziplock bag). Hold the top of the bag closed and shake to distribute the corn starch. Toss in some of the sweet potatoes and shake to coat. Place coated fries on a baking sheet. Repeat this process, adding more cornstarch to the bag as needed, until you've coated all of the fries.

Drizzle the fries with olive oil and toss with your fingers so they are evenly coated. Arrange fries on the baking sheet so that they are not too crowded and in a single layer.

Bake the fries for 15 minutes. Flip the fries using a spatula and cook for another 10 minutes or until lightly browned and crispy. Remove fries from oven and immediately sprinkle with truffled sea salt. 

Serve right away. These are delicious and luscious without anything to dip them in. But I also like to serve sweet potato fries with a little sweet chili sauce (available in the Asian section of most markets).

Enjoy!

recipe slightly adapted from www.theartofdoingstuff.com

Friday, January 25, 2013

A Personal Chocolate Chip Cookie

Do you ever want a chocolate chip cookie? Just one? All to yourself?... You can! It's so easy, you can whip up a cookie in less than 5 minutes. All for you. Just for you. Go ahead... make on now.


A Personal Chocolate Chip Cookie
1 tablespoon butter, melted
1 tablespoon granulated sugar
1 tablespoon brown sugar
3 drops vanilla
pinch salt
1 egg yolk
1/4 cup flour
2 tablespoons chocolate chips

In a small bowl, mix the butter, sugars, vanilla, salt, and egg yolk. Add the vanilla and mix until just combine. Stir in the chocolate chips. Place the cookie dough in a ramekin. You could also simply put the dough on a microwave safe plate. Microwave the cookie dough for about 40 seconds.


Now you can eat the cookie right out of the ramekin or place it on a plate. Enjoy!!!

Korean Pork Tacos with Ginger Slaw

I've had some delicious Korean tacos from food trucks in Southern California. I don't know why I was craving them, but I was... the fusion of the different flavors make such a delicious meal. So I searched the internet for some recipes. I didn't find one that sounded exactly right to me, but I used what I found as inspiration to create my own recipe. It was a HUGE success. Seriously - you need to make these ASAP. The flavor is bursting out of these babies! Bonus... they are gluten-free if you eat them with corn tortillas.


Korean Pork Tacos
about 4 pounds pork loin or pork roast
1/2 cup brown sugar
1/2 cup soy sauce
6 garlic cloves, minced
4 tablespoons fresh ginger, minced
3 tablespoons sambal oelek (chili paste)
4 tablespoons sesame oil
2 teaspoons cornstarch
4 tablespoons rice vinegar

for garnish (optional but recommended): lime wedges, jalapeños, sesame seeds, red onion 

Whisk all ingredients (except pork) in a medium bowl to form a marinade. Trim excess fat from pork loin and cut into 3 or 4 sections. Place pork in a large ziplock bag or shallow bowl along with the marinade and seal (or cover with plastic wrap if using the shallow bowl method). Allow the pork to marinate in the refrigerator overnight.

Remove the pork in the marinade from the refrigerator and place in a crockpot (pork and marinade). Cook on low for 6 to 8 hours. 

While the pork is cooking slowly, make some ginger slaw for the tacos...

Ginger Slaw
1/4 head green cabbage, julienned
2/3 cup carrots, julienned
1 tablespoon pickled ginger, minced
1 teaspoon fresh ginger, minced
3 tablespoons rice vinegar
1 tablespoon sesame oil
dash red pepper


Whisk together sesame oil, rice vinegar, gingers and red pepper in a medium bowl. Toss cabbage and carrots with the dressing. Cover and refrigerate until ready to use.

Shred the pork using two forks. Stir pork into the sauce in the crockpot. 


Serve the Korean pork with warmed flour or corn (for gluten-free) tortillas. Top with ginger slaw, red onion, jalapeños, sesame seeds, and a squeeze of lime. Serve with Asian cucumber slaw along side the tacos or you can add the cucumbers on top of the taco too.

Enjoy!

Thursday, January 24, 2013

Asian Cucumber Slaw

I absolutely love the flavor of this cucumber slaw. It might be my favorite way to eat cucumbers. It's so simple to throw together and healthy too! Serve it as a simple side dish with your favorite meal or with Korean Pork Tacos.


Cucumber Slaw
1 cucumber, sliced thin
1/4 teaspoon salt
4 tablespoons rice vinegar
dash crushed red pepper
dash sesame oil
1 teaspoon sesame seeds

I slice my cucumber on the thinnest setting on my mandolin slicer. You can slice them with a knife as thin as possible. Be careful!

Whisk salt, vinegar, red pepper and sesame oil in a small bowl. Add sliced cucumber and toss to coat. Sprinkle with sesame seeds.

Enjoy!

Tuesday, January 22, 2013

Cookie Dough Topped Brownies

Every time I think about or make brownies, I think of my sisters. We would make brownie batter (and sometimes leave out the egg) and just eat it - raw - with a spoon - without cooking it - put it in a little bowl - and we told my brother-in-law it was pudding... seriously. I think brownie batter might be the best thing. Although, it's really difficult to choose between brownie batter and chocolate chip cookie dough. Cookie dough might be the main reason why I like to make chocolate chip cookies - just to eat some of the dough. Now you don't have to choose.... brownies with cookie dough on top!!! Perfection!


Cookie Dough Topped Brownies
for the brownies...
1 1/2 cups butter, melted and cooled
4 eggs
3 cups sugar
1 1/2 cups cocoa powder
1 1/2 cups flour
1 teaspoon salt
2 teaspoons vanilla

Note: I usually like to just grab a box of brownie mix rather than making brownies from scratch... I always seem to have brownie mix in the house (just in case I need to make some to eat without cooking it). If you want to make brownies from scratch, here's a simple recipe (or you can just follow the directions on the box like I did).

Combine sugar, cocoa powder, flour, and salt in a large bowl. Mix in butter, eggs, and vanilla and stir until just blended.

Line a 9 by 13 inch baking pan with foil, allowing some overhang. Spray the foil with non-stick cooking spray and pour the brownie batter into the prepared pan. Bake at 350 degrees for 40 to 45 minutes. 

Note: You could halve the recipe and pour into an 8 by 8 inch pan.

Allow the brownies to cool.

for the cookie dough...
3/4 cup butter, softened
3/4 cup brown sugar
1/4 cup granulated sugar
3 tablespoons milk
1 1/2 teaspoons vanilla
1/2 cup flour
1 cup mini chocolate chips

In a large bowl, using an electric mixer, cream together the butter and sugars. Add the milk and vanilla into the sugar-butter mixture and blend. Mix in the flour until just combined. Stir chocolate chips into the dough using a spatula.

Spread the cookie dough onto cooled brownies. You can use clean, damp hands to smooth the  dough evenly onto the brownies. (I found that damp hands work much better than a spatula because the dough doesn't stick to your hands the way it sticks to a spatula.)

Refrigerate the cookie dough topped brownies until the cookie dough is set (about 1 hour). Remove the brownies from the refrigerator. Gently lift the cookie dough topped brownies from the pan using the foil overhang. Place on a cutting board and use a sharp knife to cut into squares.  Note: You may need to wipe the knife with a damp cloth to clean it after a few cuts in order to keep your cuts smooth. If you cut the brownies when the are straight out of the refrigerator, they'll cut more smoothly.

Enjoy!

Monday, January 21, 2013

Potato Skins


Only two weeks until the Super Bowl... potato skins are a classic football food in my book. These are really not that difficult to make. They're not the healthiest snack you could choose, but you can take a mini vacation from your diet for Super Bowl Sunday and enjoy some of these with a nice cold beer and a great football game on TV. You can bake the potatoes a day head if you want and then simply assemble them on the day you want to enjoy them.

Potato Skins
5 to 6 medium potatoes (Idaho/russet/baking/etc)
1 to 2 cups shredded cheese (I use a mix of jack & cheddar)
6 slices of bacon, cooked and crumbled
1/4 cup chopped green onion (green part only)
non-stick cooking spray or olive oil
salt & pepper to taste

Bake the potatoes until tender. Allow the potatoes to cool, then slice each potato in half length-wise. Using a small spoon, scoop the potato out of the skin, leaving about 1/4 inch of potato attached to the skin all around. 


Preheat your oven to 350 degrees.

Spray a baking sheet with non-stick cooking spray or coat with olive oil. Arrange the hollowed out potato skins on the baking sheet. Fill each potato with the shredded cheese. Season with salt & pepper to taste. Place the potato skins in the oven and bake for about 10 minutes or until the cheese is melted. Remove the skins from the oven and sprinkle bacon generously over the cheese. Pop them back in the oven for about 5 minutes or until cheese is completely melted and bubbly. HINT: I don't put the bacon on until the last 5 minutes of baking because that way it stays crispy, rather than sinking into the melted cheese.


Remove skins from the oven and sprinkle with the chopped green onion. Transfer to a plate and serve with sour cream.


Enjoy!

Saturday, January 19, 2013

Ham and Cheese Pretzel Bites

I found a few versions of this recipe on various food blogs. I'm always very hesitant to make anything that includes yeast. I don't know why I am so afraid of yeast, but I never seem to have much luck with getting the bread to rise up light and fluffy like it should. I usually end up with dense, doughy, gross mess. Maybe because pretzels aren't generally, light and fluffy or because I just got lucky with the yeast this time... but these little pretzel bites were a huge success even though the recipe calls for yeast. I made a double batch and they were gone so fast! Everyone really loved them. They take a few steps, but they are not that difficult to create.These would be perfect for your upcoming Super Bowl party!


Ham and Cheese Pretzel Bites
1 package (about 1 1/2 teaspoons) active dry yeast
2 tablespoons plus 1 teaspoon packed brown sugar, divided
1/4 cup warm water
1 cup warm milk
2 1/2 to 3 cups flour
1/2 cup finely chopped ham
1/2 cup finely chopped cheese (I used sharp cheddar)
about 6 cups water (for boiling)
4 teaspoons baking soda
4 tablespoons butter, melted
1 to 2 tablespoons course sea salt

In a large bowl, stir together the yeast, 1 teaspoon brown sugar, and warm water. Let that sit until foamy (about 8 minutes). 

In another bowl (or a small saucepan used to warm your milk), stir together the milk and 2 tablespoons brown sugar until the sugar is dissolved.

Add 2 1/2 cups of the flour to and milk mixture to the large bowl containing the yeast mixture. Stir with a wooden spoon until a soft dough forms. Add more flour as needed. Turn dough out onto a lightly floured surface and gently kneed to form a smooth ball.

Spray a large bowl with non-stick cooking spray or coat with olive oil. Place the dough into the large bowl and cover the bowl tightly with plastic wrap. Place in a warm place and allow to rise for about 2 hours or until the dough has doubled in size and bubbles appear on the surface.


Cover a large baking sheet with parchment paper and set aside.

Turn the dough out onto a lightly floured surface. Dust your hands and/or a rolling pin with flour. Divide the dough into 4 equal parts. Roll each piece of dough into a rope about 12 inches long. Using a rolling pin or your hands, flatten the rope and stretch the dough to form a 12 inch by 4 inch rectangle. Repeat with remaining sections of dough. 


Gently press ham and cheese into the flattened dough, dividing the ham and cheese evenly among the 4 dough pieces. Roll each section of roll on thetransfer the pieces to the prepared baking sheet. long side as tightly as possible to "reform" into a rope. Cut each dough piece into 12 1-inch pieces and 

Allow to rest, uncovered, at room temperature for 30 minutes. 

Preheat your oven to 400 degrees and bring 6 cups of water to a boil in a large pot. Add the baking soda to the water and reduce heat to a gentle simmer.

Cook the pretzels in batches for about 30 seconds each in the water. They will be slightly puffed and float to the surface of the water. Use a slotted spoon to remove the pretzel bites from the water and place back on the baking sheet.

Bake the pretzel bites until puffed and golden brown, about 15 to 20 minutes.

Brush the warm pretzel bites with melted butter and sprinkle with sea salt. Serve with yellow mustard or honey mustard for dipping.

Enjoy!

Friday, January 18, 2013

Cream Wafers

This is one of my mom's recipes. When I was a kid, she only brought these out for extra special occasions, like my sister's wedding. So I never wanted to try making them because I figured they must be soooooo difficult to make. In my mind, I lumped them into the same category as French macarons (which I will try soon thanks to the awesome little cookbook I got for Christmas). What I learned recently is that these fancy little Cream Wafers feel really special and look pretty and sparkly, but they are actually quite easy to make. The cookie is light and delicate with a shimmery layer of sugar. The filling is smooth, sweet, and decadent. Make these for your next special dessert - everyone will love them.


Cream Wafers
for the cookies...
1 cup (2 sticks) butter, softened
1/3 cup heavy whipping cream
2 cups flour
1/2 cup granulated sugar

for the cream filling...
1/4 cup (1/2 stick) butter, softened
3/4 cup powdered sugar
1 teaspoon vanilla (or almond or lemon) extract

In a large bowl, thoroughly mix together the butter, cream, and flour using an electric mixer. Divide the dough into two equal parts. Wrap each section of dough with plastic wrap and refrigerate for 1 to 2 hours.

After the dough has chilled, heat your oven to 375 degrees. On a well-floured surface, roll one section of the dough to about 1/8 inch thickness. Use a small round cookie cutter to cut  1 1/2 inch rounds. HINT: I actually used a shot glass to cut mine. It's the perfect little size. You could also use a small heart, square, or any small cookie cutter shape you like. Be sure to cut an even number of shapes because you'll be matching them up to create little sandwiches.


Transfer the dough rounds carefully to a flat bowl filled with the 1/2 cup granulated sugar. Coat both sides of each round with the sugar. Place the dough rounds onto an ungreased baking sheet. Prick rounds with a fork about 3 or 4 times.

Bake the cookies for 7 to 9 minutes or until just set, but not brown. Cool cookies completely and match cookies into pairs.

To make the cream filling...
Cream together the butter, powdered sugar, and vanilla until smooth and fluffy. Tint with a few drops of food coloring if desired. Use water 1/2 teaspoon at a time to thin the frosting if necessary.


Using a pastry bag or simply a small spatula, spread about 3/4 teaspoon of filling onto a cookie. Top it with a matching cookie to form a sandwich. 

Display on a pretty plate. Enjoy!

Wednesday, January 16, 2013

Baked Brie

I made this luscious appetizer twice recently. It's THAT good. And it's so extremely easy to make. You may have had a baked brie in the past that's wrapped in pastry dough (i love a pastry dough-wrapped brie with some brown sugar and walnuts or pecans). But this is a little different, a little less work, and gluten-free! BONUS! The delicious creamy, melted cheese oozing onto the plate and mixing with the glaze is phenomenal. I served this with slices of a small baguette (I've been able to find gluten-free baguettes at our local Sprouts market). You could also serve it with your favorite cracker. 

Baked Brie
1 round of brie (or other soft French cheese)
2 tablespoons pear or apple brandy
2 tablespoons maple syrup
2 tablespoons toasted almonds, coarsely chopped

Toast almonds in a skillet over medium heat until just lightly browned. Watch them carefully so they don't burn. Set aside and allow to cool. Coarsely chop the almonds.

Preheat the oven to 400 degrees.

In a small bowl, combine the brandy and maple syrup. Place the brie on an oven-safe plate (preferably one that has a bit of a rim). Pour the brandy-syrup mixture over the brie, sprinkle with some of the almonds, and bake for about 10 minutes. When you remove it from the oven, spoon some of the liquid that's dripped onto the plate, back over top of the cheese. Slice into the warm brie and spread some of the melted cheese onto a slice of baguette or a cracker.

This is also excellent reheated. Store left overs in the refrigerator. Reheat in a 400 degree oven for about 7 minutes.

Enjoy! 

Tuesday, January 15, 2013

Hazelnut Frosting


Nutella is one of my favorites. Last fall I had a hazelnut yogurt from Pinkberry (while in California because I can't find a Pinkberry in Oklahoma)... it was the most delicious yogurt - EVER! Seriously, Pinkberry is always at the top of my list when I'm in California. I usually just like the original tart yogurt with some fruit and maybe some chocolate shavings. And I always try a taste of whatever new flavor they are sampling. But I absolutely fell in love with the hazelnut yogurt. So if you are anywhere near a Pinkberry - oh wait - they might not even have the flavor any more - but if they do, you HAVE to try the hazelnut yogurt. OK - this really is supposed to be about Hazelnut Frosting. It has Nutella in it, which is also good simply eaten on a spoon like peanut butter. Top your favorite chocolate cupcake with this frosting.


Hazelnut Frosting
1 cup butter, at room temperature
1 teaspoon vanilla extract
3 tablespoons cocoa powder
4 cups powdered sugar
1 cup Nutella
4 tablespoons water or milk (plus more to thin as needed)
crushed toasted hazelnuts (optional)

Using an electric mixer, beat the butter and vanilla until smooth. Add the cocoa powder and powdered sugar and mix on the lowest speed at first (be careful because if you mix it to fast right away, the powdered sugar will just fly in your face, on the counter, on the floor, all over your kitchen in a powdery white mess - trust me... I've done it a thousand times and still haven't learned my lesson). 

Add the water and Nutella and mix until smooth and creamy. You may need to add extra water or milk to get the creamy texture. 

Use a pastry bag with a large star tip or a spatula to frost a chocolate cupcake (or a two dozen). Sprinkle with crushed toasted hazelnuts if desired. This recipe makes enough to generously frost about 24 cupcakes.

Enjoy!