Pages

Saturday, June 30, 2012

Chalkboard Paint

I just love chalkboard paint. It's so simple and you can really creat some cute stuff with it. I've seen entire walls painted with chalkboard paint - SO FUN! What kid wouldn't want that in their room? I think grown-ups could have fun with it too. Here's one of my recent chalkboard paint uses. This was actually my husband's idea - flour storage/organization.

If you read this blog often, you know I often create gluten-free meals, desserts, snacks. I've been through much trial and error when it comes to using gluten-free flours, trying to get the perfect blend for texture and taste. With a little chalkboard paint and some glass mason jars, I got all of those little bags tossed on a shelf in my pantry neatly organized.


You could use this same technique for any type of storage you need. Simply brush a square (I did it just free-hand, but you could tape it off if you want to be exact) with the chalkboard paint using horizontal strokes. Let it dry for about 30 minutes. Then brush a second coat over the share using vertical strokes. Allow to dry completely for 24 hours and label with chalk or a chalkpen.

Have fun!

P.S. You can get the chalkboard paint and chalkboard pens at Hobby Lobby (or probably any craft store).

Tuesday, June 19, 2012

Chocolate Peanut Butter Cupcakes

Happy Birthday Julianne!

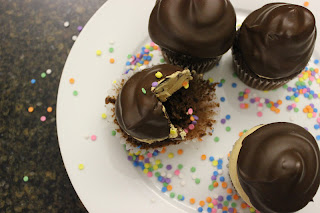
Today is my sister's birthday so I made a cupcake for her that I think she'll love. My mom always asked us to choose whatever dessert our hearts desired on our birthdays. Chocolate cake with peanut butter frosting was often at the top of Julianne's list. These chocolate peanut butter cupcakes are extra special because they are dipped in chocolate (kind of like a chocolate dipped ice cream cone)... so fun!!


Chocolate Peanut Butter Cupcakes
for the cupakes...
* You could just use your favorite chocolate cupcake recipe. If you don't have one, try this...
3/4 cup flour
1/3 cup cocoa powder
3/4 teaspoon baking soda
1/2 teaspoon salt
1/2 cup plus 2 tablespoons sugar
1/2 cup buttermilk
1/3 cup vegetable oil (or canola oil)
1 egg
1 teaspoon vanilla extract

for the peanut butter buttercream frosting...
1/2 cup sugar
2 egg whites
1/8 teaspoon salt
12 tablespoons (2 sticks) butter, softened
1 cup peanut butter
2 teaspoons vanilla extract

for the chocolate coating...
about 1 cup chocolate chips or other semi-sweet chocolate finely chopped
1 1/2 tablespoons vegetable oil or canola oil

to make the cupakes...
* You can use your own favorite chocolate cupcake recipe or -

In a large bowl, whisk sugar, buttermilk, oil, egg, and vanilla until smooth. Whisk in flour, cocoa powder, and salt until combined and smooth. Divide batter into 12 muffin cups that have been prepared with paper liners.

Bake at 350 degrees 20 minutes until center is set. Cool in pan for a few minutes, then remove from pan and cool on a wire rack until completely cool.

to make the peanut butter buttercream frosting...
*This frosting is very light, fluffy, and creamy. It's very good, but it's not quite the same as what my mom used to make for my sister. I might need to try her frosting in this recipe next time.

Using an electric mixer (preferably a stand mixer), whisk sugar, egg whites, and salt until combined. Set the bowl over a pot of simmering water and whisk until the mixture reaches 160 degrees on a candy thermometer. Immediately transfer to the mixer fitted with the whisk attachment. Whip on medium-high speed until the mixture resembles shaving cream and is cool (about 10 minutes). On medium speed, whip in the butter, in about 1-inch pieces at a time, until creamy. Add peanut butter and vanilla and beat until smooth.

to assemble the cupcakes...
Place frosting in a pastry bag fitted with a large round tip, or place it in a large ziplock bag and cut the corner of the bag. Pipe the frosting high on each cupcake. Refrigerate frosted cupcakes for about 1 hour until the frosting is firm.

to make the chocolate coating...
Melt the chocolate in a microwave safe bowl at 30 second intervals on 50% power setting - or - melt in a small bowl set over a small pot of simmering water. Stir in the oil until completely incorporated and smooth. Transfer the chocolate coating to a large, deep mug.

Holding each cupcake by its bottom, dip each frosted cupcake into the chocolate, remove from chocolate, and allow excess chocolate to drip off for a few seconds. Transfer the cupcake to a cooling rack, sitting right side up. You can refrigerate the cupcakes for a few minutes to harden the chocolate coating, or allow them to sit at room temperature for a bit longer before serving. Enjoy!!


Here's a picture of Julianne and me from several years ago (obviously because my hair was so blonde). I wish I could deliver these cupcakes to her - if only she didn't live 2000 miles away... Happy Birthday, Julie!

Wednesday, June 13, 2012

Vanilla Bean Buttercream Frosting

Need a simple frosting? This vanilla bean buttercream is easy and simple yet the vanilla bean in it makes it feel just a little more fancy than plan old vanilla (I love the little black specs too).


Vanilla Bean Buttercream Frosting
2 sticks butter, softened
4 cups powdered sugar
1 tablespoon water or milk
1 teaspoon vanilla extract
1 whole vanilla bean

Using an electric mixer (a large stand mixer works best but a handmixer will do just fine), beat butter until creamy. Add the powdered sugar, milk, and vanilla extract. Mix on very slow speed just until the sugar begins to get incorporated.

Using a small sharp knife, split the vanilla bean lengthwise. Scrape out the entire vanilla bean. Put the contents (those thiny little black specs) into the bowl with the frosting mixture.

Beat the frosting until light and fluffy (about 5 to 10 minutes). Add milk a teaspoon at a time if needed to reach a spread-able consistency.

Top your favorite cake or cupcakes. Enjoy!

Tuesday, June 12, 2012

Spiced Chicken with Chickpea & Cucumber Salad

Here's a simple summer dinner idea (from Real Simple magazine - how appropriate). It's perfect for a summer evening. If you were having dinner at my house, we'd eat it outside at the table near the pool and watch the fireflies light up the back yard.


Spiced Chicken with Chickpea & Cucumber Salad
1 can (15 ounces) chickpeas, rinsed and drained
1/2 English cucumber, thinly sliced (I used my mandolin slicer)
1/2 cup torn basil leaves
1 shallot, thinly sliced
2 tablespoons olive oil
2 teaspoons red wine vinegar
salt & pepper
2 tablespoons sesame seeds
1 tablespoon paprika
6 boneless, skinless chicken breasts

In a medium bowl, toss the chickpeas, cucumber, basil, and shallot with the oil, vinegar, salt & pepper.

Heat the grill to medium. In a small bowl, combine the sesame seeds and paprika along with some salt & pepper. Sprinkle the mixture onto the chicken, coating completely and pressing the mixture into the chicken to help it adhere.

Grill the chicken until cooked through (about 10 minutes per side). Serve the chicken with the chickpea salad.

You can add the dipping sauce shown above (not from Real Simple magazine, but still very simple to make). Just mix together about 1/4 cup plain yogurt, 1/4 cup chopped cilantro, juice of 1 lime, 1 jalapeno (finely chopped). Enjoy!

recipe from Real Simple magazine, June 2012 issue

Monday, June 11, 2012

Grilled Miso Salmon

I think this is my favorite salmon recipe. I've been making it for years now. Actually I think it's the first thing I made for my parents when they visited us in California. Usually I prep the sauce and fish, then Mark grills it. It is simple to make and so delicious. Serve it with some rice and your favorite grilled or sauteed veggies. I hope you like it.
 

The only challenge of this recipe is the miso paste. I never had a problem finding it in southern California, but here in Oklahoma City... now that's a different story. I went to at least five different markets searching for any kind of miso paste. Most places told me they had no idea what I was talking about. Some tried to give me instant miso soup (definitely not what I was looking for). Just by pure luck we happened to wander into a little gourmet market in Tulsa recently and found the miso paste I had been looking for.  Hooray! Now I can share this recipe with you! When you are looking for miso paste, it is typically in the refrigerated section near the produce (or with the produce), sometimes near the herbs.


Grilled Miso Salmon
4 salmon fillets
1/2 cup white or yellow miso paste
1/4 cup sake or white wine
1 tablespoon soy sauce
wasabi paste (optional)

for the miso sauce
1/2 cup sake or white wine
1 cup chicken broth or fish stock
1/4 cup white or yellow miso paste
2 tablespoons fresh minced ginger
1/4 cup chopped green onion
1 1/2 teaspoons cornstarch dissolved in 1 tablespoon soy sauce

prep the fish...
In a small bowl, combine the miso paste, wine, and soy sauce. Brush the mixture on the salmon. Heat the grill.

meanwhile,
prep the miso sauce...
Whisk together the wine, broth, miso, ginger, and onion in a small saucepan. In a small bowl, stir the cornstarch into the soy sauce and set aside. Place the saucepan over medium-high heat and bring liquid to a boil. Reduce by half. Whisk in the cornstarch mixture and return to the heat, whisking until slightly thickened (about 1 minute). Keep warm until ready to serve.

Grill the salmon over medium heat about 7 minutes on each side or until cooked through.

Spoon the sauce over the fish. Serve with veggies and rice if desired. Enjoy!!

You can serve the salmon with some wasabi on the side. You should be able to buy wasabi powder in the Asian section of your local market. You mix equal parts powder and water in a small bowl (you only need about a teaspoon). Cover with plastic wrap, and let it sit for about 10 to 15 minutes.

recipe adapted from Williams Sonoma Grilling cookbook

Tuesday, June 5, 2012

Gluten-Free Cornbread

Another successful gluten-free experiment!!! I think I may just stick with gluten-free baking because I've had such success recently. I'm learning the different characteristics of non-wheat flours like coconut, almond, oat, rice, etc. It's so much fun to experiment with different combinations.

Gluten-Free Cornbread
1/4 cup butter, softened
3 tablespoons sugar
2 eggs
1/2 cup sour cream
1/2 cup milk
1/2 cup white rice flour
1/4 cup corn flour
1/4 cup potato flour
3 teaspoons baking powder
1 teaspoon xanthan gum
3/4 teaspoon salt
2/3 cup cornmeal

Heat your oven to 425 degrees. Grease an 8 inch pan and line with parchment paper (click here for the how-to for lining a round pan).

Cream butter and sugar together in a large bowl using an electric mixer. Add the eggs and mix. Stir in the milk and sour cream. Add the dry ingredients and mix until just blended.

Pour batter into prepared pan and bake 18-22 minutes. Serve warm with butter and honey. Enjoy!!

Monday, June 4, 2012

Gluten-Free Snickerdoodle Cupcakes

I made these cupcakes especially for Katie. Snickerdoodles are her favorite cookies (she usually requests those instead of cake for her birthday). I'm always trying to perfect my gluten-free baking... always experimenting. I am happy to saw that this was a huge success. Not only did Katie enjoy these cupcakes, but so did everyone else in the house! Even all those that say they don't like anything that's "gluten-free."  With these cupcakes, no one could tell the difference!


Gluten-Free Snickerdoodle Cupcakes
cupcakes...
1 cup white rice flour
1 cup coconut flour
1 cup almond flour
1 teaspoon xanthan gum
1/2 tablespoon baking powder
1/2 teaspoon salt
1 tablespoon cinnamon
1 stick (1/2 cup) butter, at room temperature
1 cup sugar
2 eggs
1 teaspoon vanilla extract
3/4 cup milk

frosting...
1 stick (1/2 cup) butter, at room temperature
2 cups powdered sugar
1 teaspoon vanilla extract
1 to 2 tablespoons milk (or water)
pinch salt

to make the cupcakes...
In a medium bowl, combine the flours, xanthan gum, baking powder, salt, and cinnamon. In a large bowl, cream together the butter and sugar using an electric mixer until fluffy. Add the eggs and vanilla; mix to combine. Add the dry ingredients alternately with the milk.

Divide the batter into the cups of a 12-cup muffin/cupcake pan that you've prepared with paper liners. Bake at 350 degrees for 18 minutes. Remove from oven and cool in the pan for a couple of minutes. Then remove cupcakes from pan and cool completely on a wire rack.

to make the frosting...
Using an electric mixer, in a large bowl beat the butter and vanilla extract until smooth. Add the powdered sugar, salt, and milk. Beat until light and fluffy.

Top each cupcake with the frosting. Sprinkle with cinnamon sugar and garnish with a mini gluten-free snickerdoodle cookie if desired. You can use my recipe by clicking here.  Enjoy!!


inspired by Annie's Eats (one of my favorite food blogs)