Pages

Saturday, August 11, 2012

Cappuccino Cupcakes with Mocha Buttercream Frosting

This is one of my go-to cupcake recipes. It's rather simple and oh-so-good. My favorite part is the chocolate covered espresso bean on top! I say these are perfect for breakfast - pair with your favorite coffee (If you're me, it's the Old School Bagel caramel mocha).


Cappuccino Cupcakes with Mocha Buttercream Frosting
For the cupcakes…
1 package white cake mix
1 1/3 cups double-strength coffee
3 eggs
1/3 cup vegetable oil (or canola oil)

For the mocha buttercream…
1 cup butter (2 sticks), softened
3 tablespoons cocoa powder
1 tablespoon instant coffee (I used 1 packet of Starbucks Via instant coffee)
1 teaspoons vanilla extract
4 cups powdered sugar (confectioners’ sugar)
1 teaspoon meringue powder*
2 tablespoons coffee (plus more if needed to thin the frosting a bit)

Preheat oven to 350 degrees. Line a muffin pan with paper baking cups (this recipe should make 24 cupcakes).

In a large bowl, combine the cake mix, coffee, eggs, and oil. Beat with an electric mixer until combined. Divide batter into muffin pan, filling each cup about 3/4 full. Bake 18 minutes. Cool cupcakes for about 5 minutes in the pan, then remove from pan and cool completely on a wire rack.

While the cupcakes are baking, you can make the frosting…
In a large bowl, using an electric mixer, cream the butter until light and fluffy. Add the cocoa powder, instant coffee, and vanilla extract. Beat until smooth. Add the powdered sugar and coffee, beating until smooth and fluffy (about 5 to 7 minutes). Scrape the sides of the bowl a few times throughout the mixing.

Use a pastry bag or spatula to frost each cupcake with the mocha buttercream. Top with a chocolate covered espresso bean if desired (my favorite come from Trader Joe’s).
Enjoy!

* meringue powder can be found at baking supplier stores, cake decorating/craft stores (such as Micheals/Hobby Lobby/Jo-Ann's), and specialty markets

Friday, August 10, 2012

Gluten-Free Lemon Poppyseed Blueberry Muffins

Here’s another experiment with gluten free flours. I saw this recipe on one of my favorite blogs, Joy the Baker. If you haven’t seen her blog, check it out by clicking here. She has great recipes and a way of writing that makes it seem like you’re just having a chat with a close friend – it makes me smile. I adapted her recipe for lemon poppyseed blueberry muffins so that Katie could enjoy them too. Lemon poppyseed and blueberry might be my two favorite types of muffins so this sounded like a perfect combination. I am delighted to report that the experiment was a huge success! I think I’m starting to get the hang of the gluten-free flour combinations that work. These muffins are moist and full of flavor. The crumble on the top makes them even a little more special.
Gluten-Free Lemon Poppyseed Blueberry Muffins
7 tablespoons butter
1/3 cup milk
1 egg plus 1 egg yolk
1 teaspoon vanilla
3/4 cup white rice flour
1/2 cup oat flour
1/4 cup almond flour
3/4 cup sugar
1 1/2 teaspoons baking powder
1 teaspoon xanthan gum
3/4 teaspoon salt
1 tablespoon lemon zest (zest from about 1 lemon)
1 tablespoon poppyseeds
1 1/2 cups fresh blueberries
For the crumble topping:
3 tablespoons butter
1/4 cup almond flour
1/3 cup oat flour
3 tablespoons sugar
Preheat your oven to 375 degrees. In a small saucepan, melt the 7 tablespoons butter and cook until it’s bubbly and just starting to brown slightly. Pour the butter into a bowl and allow it to cool a bit (you don’t want to start mixing it with the other ingredients while it’s still piping hot).
In a medium bowl, whisk the milk, egg, egg yolk, and vanilla. Add the browned butter and whisk.
In a large bowl, whisk the flours, sugar, baking powder, salt, and xanthan gum. Add the milk mixture all at once and stir gently to combine. Gently fold in the lemon zest, poppyseeds, and blueberries. Divide the batter among 12 muffin cups prepared with paper or foil liners.
Combine the crumble topping ingredients in a small bowl and rub with clean fingertips until crumbly. Sprinkle the mixture over the top of the batter in each muffin cup.
Bake at 375 for about 20 minutes.

The original recipe uses regular all-purpose flour (which is made from wheat and contains gluten). I am sure the muffins would be equally as excellent if you use that in place of the rice, oat, and almond flour that I used. Just substitute 1 1/2 cup all-purpose flour for the others in the batter and 1/2 cup all-purpose flour for the others in the topping.
Enjoy!!
 
Adapted from Joy the Baker

Thursday, August 9, 2012

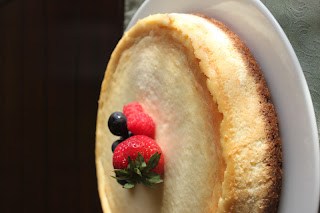
Gluten-Free Cheesecake with Strawberry Sauce

Mmmm…. Cheesecake. I don’t remember this being a go-to dessert in our house growing up – we usually had cakes, cupcakes, cookies… but the only cheesecake I remember is from my Aunt Charlene (I think it had caramel and pecans). Now that I mention it, I’m going to have to get that recipe from her and share it. I remember it being delicious! Save that thought for a future blog post. Moving on…
I used to be afraid of gluten-free cooking and baking – especially the baking because most of my creations include flour. But I’ve learned after lots of experimentation (not always successful), that gluten-free baking isn’t scary at all! Really, you can adapt just about any recipe by swapping out either the flour or the things made with flour (like graham crackers) for a gluten-free equivalent. Most markets and grocery stores are starting to carry larger selections of gluten-free products. So you should be able to find something that will work in the crust for this recipe if you want to make it gluten-free.  For this recipe, if you mix any type of cookie or sweet cracker crumbs with some butter and extra sugar, it will be delicious. So don’t be afraid of gluten-free!
 
 
Gluten-Free Cheesecake with Strawberry Sauce
For the crust:
1 3/4 cups gluten-free graham cracker crumbs or cookie crumbs*
3 tablespoons butter, melted
1/4 cup sugar
*I used a bag of gluten-free cinnamon snap cookies that I found at my local market and smashed them to crumbs in a large ziplock bag (fun stress relief). You could use any type of crispy gluten-free cookie, gluten-free shortbread cookie, or gluten-free graham crackers. If you aren’t worried about making this cheesecake gluten-free, then you can just use regular graham cracker or ginger snaps or other crumb of your choice.
For the cheesecake:
3 packages (8 ounces each) cream cheese, softened
1 cup sugar
1 teaspoon lemon zest
2 teaspoons vanilla
3 eggs
1 cup sour cream
For the strawberry sauce:
1 1/2 cups strawberries, chopped*
1/2 cup sugar
1/2 cup water
1 teaspoon lemon zest
1 tablespoon corn starch
*You could substitute your favorite berry for the strawberries. Try it with blueberries, raspberries, or blackberries. Yum!
Prepare the cheesecake…
Preheat oven to 350 degrees.
Mix the crust ingredients in a medium bowl and press into the bottom of a springform pan. Bake the crust for 8 minutes. Remove from oven and cool.
In a large bowl, use an electric mixer to beat the cream cheese and sugar until smooth and well blended. Add the eggs one at a time, mixing between each addition. Blend in the sour cream, lemon zest, and vanilla. Pour the mixture into the prepared crust.
Bake the cheesecake at 350 degrees for about 1 hour, or until the center is just set. Turn off the oven and leave the door slightly ajar, cool the cheesecake in the oven for about 30 minutes. Then remove the cheesecake from the oven and cool completely. Cover with plastic wrap and refrigerate 4 hours or overnight.
Prepare the strawberry sauce…
Combine all ingredients except for the corn starch in a medium pot. Cook over medium heat until the berries are soft and the liquid begins to thicken, about 10 to 15 minutes. Remove from heat and allow to cool.
When the mixture is cool, place in a blender or food processor and puree until smooth. Return the strawberry puree to the pot and place over medium heat. Whisk in the cornstarch and cook until thickened. Cool completely. Store in a sealed container in the refrigerator until ready to use. 
Spoon the strawberry sauce over a slice of cheesecake and serve. Enjoy!
  

This recipe is my own creation based on various cheesecake recipes I’ve used in the past and a little kitchen experimentation.

Sunday, August 5, 2012

Grilled Artichoke with Two Dipping Sauces

Just about every time our family eats artichokes, we talk about how amazing it is that someone decided it would be a good idea to eat an artichoke. Have you ever thought about it? First of all artichokes are not a welcoming looking vegetable - they're not really the pretty of a color, they have sharp little thorns on every leaf, those leaves are thick and tough, and that's just the outside! Inside is that intimidating hairy purple stuff... So our family thinks it's truly amazing that people figured out how to eat artichokes. If you know the history about how humans started eating artichokes, please tell me.


Don't be intimidated by these mysterious vegetables... with a few steps, you can grill delicous artichokes to enjoy as an appetizer or side with your favorite summer meal.

Grilled Artichokes
2 whole artichokes
1 lemon, quartered
salt
freshly ground sea salt & peppercorns

Sesame Dipping Sauce
1/2 cup mayonnaise
2 tablespoons soy sauce
2 tablespoons sesame oil
1 tablespoon honey
1 tablespoon lemon juice

Green Goddess Dipping Sauce
1 cup sour cream
1/4 cup fresh parsley
3 tablespoons cilantro, basil, or other fresh herb of your choice
3 tablespoons fresh tarragon
3 chives, roughly chopped
1 clove garlic
1 tablespoon honey
2 tablespoons olive oil
1 teaspoon anchovy paste
juice of 1 lemon
salt & pepper

prepare the artichokes...
Fill a large stockpot about half full with water. Add about a teaspoon of salt. Place the pot over high heat and bring water to a boil. Rub the outside of each artichoke with the lemon. Then squeeze any remaining juice into the water and toss the lemon pieces into the water as well. Place the artichokes in the boiling water, cover and steam for about 20 to 30 minutes or until a fork pierces the bottom of each artichoke easily.

While the artichokes are boiling, prepare the sauces...

for the sesame dipping sauce...
Whisk all ingredients in a medium bowl. Cover and refrigerate until ready to serve.

for the green goddess dipping sauce...
Place the parsley, tarragon, chives, other herbs, and garlic in a food processor and finely chop. Add the remaining ingredients and blend until smooth. Transfer to a bowl, cover and refrigerate until ready to serve.

finish the artichokes...
When the artichokes are tender at the bottom, remove from the boiling water and allow to cool slightly until they can be handled without burning your hands. Using a large sharp knife, cut each artichoke in half lengthwise.
Remove the fuzzy center and purple leaves using a small sharp knife. To remove the fuzz easily, cut along the bottom of the "hairy fuzz" in a half circle, remove some of the purple leaves that surround the fuzz and use your small knife to cut around the hair that extends toward the leaves.


Drizzle each artichoke with olive oil. Season with sea salt & freshly ground peppercorns. Grill the artichokes for about 10 minutes in medium-high heat. Turning once. This is to warm them and give them that char-grilled flavor. Serve immediately with the dipping sauces.

If you haven't eaten an artichoke before, here's how... you simply pull a leaf from the artichoke, dip the tender center into a sauce, and scrape the tender "meat" of the artichoke leaf with your teeth. Work your way toward the center (or heart) of each artichoke. Enjoy!

Friday, August 3, 2012

Lemon Sorbet

It is H-O-T this summer! Here's a refreshing treat to help you cool off a little. Lemon sorbet has long been used as a pallet cleanser between courses of fancy dinners. But lemon sorbet doesn't have to be fancy (it's super easy to make if you have an ice cream maker) and it's perfect to cool you down on a hot summer day.

Lemon Sorbet
1 cup water
1 cup sugar
1 cup fresh lemon juice (about 5 or 6 lemons depending on size)
1 tablespoon lemon zest (zest of about 2 lemons)

Place the water and sugar in a small saucepan set over medium heat. Bring the mixture to a boil just until the sugar has dissolved completely in the water. Cool completely. (You've just made simple syrup!)

Add the lemon juice and lemon zest to the simple syrup and chill in the refrigerator.

Pour the chilled mixture into an electric ice cream maker and chill per manufacturer instructions. Remove sorbet from the ice cream maker and store in the freezer.

You could use this same process to create sorbet with just about any fruit. Just substitute the lemon juice and zest for a different fresh fruit juice or fruit puree. Enjoy!

Thursday, August 2, 2012

Red Wine Sangria

Yesterday I shared a recipe for white wine sangria – full of sweetness and fruitiness. Just in case you’re not a big fan of white wine or typically prefer red, here’s the compliment using red wine. It’s just as easy. You’ll notice that many of the ingredients are the same. Try it with your favorite fruits – blackberries and cherries might also be delicious in this red wine sangria.
 
Red Wine Sangria
1 bottle red wine (I used a cabernet sauvignon but you can choose whatever you like )
½  cup orange liqueur (Grand Marinier or Triple Sec work well)
¼ cup simple syrup*
¼ cup orange juice and/or pomegranate juice
1 cup seltzer water (or you can use 7-up or another lemon-lime soda)
1 nectarine, sliced
1 apple, sliced
1 orange, sliced
* To make the simple syrup, combine equal parts sugar and water in a saucepan. Heat until almost boiling and all sugar is dissolved. Cool completely and store in a sealed container.
Combine all ingredients in a large pitcher. Refrigerate at least 4 hours or overnight to allow flavors to blend. Serve cold with a little ice being sure to include some fruit in each glass. Enjoy!

Wednesday, August 1, 2012

White Wine Sangria

Temperatures at our house over the past few weeks have been over 100 degrees… and the forecast for the next week shows mostly 104-112 degrees – that’s HOT! It’s the perfect time for cold and fruity sangria by the pool… or in the air-conditioned house when 112 degrees becomes too hot to handle! I have to confess that I do enjoy these super high temperatures (I really dislike being cold). I’d rather be wearing shorts and a tank top than boots, gloves, and a winter coat.
 
Does it also count as a healthy drink because it contains fresh fruit??!  I hope so. But regardless of the health benefits, it’s delicious – so indulge a little while trying to keep cool in the heat of the summer.
White Wine Sangria
1 bottle white wine (I typically use a Riesling or Muscato)
1/2  cup orange liqueur (Grand Marinier or Triple Sec work well)
1/4 cup simple syrup*
1/4 cup apple juice
1 cup seltzer water (or you can use 7-up or another lemon-lime soda)
1 nectarine, sliced
1 granny smith apple, sliced
1 orange, sliced
1/2 cup blueberries
1/2 cup strawberries
* To make the simple syrup, combine equal parts sugar and water in a saucepan. Heat until almost boiling and all sugar is dissolved. Cool completely and store in a sealed container.
Combine all ingredients in a large pitcher. Refrigerate at least 4 hours or overnight to allow flavors to blend. Serve cold with a little ice being sure to include some fruit in each glass.
You can also add other fruits or substitute with your favorites. Try pears, limes, lemons, peaches, raspberries, etc. Experiment with different fruits for various flavors – I’m sure they’ll all be delicious. Enjoy!