Pages

Thursday, May 31, 2012

Gluten Free Banana Bread Muffins with Chocolate Chips

Remember I said our house was gluten free this week for Katie? Well, here's another gluten free recipe (also somewhat related to Hawaii just like the coconut shrimp)...

I'm always looking for a banana bread recipe that tastes like the banana bread we got in Maui while on our honeymoon. Nothing ever even comes close! It was absolutely THE BEST banana bread I've ever had - on the road to Hana, it's a little diversion to get Aunt Sandy's banana bread at the Ke'anae Landing Fruit Stand. I tried to order some online, but it doesn't look like that's an option - bummer :( 
wish we were in Hawaii to visit this fruit stand (and relax on the beach too)
The recipe here doesn't even compare to Aunt Sandy's in Maui, but it is the best banana bread that I have made. My banana bread always comes out too dry or all gooey in the middle. These muffins were perfectly moist but not gooey. And they were gobbled up so fast! A true sign that they were good.


Gluten Free Banana Bread Muffins with Chocolate Chips
1 cup coconut flour
1 cup oat flour
1 teaspoon baking soda
1 teaspoon xanthan gum
1/4 teaspoon salt
1/2 cup (1 stick) butter, at room temperature
2 tablespoons canola oil
3/4 cup brown sugar
2 eggs
5 to 7 very ripe bananas
1/2 cup mini chocolate chips (optional)

Combine the flours, baking soda, xanthan gum, and salt in a bowl. Using a mixer, cream the butter, canola oil, and sugar together. Add the eggs and bananas and mix. Add the the flour mixture slowly and stir until just combined. Stir in the chocolate chips if desired.

Evenly divide the batter into the 12 cups of a muffin pan prepared with paper liners.

Bake at 350 degrees for 18 minutes.  Enjoy!

Just a few pictures to share from the Road to Hana drive. If you haven't done it, you should - in a convertable. It's beautiful!

Tuesday, May 29, 2012

Gluten Free Coconut Shrimp

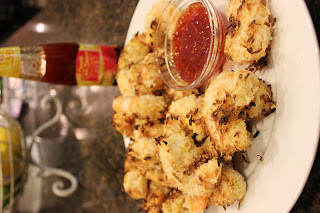
My husband said this dinner made him feel like we were in Hawaii. It was a very warm and humid evening, some thunderstorms were in our area, and we were enjoying these coconut shrimp with sweet chili sauce.


This dish takes just a few simple steps. The key is to get all of your bowls set up so you can have a little assembly line going as you bread the shrimp with the coconut. I made this gluten free (our whole house is gluten free this week because we love it that Katie is here). Get ready for a few more yummy gluten free recipes later in the next few days!


Gluten Free Coconut Shrimp
2 pounds large tiger prawns or shrimp, peeled and deviened with tails on if possible
2/3 cup coconut flour
1/2 teaspoon cayenne pepper
1 teaspoon garlic powder
2 eggs, beaten
1 1/2 cups shredded coconut
1/4 cup almond flour
salt & pepper to taste

Heat the oven to 425 degrees. Prepare a baking sheet with parchment paper. Put ingredients into three bowls as follows -- dish #1-coconut flour, cayenne pepper, garlic powder; dish #2-eggs; dish #3-coconut, almond flour, salt & pepper. Dip each shrimp first into dish #1, then #2, then #3. Place shrimp on the prepared baking sheet.

Bake for about 15 minutes. Flipping shrimp half way through baking.

Note: if you don't want to make this gluten free, you can substitute all purpose flour for the coconut flour and breadcrumbs for the almond flour.

Serve with sweet chili sauce for dipping. I hope this dish brings you memories of Hawaii too. Enjoy!

Monday, May 28, 2012

Slow Cooker Ham & Scalloped Potatoes in Southern California

We spent last week in Southern California - business trip mixed with fun with family & friends in the evening. My best friend, Jenny, made us a delicious meal in her home one evening and graciously shared the recipe with me.

Jenny's Slow Cooker Ham and Scalloped Potatoes
1 1/2 pounds ham, cut into large chunks
7 to 9 medium sized potatoes, peeled and thinly sliced
2 onions, peeled and thinly sliced
1 (10 3/4 oz) can cream of celery soup
1 cup fat-free or low-fat shredded cheddar or American cheese
1/2 teaspoon salt
1/4 teaspoon pepper or to taste
paprika

Layer half each of ham, potatoes, and onion in slow cooker. Sprinkle with half each of salt & pepper, then half of shredded cheese. Repeat layers. Spoon soup over ingredients. Cover and cook on high for 4 hours, or on high for 1 hour, then low for 6-8 hours. Sprinkle with paprika and serve. Enjoy!!

Jenny served the ham & scalloped potatoes with salad, asparagus, and breadsticks. It was such a delicious meal. You could serve this any time of year - perfect in spring with fresh salad and asparagus and perfect in fall or winter because it's a very nice, warm "comfort food."
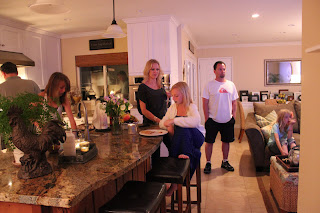
Jenny had her table set beautifully. We ate family style and enjoyed a wonderful evening together.

     
 Always the perfect hostess, Jenny had a sweet note on her chalkboard for us and (our favorite) salted dark chocolate caramels.

 Dessert was vanilla or chocolate ice cream with warmed cookie butter and dark chocolate chips.
It was decadent.

You can get cookie butter at Trader Joe's (I got some of this to take back to Oklahoma because sadly there are no Trader Joes in the state).

 Thank you, Jenny, Ryan, Karly, and Leah for a fantastic dinner and fun evening in your home! xo


In addition to a wonderful evening with our dear friends....

The view from our hotel in Huntington Beach

Of course we stopped at In-N-Out for a buger as soon as we got to Orange County
(no In-N-Out in Oklahoma either)

 
Oklahoma isn't all bad (even though they're missing Trader Joe's, In-N-Out, Costco, and the Pacific Ocean)... this beautiful rainbow was in our Oklahoma neighborhood on our way to the airport before our week in California.

Saturday, May 26, 2012

Buttermilk Pie

Have you ever heard of such a thing??!!... Buttermilk Pie?! Well, my first experience with this delicious treat was at Toby Keith's Bar/Restaurant in Oklahoma City. Of course I had to try it - it was dessert AND something I had never tried before. It was soooooooo good. It's kind of like a sugar cookie in pie form. Yum! So I searched online and found a few recipes that I tweaked and blended together to create my own recipe.

Buttermilk Pie
1 1/4 cups buttermilk
3 eggs, separated
1 disk refrigerated or homemade pie dough (I used refrigerated just because I didn't want the hassle of homemade)
1 stick butter (1/2 cup), melted
1 1/2 cups sugar
3 tablespoons flour
2 teaspoons vanilla
1/4 teaspoon salt
powdered sugar, for dusting

Preheat the oven to 350 degrees. Place the dough into a deep-dish pie plate and crimp edges as desired. Pierce all over with a fork. Line the dough with foil, and fill with pie weights. Bake the crust only until the edges are golden (about 20 minutes).  Let cool completely on a wire rack.

In a large bowl, beat the butter and sugar with an electric mixer on medium-high speed until combined. Add the egg yolks and beat until the mixture is thick and pale yellow. Add the vanilla and mix. Reduce the mixer to low speed and add the flour and salt. Beat until just incorporated. Slowly pour in the buttermilk, scraping down the sides of the bowl until combined.

Beat the eggs whites on medium high speed using an electric mixer until stiff peaks form. Fold the egg whites into the yolk mixture in three additions, carefully folding until no white streaks remain. Pour the filling into the prepared crust. Bake at 350 degrees until golden and set around the edges, 45 to 50 minutes. Let the pie cool on a wire rack.

Dust with powdered sugar before serving. Enjoy!

Friday, May 25, 2012

Red Wine Reduction Sauce

You just can't go wrong with a red wine reduction sauce. It might sound fancy, but it's so very simple. Try it next time you serve steak - it will make you meal more luscious.
Red Wine Reduction Sauce
2 tablespoon olive oil
3 shallots, minced
1/2 bottle red wine
1 can (about 2 cups) beef broth
1 can (about 2 cups) chicken broth
1 bay leaf
1 teaspoon dried thyme
1 teaspoon freshly ground pepper

Heat oil in a medium saucepan. Add the shallots and saute until softened. Add the wine, bring to a low boil, and reduce for about 10 minutes. Add the broth, bay leaf, thyme, and pepper. Simmer until reduced by half, allowing the flavors to blend (about 20 minutes).

Serve over your favorite steak. I also like to top it off with some blue cheese crumbles - the flavors are so delicious together.

Enjoy!

Thursday, May 24, 2012

Asian Cucumber Salad

This is a simple and tasty salad that's perfect for summer. You can adjust the heat by reducing or increasing the amount of red pepper flakes. The rice vinegar makes it a little tangy and the honey adds a little sweetness. We served this salad with some teriyaki salmon - delicious!

Asian Cucumber Salad
6 mini cucumbers, thinly sliced
1/8 cup red onion, thinly sliced
1/2 cup rice vinegar
2 tablespoons sesame oil
2 cloves garlic, minced
1 tablespoon fresh ginger, minced (about a 1 inch cube piece)
1 tablespoon sesame seeds
1 teaspoon red pepper flakes

I used a mandolin slicer to thinly slice little rounds of cucumber, but you could also use a sharp knife. No need to peel the cucumber - the dark skin provides nice color.

Whisk remaining ingredients in a medium bowl. Add cucumbers and onion and stir to coat the cucumbers and onions.

Enjoy!

Wednesday, May 23, 2012

Halo Cake

This is just a quick post to share a cake that I made recently for a birthday. The request was "Halo" (as in the video game kind, not the angel kind). The birthday boy found a picture of a cake that he liked so I used that (and some images I found online of Halo screenshots) as my inspiration.


 The key to the clean lines of this Halo symbol is an x-acto knife. I have one that stays in my cake decorating toolbox for this very purpose. It allows me to cut the fondant exactly the way I want it.

I really enjoyed painting these scenes from the video game onto the cake. I first cut the panels out of white fondant and attached them to the cake. Then used gel paste food coloring mixed with a tiny bit of vodka (you can use any clear alcohol) and used a small paint brush to design these. This paint brush stays in my cake decorating toolbox too. Tip: when you're painting fondant, you only need a tiny tiny amount of alcohol to thin the food coloring. It evaporates very quickly so it doesn't leave your artwork looking wet (water doesn't evaporate as quickly so it doesn't work as well for painting).

I hope this gives you some inspiration to try fondant painting. You can try abstract at first just to get the hang of it! Enjoy!!

Monday, May 21, 2012

Ice Cream Cake

 
Cake and ice cream rolled together with fudge on top... perfection! You will love this ice cream cake. It takes a few steps, but the ingredients are simple and the steps are not very complicated. As a kid, I often requested my mom make this cake for me on my birthday. It was a rule in our house that on your birthday Mom would make whatever kind of cake you wanted (or buy a cake at the local bakery if you requested that too). My mom made delicious dessert all the time - I'm sure I've told you about some of them and the fact that we were lucky enough to have something special just about every night of the week. This is one of my favorites and I'm happy she shared it with me.

Happy Birthday Andrew!!!
Actually, this cake has also become Andrew's favorite. He has requested it for at least four years in a row on his birthday (see how I carried on Mom's rule? - for example, this year Katie didn't pick cake at all... she picked cookies). This year was no different for Andrew... his request was ice cream cake. So this weekend we got to enjoy celebrating Andrew's birthday (and eating cake).
Ice Cream Cake
for the cake:
4 eggs (separated)
1/2 cup sugar
1/3 cup sugar
1 teaspoon vanilla
1/2 cup flour
1/3 cup cocoa powder
1/2 teaspoon baking powder
1/4 teaspoon baking soda
1/8 teaspoon salt
1/3 cup water

for the chocolate fudge glaze:
4 tablespoons butter
4 tablespoons cocoa powder
4 tablespoons water
1 teaspoon vanilla
2 1/2 cups powdered sugar
1/2 gallon of your favorite ice cream (I used vanilla in the pictures here, but cookie dough and mint are excellent flavors for this cake too)

to make the cake:
Line a 15 1/2 by 10 1/2 by 1 inch pan (jelly roll pan or rimmed baking sheet) with foil; generously grease the foil. Using an electric mixer, beat egg whites until foamy; then gradually add 1/2 cup sugar; beating until stiff peaks form. Set aside.  HINT: I use my kitchenaid stand mixer to beat the eggs whites and it works perfectly every time (much easier than a hand mixer).

Beat egg yolks with vanilla at high speed using an electric mixer with vanilla at high speed for about 3 minutes. Gradually add 1/3 cup sugar, beating 2 additional minutes. Add dry ingredients to the egg yolk mixture alternately with the water. Fold the chocolate mixture into the egg whites. Spread the batter evenly over the prepared pan.

Bake at 350 degrees for 12-15 minutes or until top springs back when touched.

While the cake is baking, prepare a clean kitchen towel by covering it with waxed paper and dusting the waxed paper with powdered sugar. When the cake comes out of the oven, immediately invert it onto the towel. Carefully peel off the foil. Roll the cake in the towel starting from the narrow end. Place on a wire rack to cool completely.


When the cake is completely cool, carefully unroll the cake and spread with ice cream (I let the ice cream soften a bit before I try to spread it). Re-roll the cake, place on a large plate or platter, and freeze.
    

to make the fudge glaze:
Melt the butter in a small saucepan over low heat. Add the cocoa powder and water, stirring constantly until the mixture thickens. DO NOT BOIL. Remove from heat and cool slightly. Blend in the powdered sugar and vanilla using an electric mixer.

Remove the cake from the freeze, pour on the fudge, spread with a spatula if needed, re-freeze.
   Enjoy!


recipe from my mom

Tuesday, May 15, 2012

S'mores Bars

I stumbled across this recipe online somehow and instantly knew I had to try it out. It is fantastic! You must try it as soon as possible. It's quite easy too.

S'mores have been a staple in my summer eating habits my entire life. Growing up in-the-middle-of-nowhere-Pennsylvania we spend many many summer evenings at the fire pit in the backyard, roasting hot dogs and making s'mores (and mountain pies, but that's a whole other story for later). The s'mores didn't end when I became a Southern Californian... our backyards were never very big, but we always had a little fire pit for summer evening s'mores. Oddly enough, in Oklahoma we do not have a fire pit - yet. I'm sure we'll have it ready soon. Until then, these are perfect! S'mores that you can make in your oven! Oh so good!!

S'mores Bars
1/2 cup (1 stick) butter, softened
1/2 cup sugar
1/4 cup brown sugar
1 egg
1 teaspoon vanilla
1 1/3 cups flour
3/4 cup graham cracker crumbs
1 teaspoon baking powder
1/4 teaspoon salt
2 giant Hershey's bars (7 ounces each)
1 (7 ounce) jar marshmallow cream

Using an electric mixer in a large bowl, beat the butter and sugars until fluffy. Add the egg and vanilla and mix. In a medium bowl, combine the flour, graham cracker crumbs, baking powder, and salt. Slowly add the flour mixture to the large bowl, using the electric mixer to combine.

Divide the dough in half. Press the first half into a greased 8 inch square pan. Top the dough with two giant Hershey bars. Spread the marshmallow cream on top of the chocolate. On a piece of parchment paper (or waxed paper), roll out the second half of the dough into an 8 inch square. Place the dough on top of the marshmallow and trim away any excess.

Bake at 350 degrees for 30 minutes until golden. Cool completely before cutting.

Enjoy!!


recipe from Sprinkle Some Sunshine

Sunday, May 13, 2012

Decadent Triple Chocolate Cake


If you can never have too much chocolate, then this cake will satisfy your deepest chocolate desire. I made this cake especially for my mom - the ultimate chocolate lover. Happy Mother's Day, Mom! I certainly inherited my love for chocolate from her. I'm guessing I began loving chocolate before I was born - thanks Mom!

While I'm on that subject - thanking my mom, that is - there are countless things I can thank my mom for. She's absolutely the BEST! She's the kindest, most thoughtful person I know and so full of love. Of all the traits I could gain from my mother, that would be the one I want to embrace. I strive for it every day. Another thing I have to thank my mom for is passing along her love for cooking and baking (even though as a kid I said I never wanted to learn to cook - remember that, Mom? Well, it's one of my favorite things to do now and even led to this very blog.) My mom inspires me, shares all of her recipes with me (which will provide many more recipes for me to share with everyone on this blog), and she's always a phone call away when I need kitchen advice (or any other kind of advice too). She's a great cook and an awesome mom!

Mom and me (before my wedding) via Felicia Perry Photography
Do we look alike?
Now, on to the cake... get ready for the ultimate in chocolate. This cake is 100% chocolate - chocolate cake, chocolate buttercream filling, chocolate ganache and chocolate shavings. Oh my! It's moist and rich. I chose to top it with some fresh flowers for Mother's Day, but you could garnish it with fresh berries or just the shavings. The shiny ganache makes it look fancy all on its own. 


Decadent Triple Chocolate Cake
(1) the chocolate cake:
1/4 cup cocoa powder
1 stick (8 tablespoons) butter
1 packet of Starbucks Via instant coffee (whatever type you like)
6 tablespoons water
1 cup sugar
1 egg
1/4 cup buttermilk
1 tablespoon vanilla
1 cup all-purpose flour
1/2 teaspoon baking soda
1/4 teaspoon salt

Prepare two 6 inch round baking pans with non-stick cooking spray that contains flour (I use Bakers Joy) or with regular cooking spray and then dust with a little cocoa powder. Line the bottom of each pan with a piece of parchment paper.

In a medium saucepan, melt the butter. Whisk in the cocoa powder, instant coffee, and water. Next, whisk in the sugar and remove from heat. Whisk in the egg, buttermilk, and vanilla. Then add the flour, baking soda, and salt. Whisk until just combined.

Divide the batter between the two prepared pans and bake at 350 degrees for 20 minutes. Cool completely on a wire rack set over a rimmed baking sheet. When cool, use a sharp knife to flatten both cakes. Remove the parchment paper.

(2) the chocolate buttercream:
1 stick (8 tablespoons) butter
2 cups powdered sugar
1/2 cup cocoa powder
1 teaspoon vanilla
1 tablespoon water or milk
dash salt

Using an electric mixer, beat all ingredients in a medium bowl until smooth and fluffy.

(3) the chocolate ganache:
6 ounces bittersweet chocolate, finely chopped
2/3 cup heavy cream
1 tablespoon honey

I used Ghirardelli bittersweet chocolate bars. They are 4 ounces each so you'll need 1 and a half bars if you use them. Place the chocolate in a small bowl, preferably something that will allow you to easily pour the ganache out of it and onto the cake. Heat the cream and honey in a small saucepan. Pour the hot cream over the chocolate and stir until the chocolate is all melted and the ganache is smooth. Allow it to see for 5 minutes to cool and thicken a bit.

assemble: 
Assemble the cake on the wire rack. Top one cake with the chocolate buttercream. Smooth the buttercream to create an even layer. Top that layer with the second cake cut side down (so that the top is smooth). Pour the ganache over the layered cake. Use a small spatula to smooth the ganache and fill in any exposed cake on the top or sides. Allow the cake to sit for about 15 minutes so that the ganache hardens a bit.
 
Press additional chocolate shavings (I used the remaining half of the Ghirardelli bar that I didn't put in the ganache) around the sides of the cake. Top with fresh flowers or berries.

Enjoy!

cake and basic assembly adapted from Martha Stewart
chocolate buttercream and chocolate ganache are my own recipe

Saturday, May 12, 2012

Chicken Curry

I love Indian curry dishes and Thai curry dishes. They are so flavorful and just plain delicious! For years I've been trying to make different types of curry meals at home that are similar to those I enjoy at Indian or various Asian restaurants. But I fail every time... they just never have the right flavor. I've tried countless curry powders and curry pastes in my sauces.

Some day I will succeed! Until then, I will cheat - hahaha! I've found a brand of Indian-style curry simmer sauces at our local market that I really enjoy. You may not be able to find the exact same brand in your area, but look for something similar. It will likely be in the isle that contains other ethnic ingredients (probably near Asian ingredients).


Chicken Curry
2 pounds chicken breast, cut into thin 1 inch pieces
2 bell peppers, cut into 1 inch pieces
5 large carrots, cut into thin 1 inch pieces
1 onion (I used Vidalia), roughly chopped
2 tablespoons olive oil
3 jars Kashmiri Curry sauce
2 cups water
salt & pepper
2 cups cooked rice
1/4 cup green onions, minced (green part only)

First off let me tell you that I made a very large batch of this chicken curry to feed myself and the four men in my house. You could always do half of this recipe if you don't have teenage boys in your house.

In a small saucepan, boil the carrots in 2 cups of water. Drizzle the olive oil in a large stockpot and add the chicken, peppers, and onion. Season with salt & pepper. Cover and cook until the chicken is opaque and the vegetables are beginning to soften. Add the carrots and the sauce (I use the water from the carrots to rinse the jars of sauce and add to the pot to get as much flavor as possible). Cover and simmer on low for about 15 to 20 minutes. Remove the lid and simmer about 5 more minutes to thicken the sauce slightly.

Serve with rice and flatbread. Garnish with green onion.

My favorite sauce so far in this line is the Tikki Masala simmer sauce. If you can find a Tikki Masala in your market, try it out in place of the Kashmiri Curry sauce I used in this recipe.

Enjoy!!!

Friday, May 11, 2012

Pomegranate Margaritas

Mark made these yummy margaritas recently. It was Cinco de Mayo and a sunny day with a temperature of about 90 degrees --- perfect for this cold drink.

Pomegranate Margaritas
1 3/4 cups pomegranate juice
margarita salt
1 1/2 cups tequila
1 cup grand mariner
2/3 cup lime juice
ice cubes
lime wedges

Dip the rim of a margarita glass in some pomegranate juice poured on a saucer (or run a lime wedge around the rim), then dip the glass in the salt.

In a pitcher, stir the pomegranate juice, tequila, grand mariner, and lime juice together. Pour some of the margarita into the prepared glass and garnish with a lime wedge.

Enjoy!

recipe slightly adapted from Food & Wine Magazine, November 2005

Thursday, May 10, 2012

A Cute Owl Birthday Cake

My friend Emily had a birthday this week (actually Emily is Katie's roommate), but I can still count her as my friend too, right?!. I mean, we are friends on Facebook and everything. haha... Because I live half-way across the country now from her, I wasn't able to make her a birthday cake this year. Boohoo... So I'll share with you the cake I made for her last year. Her cake from two years ago was already posted (it was a sunflower with bumble bees two years ago - click here if you missed that post).


It was a white cake with lemon filling and buttercream frosting. Covered with marshmallow fondant. The owl, tree, and flowers are also marshmallow fondant. This was such a fun cake to make. I'm very thankful that her mom, Abby, asked me to make it. Love these little owls and these girls in the photo below.

Happy Birthday Emily!!!
That's Emily on the left.
This photo was taken when we were in Napa recently to celebrate Katie's 21st birthday.
Katie is on the right and Elise (also Katie's roommate - and my friend too) is in the middle.