Pages

Thursday, February 21, 2013

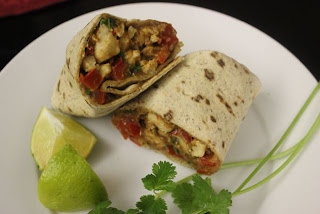
Chicken Satay Wrap

It's not often that I repeat meals in our house. I'm always experimenting and trying new recipes. I'm very fortunate to have a family that willingly tries all of my creations and they all share their honest opinions. We've also always had a deal that if an experimental dinner is just disgusting, we throw it away and get some yummy take-out. Having a back-up plan makes everyone a little more excited to try something new. We've only had to use the back-up plan and get take-out a few times. There are a handful of meals I've made over and over again just because they are so delicious (chicken laksa is one that the kids request often) and this chicken satay wrap gets repeated because it's one of MY favorites....

Chicken Satay Wrap
2 boneless, skinless chicken breasts, cut into 1 to 2 inch pieces
1 large red bell pepper, cut into 1 inch strips
2 tablespoons fresh ginger, minced
3 cloves garlic, minced
1 teaspoon red pepper flakes
1/2 cup cilantro
3 tablespoons smooth peanut butter
2 tablespoons lime juice
2 tablespoons soy sauce
3 tablespoon sesame oil
flatbread or large tortilla (I like to use flat-out brand)


Heat 2 tablespoons of the sesame oil in a large skillet over medium heat. Add the chicken breast pieces and cook until browned on both sides (5 to 10 minutes). Add peppers, garlic, ginger, and red pepper flakes to the skillet. Cook, stirring often, for 6 or 7 minutes or until peppers are softened and chicken is cooked through. 

Meanwhile, in a small bowl, whisk together cilantro, peanut butter, lime juice, soy sauce, and remaining 1 tablespoon sesame oil. Stir most of the mixture into the chicken and peppers. Reserve a small amount to spread on the flatbreads. Fill a flatbread with a about a cup of the chicken/pepper mixture and wrap tightly. Slice the wrap in half and serve with a lime and some cilantro as garnish.

Enjoy!

Sunday, February 17, 2013

Gluten-Free Almond Bars


Oh my gosh!  I can hardly explain how much I love these Gluten-Free Almond Bars. Seriously. These cookie bars are like two of my favorite things joined together to make one absolutely amazing dessert. Brownies and bear claws... these almond bars have the texture of a brownie (without the chocolate) and the flavor of a bear claw. Perfect.


Gluten-Free Almond Bars
1/2 cup almond paste (5 ounces)*
1/2 teaspoon salt
3/4 cup sugar
2 sticks butter (1 cup), softened
1 egg, separated
1 teaspoon almond extract
1/2 cup almond flour
3/4 cup sweet sorgum flour
1/2 cup sliced almonds

*You can find almond paste in the baking aisle at your local market. Don't buy marzipan. Look for almond paste.

Preheat your oven to 350 degrees. Line a square baking pan with foil leaving foil that overhangs. Spray the foil with non-stick cooking spray.

Pulse the almond paste in a food processor. Add the salt and 1/4 cup of the sugar and pulse until blended with the almond paste and finely ground. 

In a large bowl, using an electric mixer, beat together the butter and the remaining 1/2 cup sugar. Add the almond mixture, egg yolk, and almond extract and beat well to blend. Add the flours and mix until combined. Spread the mixture evenly in the prepared pan. Brush the egg white over the top and sprinkle with the sliced almonds.

Bake for 35 to 40 minutes. Cool the bars in the pan for at least an hour until completely cooled. Then cut into small squares with a sharp knife. These bars need some time to set after baking so don't try to cut them too soon.


Enjoy!!

Saturday, February 16, 2013

Meatloaf with Red Wine Glaze

I guess meatloaf is one of those "comfort foods" for most people. One of those things you remember eating as a kid, one of those things your mom used to make, a classic... For me, meatloaf never really fell into that category. I would never have picked it as one of my favorites. Honestly, I never ever liked meatloaf as a kid. My mom would make it occasionally, but I just never really liked it. (Sorry, Mom. EVERYTHING else you made was the BEST... meatloaf just wasn't one I liked.) As an adult, I've come to really enjoy a warm and delicious meatloaf - but never the traditional kind with the ketchup or tomato sauce mixture slathered on the top. I prefer mine with a nice gravy and some potatoes on the side. (I'll have to give my mom's meatloaf another try.) This meatloaf recipe here is fantastic - moist, full of luscious flavor, and perfect with a red wine reduction sauce. Everyone at my house loved it!


Meatloaf with Red Wine Glaze
2 slices sandwich bread, torn into pieces
1/2 cup milk
1 egg
1 egg yolk
2 tablespoons italian parsley, coarsely chopped
1 1/2 teaspoons sage, chopped
1 teaspoon thyme, chopped
1 tablespoon salt
pinch black pepper
pinch nutmeg
pinch cayenne pepper
3/4 cup grated Parmesan cheese
1/4 cup bread crumbs (Italian seasoned if you have it)
2 tablespoons butter
1 medium onion, finely diced
4 garlic cloves, minced
1 pound ground lamb*
1/2 pound ground pork*
1/2 pound ground veal*
vegetable oil
1 1/4 cups dry red wine (I used a cabernet)
1/4 cup sugar
1 tomato, finely chopped
1 teaspoon molasses
pinch allspice

*You can use a different combination of the meat if you like, depending on what's available at your local market. I used half lamb and half pork.

Preheat your oven to 350 degrees. In a large bowl, combine the bread pieces with the milk, the whole egg, egg yolk, chopped parsley, sage, thyme, salt, black pepper, nutmeg and cayenne. Mash to a thick, smooth paste. Add the Parmesan cheese and bread crumbs and stir until thoroughly combined.

In a medium skillet, melt the butter. Add the onion and cook over medium-low heat until softened (about 10 minutes). Add the garlic and cook just until fragrant, 1 minute longer. Let cool, then transfer to the bowl. Add the lamb, pork and veal and knead until evenly combined.

Brush a medium oval baking dish with oil. Transfer the meat loaf mixture to the dish and pat it into a 4-by-12-inch oval loaf. Bake for about 50 minutes, or until firm but not quite cooked through.

Meanwhile, in a medium saucepan, combine the red wine with the sugar, chopped tomato, molasses and allspice and bring to a boil over moderate heat, stirring to dissolve the sugar. Boil until the glaze is thick and syrupy, about 15 minutes.

Brush half of the glaze over the meat loaf. Continue baking for about 20 minutes longer, until an instant-read thermometer inserted in the center registers 150 degrees. Brush the meatloaf once more with the remaining glaze during baking. Let the meat loaf rest for 15 minutes. 

Serve thick slices with mashed red potatoes.


This may be come one of your favorite "comfort foods" perfect for a white winter day...

recipe from FoodandWine.com

Friday, February 15, 2013

Homemade Hostess Cupcakes

I made these cupcakes a while back and they've been sitting in the queue waiting to be shared. I decided it was time because they are so luscious, they need to be shared! Hostess was in the news a few months ago and everyone was stocking up on their products in fear that they would soon be completely unavailable. If you are one of those people that loves the cream filled Hostess cupcake with their chocolate glaze and signature swirl on top, then have no fear! You can create these cupcakes even if every store in the world runs out.


Homemade Hostess Cupcakes
for the cupcake
1 3/4 cups plus 2 tablespoons cake flour
1 cup cocoa powder
1 1/2 teaspoons baking powder
3/4 teaspoon baking soda
1/2 teaspoon salt
6 eggs at room temperature, separated
1 cup vegetable oil (I used canola oil)
1 1/2 cups plus 6 tablespoons sugar, divided
6 tablespoons water

for the filling
2 cups marshmallow creme
1/2 cup (1 stick) butter, at room temperature
3/4 cup powdered sugar
pinch salt
1/2 teaspoon cream or milk

for the chocolate glaze
5 ounces (about 1 cup) chopped bittersweet or semi-sweet chocolate (chocolate chips work too)
1/2 cup plus 2 tablespoons heavy cream

make the cupcakes...
Preheat your oven to 350 degrees. Line two cupcake or muffin pans with 24 cupcake papers.

In a medium bowl, whisk together the cake flour, cocoa powder, baking powder, baking soda, and salt. In a separate large bowl, whisk together the egg yolks, oil, 1 1/2 cups of the sugar, and water until smooth. Whisk the dry ingredients into the egg mixture until just blended.

In a medium bowl, use an electric mixer to whip the egg whites until foamy. Continue beating and gradually add the 6 tablespoons of sugar until stiff, glossy peaks form. Add about a quarter of the egg whites to the bowl with the chocolate batter and fold it in to lighten the chocolate. Carefully fold in the remaining egg whites into the chocolate mixture until the batter is smooth and not white streaks remain.

Divide the batter among the prepared cupcake liners (fill each one about 3/4 full). Bake about 18 minutes. Cool cupcakes on a wire rack.

make the filling...
Combine the marshmallow creme and butter in a medium bowl and use an electric mixer to beat until smooth. Mix in the powdered sugar and salt, whipping until the mixture is light and fluffy. Transfer all but about 1/3 cup of the mixture to a pastry bag fitted with a medium tip.  Blend in the cream to the reserved filling. This is what you'll use to create the swirl on top of each cupcake. Transfer this mixture to another pastry bag fitted with a small round tip (or you can use a ziplock bag and snip a small corner off right before you are ready to pipe on the swirl). Chill until ready to use.


To fill the cupcakes, insert the medium tip into the center of the cupcake and squeeze a small amount of filling into the cupcake. Stop squeezing and pull the tip out of the cupcake. If you don't have a tip, you could cut a small amount of cake from the middle of each cupcake and add the filling with a small spoon.

make the chocolate glaze...
Place the chocolate in a small bowl. Bring the cream to a simmer in a small saucepan. Pour the hot cream over the chocolate and whisk until smooth. Let the chocolate glaze cool slightly (about 5 minutes). Working one at a time, dip the top of each cupcake into the chocolate glaze. Then turn it upright and set on a wire rack or plate until the glaze is set. When the glaze is set, use the second portion of the filling in the pastry bag with the small tip to pipe a swirl across the top of the cupcakes.

    
Enjoy!!

recipe slightly adapted from www.annies-eats.com

Thursday, February 14, 2013

Candied Pecans


Want a quick and delicious snack? You can make these sweet candied pecans in no time. You could easily substitute walnuts for the pecans or even create a mixture. I like to just pop them in my mouth and savor the sweetness or sprinkle them on a salad for a little extra glamour. 

Candied Pecans
1 cup pecan halves (or walnut halves)
1 egg white
3/4 cup brown sugar

Preheat your oven to 325 degrees.

In a medium bowl, whisk the egg white until it is foamy and no liquid remains (you can use an electric mixer if you don't need the arm work out). Fold in the pecans and the brown sugar. Mix until the pecans are evenly coated. 

Spread the coated nut mixture on a greased baking sheet. Bake for about 13 minutes or until coating is cooked and golden brown.

Enjoy!


Tuesday, February 12, 2013

Cream Cheese Filled Pumpkin Muffins

I know pumpkin is usually a flavor reserved for fall, but it's still cold where I live. So I decided it's perfectly acceptable to make these pumpkin muffins. Actually, it's perfectly acceptable for you to make them any time of year you choose! These muffins are similar to (not exactly the same as) the pumpkin cream cheese muffins you can get at Starbucks. These would go especially well with a nice spiced chai tea latte.


Cream Cheese Filled Pumpkin Muffins
for the cream cheese filling...
4 ounces cream cheese, softened
1/2 cup powdered sugar

for the muffins...
1 1/2 cups flour
1/2 teaspoon cinnamon
1/2 teaspoon nutmeg
1/2 teaspoon ground cloves
1 tablespoon pumpkin pie spice
1/2 teaspoon salt
1/2 teaspoon baking soda
2 eggs
1 cup sugar
1 cup pumpkin puree
2/3 cup vegetable oil (I used canola oil)

for the topping...
1/4 cup sugar
3 tablespoons flour
1 teaspoon cinnamon
2 tablespoons cold butter, but into pieces

First, combine the cream cheese and powdered sugar in a medium bowl until smooth. Flatten a piece of plastic wrap on your countertop about 10 or 12 inches long. Spoon the cream cheese mixture onto the plastic wrap. Use the plastic wrap to form the mixture into a log about 1 inch in diameter. Wrap the log in a layer of foil and place in the freezer for an hour or two. Remove cream cheese log from the freeze and slice into 12 equal pieces. (NOTE: If you are in a hurry, you can skip this step and drop a tablespoon of the cream cheese mixture onto the top of each muffin before adding the topping and baking.)

To make the topping, combine the sugar, flour, and cinnamon in a small bowl. Cut in the butter using two forks or a pastry blender. Mix until the mixture is course and crumbly.

Preheat your oven to 350 degrees. Prepare a 12-cup muffin pan with paper liners.

In a medium bowl, combine the flour, spices, salt, and baking soda and whisk to blend. In a large bowl, using an electric mixer, combine the eggs, sugar, pumpkin puree, and oil.  Slowly add the dry ingredients and mix until just blended. 

Divide the batter evenly among the 12 muffin cups, keeping about 1 cup aside. Top each with a slice of the cream cheese mixture. Divide the remaining 1 cup of batter among the muffins, covering the cream cheese mixture. Sprinkle the muffins with the topping and bake for 20 to 25 minutes. 

Cool muffins on a wire rack. Enjoy!!


recipe slightly adapted from www.annies-eats.com
Thursday, February 7, 2013

Glazed Donut Muffins

I stumbled on these yummy muffins through Pinterest (I think). The name alone gave me reason to try them out. I am trilled to report that they are absolutely delicious - a perfect, sweet breakfast treat. The flavor of the muffin reminds me of the buttermilk spice muffins at Mimi's Cafe. The glaze is luscious. These are perfect with a cup of tea or you favorite morning coffee.


Glazed Donut Muffins
for the muffins...
1/4 cup butter, at room temperature
1/4 cup vegetable oil (I used canola oil)
1/2 cup granulated sugar
1/3 cup brown sugar
2 eggs
1 1/2 teaspoons baking powder
1/4 teaspoon baking soda
3/4 teaspoon ground nutmeg
1 teaspoon cinnamon
3/4 teaspoon salt
1 teaspoon vanilla extract
2 2/3 cups flour
1 cup milk
for the glaze...
3 tablespoons butter, melted
1 cup powdered sugar
3/4 teaspoon vanilla
2 tablespoons hot water
make the muffins...
Preheat your oven to 425 degrees. Line 12 muffin cups with muffin liners.
In a large bowl, use an electric mixer to beat together the butter, oil, and sugars until smooth. Beat in the eggs. Add the baking powder, baking soda nutmeg, cinnamon, salt, and vanilla and mix until combined. Mix in the flour, alternating with the milk until just combined. Don't overmix it.
Use a large cookie scoop to fill the muffin cups, dividing the batter equally among the 12 prepared muffin cups. Bake 15 to 17 minutes or until puffed and lightly golden, rotating halfway through the baking time. 
Cool muffins on a wire rack. 
make the glaze...
In a medium bowl, mix together the melted butter, powdered sugar, vanilla, and water. Whisk together until smooth. Dip the top of each muffin into the glaze and allow excess to drip back into the bowl. Place the muffins on a plate or the wire rack and allow the glaze to harden. You can dip the muffins a second time if you want extra glaze.
Enjoy!


original recipe at sweetpeaskitchen.com

Saturday, February 2, 2013

Oatmeal Raisin Cookies


I seem to enjoy making desserts more than any other meal. Yes - I just declared dessert is a meal. I guess because it's my favorite meal. I also usually bake things that I like to eat - like cookies - and I'm always a little disappointed that they never seem to result in glowing reviews from my husband (usually from every else, but not him). We had a discussion about this recently and realized the problem - my favorites are usually something with chocolate (which are always a good addition to any cookie), but his favorite would be oatmeal raisin cookies. I LOATHE raisins. YUCK! BLEAHHHH! GROSS! There's really nothing I like about raisins and I NEVER think it's a good idea to put them in anything - especially dessert! I don't think I can put enough words on a page to express the amount of dislike I feel for raisins. But I love my husband way more than I dislike raisins. I am forever on a quest to make him smile, create a meal he enjoys, bake a dessert that he raves about, in general I just want to make his life awesome. The recipe I'm about to share is pure love from me to him - in the form of oatmeal raisin cookies. I think it might have just made his life a little bit more awesome.


Let me remind you that I am really really disgusted by raisins. So this is major - I really really really liked these oatmeal raisin cookies. I couldn't believe it. I usually can't stand the texture of raisins in my mouth, but these cookies have the perfect texture (even the raisins). If you are not a raisin fan, make these cookies anyway - make them for someone you love. It will make them smile.


Oatmeal Raisin Cookies
1 cup plus 1 teaspoon flour
1 tablespoon ground cinnamon1 1/2 teaspoons baking soda1 1/4 teaspoons salt9 tablespoons butter, at room temperature3/4 cup brown sugar5 1/2 tablespoons granulated sugar2 eggs2 vanilla beans, split lengthwise1 tablespoon vanilla extract2 cups old-fashioned oats1 cup raisins


Combine the flour, cinnamon, baking soda, and salt in a medium bowl. Set aside.

Place the raisins in a small bowl and cover them with hot water. Allow to sit for about 30 minutes. Drain water and place raisins on clean paper towels. Cover raisins with a paper towel and press to remove excess water.

In a large bowl, use an electric mixer to beat the butter. Add the sugar and beat until light and fluffy. Add the eggs and beat. Scrape the tiny seeds out of the vanilla bean into the bowl and add the vanilla extract and mix. Slowly add the flour mixture and mix until just combined. Stir in the oats and then the raisins.

Refrigerate the dough for about 30 minutes. Preheat your oven to 325 degrees. Cover a baking sheet with parchment paper or a silicon baking mat (such as silpat). Remove the dough from the refrigerator and allow to sit for a minute or two.

Use a large cookie scoop (about 3 or 4 tablespoons) to scoop even amounts of dough and place on the prepared baking sheet about 2 or 3 inches apart. Bake cookies for 17 minutes. Remove from oven and allow to cool on cookie sheet for a few minutes. Then transfer to a wire rack to cool completely. Repeat the process with remaining dough.

Enjoy!


----------------------------------------------------------------

Now, you can also make the very same recipe and substitute chocolate chips in place of the raisins. I did (in the picture below). I just had to try it (and I didn't think I was going to like the oatmeal raisin cookies one bit). I must be honest with you. The chocolate chip version isn't bad, but the original oatmeal raisin version is waaaaay better. The raisins must make the dough perfectly moist because the chocolate chip version ends up being a bit dry. Try the oatmeal raisin. They are delicious.


recipe slightly adapted from Annies-eats.com (original from Thomas Kellar)