Pages

Saturday, December 29, 2012

Coconut Macaroons

Need a quick cookie? These are so easy to make and so delicious! Crunchy coconut on the outside, moist and soft on the inside. Drizzling them with a little chocolate makes them just that much more decadent. These cookies made it to our Christmas cookie tray this season, but they are good any time of year (even in the summer).


Coconut Macaroons
1 (14-ounce) package sweetened shredded coconut
3 tablespoons sweetened condensed milk
pinch salt
1 teaspoon vanilla
4 large egg whites at room temperature
10 tablespoons granulated sugar
1 cup semisweet chocolate chips (optional)
1 tablespoon vegetable shortening (only if needed to thin the chocolate)

Preheat the oven to 325 degrees.

Combine the coconut with the sweetened condensed milk, salt and vanilla in a medium mixing bowl.

In the bowl of a stand mixer with a whisk attachment, beat the egg whites on medium speed until foamy. Gradually add the sugar and continue to whip the whites until stiff peaks form (about 6 to 7 minutes).

Gently fold the egg whites into the coconut mixture. Scoop tablespoon-sized mounds (I used my small cookie scoop) onto a parchment-lined baking sheet and bake for 20 to 25 minutes or until golden brown. Immediately transfer the parchment with the macaroons to a cooling rack. Cool completely before topping.

If desired, melt the chocolate chips either over a double boiler or in the microwave at half power in 30 second intervals. If the chocolate doesn't get thin enough to drizzle easily, add some vegetable shortening until you can drizzle the chocolate. Use a spoon or add you melted chocolate to a ziplock bag and cut a small hole in one corner, drizzle the cooled macaroons with the chocolate. Enjoy!

recipe slightly adapted from Alton Brown's Paradise Macaroons on foodnetwork.com

Monday, December 24, 2012

Merry Christmas

Wishing you a wonderful day! Enjoy this Christmas with family and friends... and some luscious treats.


Enjoy!

Saturday, December 22, 2012

Vanilla Marshmallows

If peppermint isn't your favorite flavor, try these vanilla marshmallows. The recipe is almost identical to the peppermind marshmallow recipe I posted recently. You can whip them up rather quickly and they will make your Christmas hot cocoa just a little bit more luscious. I bet Santa wouldn't complain if you left him a little on Christmas Eve with some cookies and hot cocoa.


Homemade Vanilla Marshmallows
1/2 cup powdered sugar
1/3 cup corn starch
2 envelopes unflavored gelatin
2/3 cup water
1 1/3 cups granulated sugar

2/3 cup light corn syrup
1/8 teaspoon salt
2 teaspoons vanilla extract
Into a small bowl, sift together the powdered sugar and cornstarch. Line a 13x9 pan with foil and coat with non-stick spray. Sift about 2 tablespoons of the sugar cornstarch mixture into the pan, tilting the pan to coat the sides. Leave any excess in the pan.

Place 2/3 cup of water in a large bowl (preferably the bowl of a stand mixer). Sprinkle with gelatin and let soften for about 5 minutes.

In a medium saucepan, heat sugar, corn syrup, and salt over medium heat until the sugar is melted and the temperature of the mixture reaches 240 degrees on a candy thermometer (about 7 minutes). Stir occasionally. Add the melted mixture to the bowl of the stand mixer in a slow steady stream with the mixer running on the lowest speed. Add the vanilla.

Then, switch to high speed and beat with the mixer until light and fluffy (about 10 to 15 minutes). Spread the mixture into the prepared pan and smooth top with a spatula. Dust the top with 2 tablespoons of the sugar cornstarch mixture. Let set at room temperature for at least 3 hours.

Lift the marshmallow from the pan using the foil. With a knife, cut into 1 inch pieces (you can also use a cookie cutter to cut shapes). Dip the knife or cookie cutters in some of the remaining cornstarch sugar mixture to prevent sticking.
Toss the cut marshmallows in the remaining cornstarch sugar mixture. Store covered at room temperature. Enjoy!!

Sunday, December 16, 2012

Homemade Peppermint Marshmallows

Christmas is quickly approaching. I love this time of year! I love all the yummy baked goods, fun flavors, and sweet Christmas treats. There are a few recipes that I make every year - this Peppermint Marshmallow recipe is one of them. Sometimes I send them off in packages to friends and family that don't live near by... and I always keep a few to enjoy with a little cup of hot cocoa. They are sweet, minty, and soft. The effort is worth it... they are much better than store-bought marshmallows.


Homemade Peppermint Marshmallows
1/2 cup powdered sugar
1/3 cup corn starch
2 envelopes unflavored gelatin
2/3 cup water
1 1/3 cups granulated sugar
2/3 cup light corn syrup
1/2 cup crushed candy canes
1/8 teaspoon salt

Into a small bowl, sift together the powdered sugar and cornstarch. Line a 13x9 pan with foil and coat with non-stick spray. Sift about 2 tablespoons of the sugar cornstarch mixture into the pan, tilting the pan to coat the sides. Leave any excess in the pan.

Place 2/3 cup of water in a large bowl (preferably the bowl of a stand mixer). Sprinkle with gelatin and let soften for about 5 minutes.

In a medium saucepan, heat sugar, corn syrup, candy cane pieces and salt over medium heat until the sugar and candy are melted (about 7 minutes). Stir occasionally. Add the melted mixture to the bowl of the stand mixer in a slow steady stream with the mixer running on the lowest speed.

Then, switch to high speed and beat with the mixer until light and fluffy (about 10 to 15 minutes). Spread the mixture into the prepared pan and smooth top with a spatula. Dust the top with 2 tablespoons of the sugar cornstarch mixture. Let set at room temperature for at least 3 hours.

Lift the marshmallow from the pan using the foil. With a knife, cut into 1 inch pieces (you can also use a cookie cutter to cut shapes). Dip the knife or cookie cutters in some of the remaining cornstarch sugar mixture to prevent sticking.

Toss the cut marshmallows in the remaining cornstarch sugar mixture. Store covered at room temperature.

Drop a few in a cup of hot cocoa or just pop them right in your mouth. Enjoy!

Thursday, December 13, 2012

Gluten-Free Cinnamon Rolls (take 2)

I tried my hand at gluten free cinnamon rolls earlier this year. Here's the recipe. They were yummy, but I wasn't completely satisfied... I always struggle with recipes that contain yeast - I can never get dough to rise enough. So this time I tried a "no-yeast" recipe. It was delicious. The texture was less like bread and more like a coffee cake texture. You should try it...


Gluten-Free Cinnamon Rolls (no yeast)
for the dough...
2 1/2 cups Pamela’s Baking  & Pancake Mix*, plus extra for the counter
2 tablespoons granulated sugar
1 1/4 teaspoons baking powder
1/2 teaspoon baking soda
1/2 teaspoon salt
1 1/4 cups buttermilk
2 tablespoons + 2 tablespoons butter, melted

for the cinnamon filling...
3/4 cup packed dark brown sugar
1/4 cup granulated sugar
4 teaspoons cinnamon
1/8 teaspoon salt
1 tablespoon + 2 tablespoons butter, melted 

for the frosting...
2 cups powdered sugar
1 tablespoon butter, melted
1 teaspoon vanilla
3 tablespoons milk or cream

*Pamela's Baking & Pancake Mix is a gluten-free/wheat-free mix that's widely available in many super markets in either the gluten-free section or baking aisle. It's also a delicious mix for pancakes and waffles (directions are on the bag).

make the cinnamon filling...
Melt the 1 tablespoon of butter in a medium bowl and stir in the sugars, cinnamon, and salt. Set aside.

make the dough...
In a large bowl, combine the Pamela's mix, sugar, baking powder, baking soda, and salt. In a small bowl, whisk 2 tablespoons of the melted butter with the buttermilk. Add the milk mixture to the dry ingredients and stir with a wooden spoon until combined. The dough will be quite sticky.

Flour a smooth, flat work surface very generously with some additional Pamela's mix. Turn the dough onto the work surface and gently pat the dough into a rectangle about 12 inches long and 8 inches wide.

Melt the remaining 2 tablespoons of butter from the filling ingredients in a small bowl. Brush the melted butter onto the rectangle of dough. Sprinkle the cinnamon mixture over the top, leaving 1/2 inch around the edges. Carefully begin rolling the dough into a log (be gentle with this step - the dough should hold together but it will be soft). Refrigerate the dough for 30 minutes (if you don't have time for this, you can skip it - it just makes it easier to cut).

Slice the log of dough into about 10 pieces. Place the cut rolls into a greased pie pan. Brush the top of the rolls with the remaining 2 tablespoons of melted butter from the dough ingredients. Bake at 425 degrees for 20 minutes or until golden brown.

make the frosting...
Melt the butter in a medium bowl. Stir in the powdered sugar, vanilla, and milk or cream until smooth.

Remove rolls from the oven and allow to cool for a few minutes. Spread frosting over the warm rolls. Enjoy!


Tuesday, December 11, 2012

Gift Suggestion: Birchbox Home

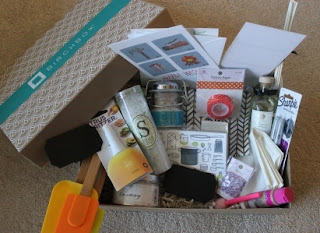
I have to share this wonderful gift idea... if you're looking for a great gift for someone that loves trying new things in the kitchen, the Birchbox Home box is a great idea. If you haven't heard of Birchbox yet - go check it out at www.birchbox.com. A typical Birchbox subscription provides you with monthly samples tailored to the things you like - it's a great way to try new beauty products (which are also available for purchase in full-size versions on their website). But the company recently came out with this super cool Birchbox Home edition. I signed up to buy one for myself right away... I was so excited!

 It comes to your door in this pretty box. Seriously - I've never seen a plain cardboard box look so cute.

 It's filled with fun cards that explain exactly what's in the box and suggests uses for each one, directions for the cool do-it-yourself napkin designs included, recipes, trendy holiday cards... I love that they don't just send you "stuff," but they tell you how to use it. (they always do this with the sample beauty products they send in subscriptions each month)

Check out all the amazing things in this box! Cards, supplies for a fun DIY project, cute cocktail napkins, truffle sea salt, sugar sprinkles, rosemary from Dean& Deluca, recipe cards (with some recipes included), a citrus spitzer, and mini chalkboard placecards.

Buy for yourself or a friend - I hope you'll enjoy it as much as I did.

Monday, December 10, 2012

Gingerbread Cookies

Back up and running now! Thanks so much for your patience. Hopefully you'll enjoy all of the recipes I'll be sharing again. The holiday season is the best time for all things luscious!

And what better way to start my sharing of holiday recipes, than with gingerbread cookies?! These gingerbread cookies are my all-time favorite cookie. I could seriously eat the whole batch myself! The rest of my family prefers the traditional frosted sugar cookie (which I will also share soon), but I always choose these gingerbread cookies over sugar cookies. Gingerbread just screams "CHRISTMAS" to me! It's warm and cozy and perfect with a cup of tea in front of the fireplace with Christmas music playing in the background. You'll definitely want to add these to your Christmas baking list...

Gingerbread Cookies
3 cups all-purpose flour
2 teaspoons groung ginger
1 teaspoon baking soda
1 teaspoon ground cinnamon
1/2 teaspoon salt
1/4 teaspoon ground cloves
2/3 cup butter
3/4 cup packed brown sugar
1/2 cup molasses
1 egg

In a bowl, stir together the flour, ginger, baking soda, cinnamon, salt, and cloves. Set aside.

In a mixing bowl, beat butter with an electric mixer. Add the brown sugar and molasses; beat until combined. Add the egg and beat well. Add flour mixture and beat at low speed until just combined. Divide dough in half. Cover and chill the dough for 3 hours or until easy to handle.

On a well-floured surface, roll half of the dough at a time to 1/4 inch thickness. Cut into desired shapes (the picture above shows a classic gingerbread man and gingerbread girl with a tree... but i've also done candy canes, snowflakes... choose whatever shape you like). Place on a lightly greased cookie sheet.

Bake at 375 degrees for approximately 7 minutes or until edges are very lightly browned. Do not overbake these cookies or they won't keep their soft and chewy texture.

Enjoy!!! Enjoy these cookies and the entire holiday season!