Pages

Saturday, September 29, 2012

Gluten-Free Coffee Cake

You may remember that my friends, the Santamauras, sent me a great little cookbook not long ago - A Jambalaya Jubilee (from the United Federation of Doll Clubs convention). The first recipe I tried from there was the Queen Elizabeth Cake and it was such a delicious success, I was dying to try another recipe. This time I chose the coffee cake and because Katie was in town, I tried a gluten-free version. It was just as wonderful as the Queen Elizabeth Cake. It's rather simple to throw together. It was a perfectly cool, rainy morning... so coffee and this cinnamon coffee cake was a great way to start the day.
Gluten-Free Coffee Cake
1 cup white rice flour*
1 cup oat flour*
1/2 cup tapioca flour*
3/4 cup granulated sugar
1 cup light brown sugar
1/2 teaspoon salt
1 teaspoon ground nutmeg
3/4 cup canola oil
1 cup buttermilk**
1 egg, beaten
1 teaspoon xanthan gum*
1 teaspoon baking soda
1 teaspoon baking powder
2 teaspoons cinnamon

*If you don't want to make this gluten-free, just eliminate the three types of flours and the xanthan gum and use 2 1/2 cups all-purpose flour.

**I didn't have buttermilk on hand, so I used 3/4 cup plain Greek yogurt and 1/4 cup milk. Big thanks to Joy the Baker for sharing the substitution. You could also use 1 cup of milk mixed with a teaspoon of vinegar.

In a large bowl, mix together flours, sugars, salt and nutmeg. Add canola oil and mix by hand until combined and brubly. Set aside 1 cup for topping. Add buttermilk, egg, xanthan gum, baking soda and baking powder to remaining mixture. (I actually added a couple teaspoons of cinnamon to the batter because I love cinnamon, but the recipe did not call for it.) Mix by hand until blended; batter will be slightly lumpy. Pour batter into greased 8x11-inch pan. Add cinnamon to the reserved topping mix and sprinkle over batter. Bake at 350 degrees for 30 minutes.

Enjoy!!
recipe adapted from Carol Jean Hazeltine in "A Jambalaya Jubilee" 63rd Annual Convention, The United Federation of Doll Clubs

Sunday, September 23, 2012

Gingerbread Krispie Squares

I don't remember my mom ever making the traditional rice krispie treats with the marshmallow. She made her own version with peanut butter, corn syrup, and topped with chocolate. They were quite delicious... I decided to make something similar - this is her recipe with some of my own substitutions (based on consulting with her on the phone as I often do). It's a hit! Try these soon. They are perfect for fall and rather simple to make.


Gingerbread Krispie Squares
1/2 cup sugar
1/2 cup light corn syrup
1/2 cup cookie butter* (or peanut butter)
3 cups rice krispies
1/2 cup white chocolate chips (or semi-sweet chocolate chips)
1/2 cup cinnamon chips (or butterscotch chips)

Line an 8 by 8 inch square pan with foil or parchment paper leaving some overhang. Spray with non-stick cooking spray. Place the rice krispies in a large bowl. Melt the sugar, corn syrup, and cookie butter in a small saucepan over medium heat until smooth. Pour the cookie butter mixture over the rice krispies and use a spatula or large spoon to mix gently. Pour the rice krispie mixture into the prepared pan and press evenly.

Melt the white chocolate chips and cinnamon chips (or chocolate & butterscotch chips) either using a double boiler or melting at 30 second intervals in the microwave on 50% power. Spread the melted chocolate over the rice krispie mixture that you've pressed into the pan.

Optional: melt a handful of white chocolate chips, place in a small ziplock bag, snip a small hole in one corner, and drizzle over the smoothed chocolate covered rice krispie mixture.

Allow to harden for an hour or so. Lift the sqaures out of the pan using the foil or parchment overhang. Place on a large cutting board and use a sharp knife to cut into squares (or triangles).


You can try any combination of chocolate chips and peanut butter, or cookie butter, or almond butter.... Please let me know what other delicious combinations you like. Enjoy!


*cookie butter is available at Trader Joe's stores.

Thursday, September 20, 2012

Jicama and Pomegranate Salad

The Sprouted Kitchen cookbook that I bought last week is still sitting on my kitchen counter. I am loving the simple and wholesome recipes. I had to share this salad because it is so pretty. It's quite simple and still delicous. The creme fraiche makes the dressing a little decadent and luscious. The Sprouted Kitchen cookbook calls this "the house salad," but I'm going to call it the Jicama and Pomegranate Salad. Don't you just love the color?!

Jicama and Pomegranate Salad
4 cups arugula/spinach (or 1 head butter or bibb lettuce)
1 small jicama, peeled and cut into 1/4-inch matchsticks
1/3 cup pomegranate seeds
1 cup Asiago or Parmesan cheese, shaved

for the dressing...
2 1/2 tablespoons creme fraiche
2 tablespoons extra virgin olive oil
1 teaspoon honey
1 scallion, white part only, finely chopped
2 tablespoons apple cider vinegar
1/2 teaspoon salt
1/2 teaspoon pepper

Whisk all dressing ingredients together. Taste and add additional salt, pepper, or vinegar as needed to your liking.

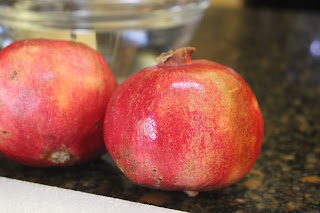
Now, if you're lucky and you have a Trader Joe's in your neighborhood (one of the things I miss in Southern California - no TJs in Oklahoma), you can likely pick up a container of ready-to-eat pomegranate seeds in the produce section. If you can't find just the seeds at your local market (like me), you'll just need to buy a whole pomegranate.

A big thanks to the gentleman stocking produce at my local Sprouts market. He suggested the method below for removing the seeds from the pomegranate. TIP: Don't be afraid to ask the store personnel in the produce section a question about what you're looking for or how to cut it, store it, etc. They may not always have the answer, but I've found that they often can share a very useful tip or two.

Seeding a pomegranate:
Fill a medium bowl with cold water. Cut the pomegranate in half. Carefully pull some of the flesh away from the seeds while holding the pomegranate over the bowl of water. Do your best to get the seeds into the water and discard the skin and flesh around the seeds. You will soon notice in your bowl of water that the seeds sink to the bottom and any small flesh or skin pieces will float to the top.
   
Use a spoon to remove all of the flesh and skin floating on the top of the water. Then drain the seeds in a fine strainer. Voila! Pomegranate seeds ready for your salad (or just for snacking).

You can now prepare the salad. Toss the arugula/spinach and jicama with the dressing to coat all of the leaves. Divide the salad among four plates. Top with the shaved cheese and sprinkle with pomegranate seeds. Enjoy!


recipe from The Sprouted Kitchen cookbook by Sara Forte

Tuesday, September 18, 2012

Gluten-Free Zucchini Muffins

I've been trying to bake something each week for Mark and I to enjoy for breakfast. It has to be simple, quick, and travel easily to work because our normal routine is to stop at Starbucks for a drink and then eat something with our drinks when we get to the office. The cookbook I dove into recently had something that sounded perfect, "zucchini bread bites." Not too sweet, kind of healthy because of the zucchini, easy to transport to work, and gluten-free... I tried the recipe exactly as desribed, but I failed. The pretty picture in the book really did look like small bites of zucchini bread sprinkled with course sugar. My version just looked like mis-formed cookies. So I just changed the cooking method slightly and made zucchini muffins! Both the "cookies" and the muffins taste delicious so you really could use the recipe for either. Enjoy them for breakfast or a snack anytime.


Zucchini Muffins (or cookies)
1 egg
1/2 teaspoon vanilla extract
3 tablespoons extra virgin olive oil
1/2 cup maple syrup
3/4 cup quinoa flakes
3/4 cup oat flour
1/2 teaspoon baking soda
1/4 teaspoon baking powder
2 tablespoons cocoa powder
1/2 teaspoon ground cinnamon
1/2 teaspoon salt
1/4 cup turbinado sugar (sugar in the raw) plus more for sprinkling
3/4 cup finely grated zucchini
1/2 cup chopped pecans (or walnuts)

In a bowl, whisk together the egg, vanilla, olive oil and maple syrup. In a separate bowl, combine the quinoa flakes, oat flour, baking soda, baking powder, cocoa powder, cinnamon, salt, and sugar.

Place the grated zucchini in a large paper towel and squeeze the excess water from the zucchini. Add the zucchini to the egg mixture and stir to combine. Stir the dry ingredients into the wet zucchini mixture. Stir in the pecans (or walnuts). The batter will be more like a muffin or cake batter than like a cookie dough. Cover and refrigerate 30 minutes.

If you are making the cookie version, line a baking sheet with a piece of parchment paper. Drop tablespoons full of batter onto the prepared baking sheet about 2 inches apart. Sprinkle with extra turbinado sugar. Bake at 375 degrees for 12 minutes.

If you are making muffins, line a muffin pan with paper liners. Fill each cup about 3/4 full with batter. Sprinkle tops with extra turbinado sugar. Bake at 375 for 18 minutes. (The batter should yield about 12 muffins or 24 cookies.)

Enjoy!

recipe slightly adapted from The Sprouted Kitchen cookbook by Sara Forte

Monday, September 17, 2012

Greek Grilled Chicken with Tzatziki

Here's the second recipe I tried from the Sprouted Kitchen cookbook. Greek Grilled Chicken with Tzatziki is delicious, just like the Papaya and Quinoa Salad from this cookbook. Try it now before the weather gets too cold. It's perfect for the last days of summer. I love it that this cookbook is full of recipes that are healthy, made from fresh foods, and taste fantastic.


Greek Grilled Chicken with Tzatziki
for the marinade...
1 cup Greek yogurt
grated zest and juice of 1 lemon (the cookbook calls for Meyer lemon, but I just used a regular lemon)
2 teaspoons ground cumin
2 tablespoons coarsely chopped fresh mint leaves
2 tablespoons coursely chopped fresh dill
1 teaspoon dried oregano
1 teaspoon salt
1 teaspoon pepper

4 boneless, skinless chicken breasts

for the tzatziki...
1 cucumber, peeled, seeds removed, and diced
1 tablespoon red onion, finely chopped
2 tablespoons fresh mint leaves, chopped
2 tablespoons fresh dill, chopped
1 garlic clove, minced
2/3 cup Greek yogurt
3 tablespoons freshly squeezed lemon juice
salt and pepper to taste

Prepare the marinade by mixing all ingredients together in a shallow baking dish. Add chicken breasts and turn to get them completely coated with the marinade. Let the chicken marinate at room temperature for 15 to 30 minutes.

Meanwhile, make the Tzatziki. Mix all tzatziki ingredients in a medium bowl. Taste and adjust seasonings as necessary to your liking.

Heat grill to medium-high heat and grill the chicken for about 10 minutes (5 minutes on each side), or until the chicken is completely cooked through. Remove from grill and let rest for 5 minutes before serving. Serve the chicken with the tzatziki and some pita bread, extra cucumbers, and feta cheese for sprinkling on top. Enjoy!


recipe slightly adapted from The Sprouted Kitchen cookbook by Sara Forte

Sunday, September 16, 2012

Papaya and Quinoa Salad

Just a few days ago, Mark and I stopped at the mall. Of course, I was sucked in to Williams-Sonoma (one of my favorite stores). I wish I could buy everything in the store - it's a kitchen dweller's dream. They always have something cooking that smells delicious and a seasonal sample. Fall is in the air, and at Williams-Sonoma in full force. I left with a pumpkin ice cream starter mix that I cannot wait to try (more on that in a future post). For now I'm going to share this delicious and healthy Papaya and Quinoa Salad from the great new cookbook we also found while at Williams-Sonoma.


If you read this blog often, you probably think all we ever do is eat dessert. While it is true that dessert is probably my favorite part of any meal (and I think it's completely appropriate to have dessert at every meal - even breakfast), we actually do eat savory and healthy food in our house quite often. I am very excited about trying the many fresh and healthy recipes in this new cookbook, The Sprouted Kitchen. First up - Papaya and Quinoa Salad with Mexican Caesar Dressing. More delicious recipes to come...


Papaya and Quinoa Salad with Mexican Caesar Dressing
for the dressing...
juice of 1/2 lemon (The Sprouted Kitchen calls for Meyer lemon, but I just had a normal lemon)
1 tablespoon red wine vinegar
1 teaspoon honey
2 cloves garlic
1/3 cup grated Parmesan cheese
1 teaspoon ancho chile powder
2 teaspoons Worcestershire sauce
handful of fresh cilantro leaves
1/3 cup extra-vigrin olive oil
salt to taste

for the salad...
1/4 of a large papaya, diced
1 head romaine lettuce, chopped
1/4 cup red onion, thinly sliced
1/3 cup roasted and salted pepitas
1/2 cup cooked and cooled quinoa (I used rainbow quinoa. The Sprouted Kitchen calls for red quinoa, but rainbow was much cheaper at my market, so I went with rainbow and it worked just fine.)


While you're cooking the quinoa, dice the papaya... Start by cutting the papaya in half lengthwise.  Scoop out and discard all those little black seeds and the stringy flesh around them.
 Then, slice long strips. Cut smaller sections across that strip, but don't cut all the way through the skin.
 Run your sharp knife along the bottom of the strip to remove the chunks from the skin.
 Collect the diced papaya in a bowl for the salad (or just for snacking).

To make the dressing, combine all ingredients except the olive oil in your food processor or blender and pulse to combine. Add the oil in a steady stream while continuing to pulse. Season to taste with salt. I just used the magic bullet (great as-seen-on-tv purchase). For a small amount like this, it's much simpler and way less clean-up. Just toss all of the ingredients, including the oil, into the cup, twist on the bladed lid, press down into the magic bullet base for a few seconds, and done!


Add lettuce, papaya, onions, and quinoa to a large bowl and toss to combine. Add about four spoonfuls of the dressing and toss to coat everything. Taste and add more dressing if you like. Divide the salad into two bowls and sprinkle with pepitas. Enjoy!


This made two meal-sized portions for Mark and me, but you could divide in four and use as an appetizer salad.

recipe from The Sprouted Kitchen cookbook by Sara Forte

Thursday, September 13, 2012

Chocolate Chip Cookie Dough Cheesecake Bars

You must get into the kitchen right now and make these. Seriously. I think I ate at least half of this whole pan of chocolate chip cookie dough cheesecake bars myself. That's how good they are. Two of my favorite things, cookie dough and cheesecake, combined together - amazing. And the cookie dough doesn't have any raw egg in it so no need to worry about salmonella. Of course, I never really worried about salmonella.... oops. As a kid (and even now) my favorite part of baking anything was tasting the raw dough or batter - especially chocolate chip cookie dough.


Chocolate Chip Cookie Dough Cheesecake Bars
for the crust...
1 1/2 cups graham cracker crumbs
5 tablespoons butter, melted

for the cookie dough...
5 tablespoons butter, at room temperature
1/3 cup brown sugar
3 tablespoons sugar
1/4 teaspoon salt
1 teaspoon vanilla
3/4 cup flour
2/3 cup chocolate chips

for the cheesecake layer...
10 ounces cream cheese, at room temperature
1/4 cup sugar
1 egg
1 teaspoon vanilla

Line an 8" square pan with parchment paper or foil, allowing some overhang. Spray it with non-stick cooking spray.

make the crust...
Mix the melted butter and graham cracker crumbs in a medium bowl. Press the mixture into the bottom of your prepared pan. Bake for 6 minutes at 325 degrees. Remove from oven and cool while you prepare the remaining ingredients.

make the cookie dough topping...
In a large bowl, use an electric mixer to beat butter, sugars, salt, and vanilla until smooth. Mix in the flour at low speed until just incorporated. Stir in the chocolate chips. Set the mixture aside.

make the cheesecake batter...
In a large bowl, use an electric mixer to cream the cream cheese and sugar until smooth. Mix in the egg and vanilla on low speed until just incorporated.

Pour the cheesecake batter into the prepared crust. Use your hands to carefully flatten tablespoon-sized pieces of the cookie dough and carefully place on top of the cheesecake batter until the batter is mostly covered. Bake for 30 minutes at 375 degrees. Remove from oven and cool completely. Refrigerate for a few hours.

When chilled, carefully lift the bars out of the pan using the parchment paper or foil overhang. Place on a large cutting board and use a sharp knife to cut into squares, wiping the knife off with the wet cloth between cuts.

Enjoy!

inspired by pinterest.com

Wednesday, September 12, 2012

Smores Fudge

I guess summer is just about over. I think I'm in denial. I know everyone is back to school, football season has started, blah, blah, blah... but honestly temperatures are still in the 90s every day at my house and the sun is shining and I'm still wearing white (after Labor Day- Ha!). Don't get me wrong, I LOVE football season... USC football, Penn State football, Steelers football. But since it still feels like summer in Oklahoma, I'll share this little tribute to one of my favorite summer desserts - with a twist.


I love smores in the summer. I probably at my first smore before I could walk, made on the fire pit in our backyard or at one of my uncle's campsites. Half of the time we wouldn't even bother with the graham crackers and chocolate, we'd just eat the perfectly toasted marshmallows. I remember how hard it was to be patient as a kid waiting for the hot embers to be perfect for marshmallow toasting. The trick is to hold the marshmallow over the hot ember (not directly in the flame or it will catch on fire) and turn it to carefully and evenly toast it to a nice warm brown color without burning it. Oh how I wish I had a fire going in my backyard right now so I could toast some marshmallows. Or I could just make some of this smores fudge - no fire required.


Smores Fudge
1/2 cup (3 oz) dark chocolate chopped or semi-sweet chocolate chips
1/2 cup (3 oz) milk chocolate chips
1 (7oz) jar marshmallow creme
2 teaspoons vanilla
2 cups packed brown sugar
1 (14 oz) can sweetened condensed milk
3/4 cup heavy cream
6 tablespoons butter
1/4 teaspoon salt
6 graham crackers, chopped
1 cup mini marshmallows
Line an 11 by 7 inch metal pan with foil so that the foil overlaps the sides. Spray with cooking spray. 

Combine the chocolate, marshmallow creme, and vanilla in a large bowl. In a large sauce pan or pot heat the brown sugar, sweetened condensed milk, cream, butter, and salt over medium heat. Stir until sugar dissolves. Increase heat to high and bring mixture to a boil. Once boiling, reduce to medium, insert a candy thermometer, and stir constantly until the mixture reaches 230 degrees. 

Immediately pour the hot mixture into the large bowl containing the chocolate, marshmallow, vanilla mixture. Stir quickly to melt the chocolate and combine all of the ingredients. The fudge will start to thicken. Carefully fold in the chopped graham crackers. Pour the fudge into the prepared pan and smooth with a spoon or spatula. Sprinkle mini marshmallows and graham cracker crumbs (left over from chopping the graham crackers) on top.
 

Set your oven to BROIL. Place the pan of fudge under the broiler to toast the marshmallows. It should take about 2 minutes, but watch the fudge very carefully so your marshmallows don't burn. Remove from oven and let sit at room temperature for at least 2 hours.

When fudge is set, lift out of the pan using the foil and place on a large cutting board. Cut fudge into pieces using a sharp knife and wiping the knife clean after each cut. Store in an air-tight container at room temperature.
 

Enjoy!

Monday, September 10, 2012

Cinnamon Dessert Pizza

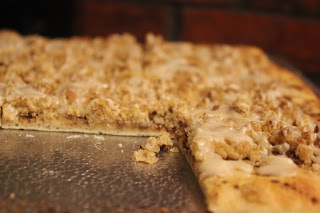
Dessert pizza?.... oh yes! If you've ever had a dessert pizza from a popular pizza joint like First Class Pizza (if you're a Southern California resident), you know what I'm talking about. Fresh from the oven, warm and gooey, cinnamon & sugar cruble with sweet icing drizzled on top. Yummmmm... If you've never tried it, you just need to make this right now. But I will warn you, this is dangerous because it is so easy to make and so delicious, you'll want to toss one in the oven every day.

You might be thinking my photos are a little strange... I mean, I said this was pizza, but obviously it's a rectangle and most pizzas are traditionally a circle. Let me explain... I must confess that I do not even own a circular pizza pan at all. I had one of those pizza stones, but I think I dropped it one day and it broke into a thousand pieces (typical in my kitchen... I make a huge mess every time I create something). So I always make my pizzas a rectangle and use a cookie sheet to bake them. It's really not strange to me at all. You see, my mom made pizza every Friday night for dinner (and our family often ate it in the family room while watching a movie). She never made a pizza that was round. It was always a rectangle and always baked on a cookie sheet... so the tradition continues. You can make your pizza in whatever way you like - round, rectangle, triangle, freeform. It will be just as delicious no matter the shape.


Cinnamon Dessert Pizza
1 pizza dough*
1 tablespoon butter, melted
2 tablespoons cinnamon

for the streusel:
1/2 cup + 1/3 cup flour
1/3 cup sugar
1/4 cup brown sugar
2 tablespoons vegetable shortening
2 tablespoon vegetable oil (I used canola oil)

for the icing:
1 cup powdered  sugar
1 tablespoon milk
1/2 teaspoon vanilla

*I just used the store-bought refrigerator dough, but you can use your favorite pizza dough recipe if you like. The store-bought kind typically comes out looking like a rectangle so it was perfect for my rectangle pizza pan - A.K.A. cookie sheet. I see a gluten-free pizza dough version in the near future.

Preheat your oven to 450 degrees. Evenly spread the pizza dough onto your pizza pan or cookie sheet. Brush the dough with the melted butter and sprinkle with cinnamon.

In a small bowl, combine the streusel ingredients using a fork or your clean fingers. Crumble the streusel evenly over the pizza dough. Bake the dessert pizza for about 8 to 9 minutes.

While the pizza is baking, make the icing. Combine all ingredients in a small bowl. Add a few extra drops of milk if needed to thin or some extra powdered sugar if you need to thicken the icing.

Remove the pizza from the oven and allow to cool for about 2 minutes. Drizzle with the icing. Slice and enjoy while it's still warm!

Thursday, September 6, 2012

Lemon Meringue Cupcakes for Mark

Today is Mark’s birthday. He is such an amazing husband and truly a wonderful man – I try to celebrate him every day, but today I thought I’d share a recipe in honor of his birthday. In reality, I’ll try to spread out the celebration throughout the whole month! Here’s just one way we’re celebrating…  Lemon Meringue Cupcakes. Mark isn’t usually a huge fan of cake, cupcakes, cookies – and certainly nothing chocolate. He does, however, enjoy lemon meringue pie (probably one of his favorites). I’ve tried making pie before, but I haven’t quite mastered it. Cupcakes that remind you of lemon meringue pie… perfect! Happy Birthday Mark!
Lemon Meringue Cupcakes
For the cupcakes…

1 box vanilla cake mix
2 eggs
1 cup mayo
1 cup water
zest of 3 lemons
2 tablespoons fresh lemon juice
1 jar lemon curd
For the frosting…1 ½ cups plus 2 tablespoons sugar
2/3 cup water
2 tablespoons light corn syrup
6 egg whites, at room temperature

My simple cupcake recipe will give you light, fluffy, moist cupcakes. I also tried the recipe on MarthaStewart.com for the cupcakes. Martha’s recipe is also good, but results in a nice heavy, dense cupcake. You can adapt to the type of cupcake you prefer. Or if you have a favorite vanilla cupcake recipe, just add the lemon zest and juice to give it the lemon flavor.
Make the cupcakes…
In a large bowl, combine all cupcake ingredients (except for the lemon curd) using an electric mixer. Mix until just combined. Divide batter among lined cups of a cupcake or muffin pan, filling each cup about 2/3 full. Bake at 350 degrees for 20 minutes. Remove from oven and allow cupcakes to cool.
You could make your own lemon curd, but I've found this lemon curd in my local market. It tastes delicious and is much less time consuming. There is a lemon curd recipe on marthastewart.com if you either don't want to buy it or can't find it in your neighborhood.
If you have a filling tip and pastry bag (such as Wilton #230), fill the bag with the lemon curd, poke the tip into each cupcake and squeeze to insert about a teaspoon of the lemon curd into each cupcake. If you don’t have a pastry bag and tip, you can cut a small piece out of the top of each cupcake using a small paring knife. Spoon about a teaspoon of lemon curd into each hole and replace the piece of cupcake you removed (you won’t be able to see it once you add the frosting).
Make the frosting…
Combine the 1 ½ cups sugar with the water and corn syrup in a small saucepan. Bring to a boil over medium heat, stirring occasionally, until sugar dissolves. Continue boiling, without stirring, until the syrup reaches 230 degrees on a candy thermometer.
Meanwhile, in the bowl of a standing electric mixer fitted with the whisk attachment, whisk the egg whites on medium-high speed until soft peaks form. With the mixer running, add remaining 2 tablespoons sugar, beating to combine.
As soon as the sugar syrup reaches 230 degrees, remove from heat. With the mixer running on medium-low speed, pour syrup down side of bowl in a slow, steady stream. Raise the speed to medium-high; whisk until the mixture is completely cool and stiff peaks form, about 7 minutes. You can test it by touching the bottom of the bowl to make sure it’s cool. Place the frosting in a pastry bag fitted with a large star tip (or you can use  a plain tip too). Swirl frosting onto each cupcake into a peak.
Using a kitchen torch, carefully toast the frosting on each cupcake. Serve immediately.
Enjoy!

General idea and frosting recipe from marthastewart.com

Tuesday, September 4, 2012

Maple Oat Scones


I love having a scone in the morning with a chai tea latte from Starbucks. When I lived in Southern California, there was a Starbucks less than a block away from my house. I sure do miss that... It's at least a 10 minute drive to the nearest Starbucks from our house in Oklahoma. It's still worth the drive. Whether you enjoy your scone with your favorite drink from Starbucks or your homemade coffee or tea, enjoy it for breakfast soon.

    
Maple Oat Scones
For the scones…
3 1/2 cups all purpose flour
1 cup whole wheat flour
1 cup quick-cooking oats, plus additional for sprinkling if desired
2 tablespoons baking powder
2 tablespoons sugar
2 teaspoons salt
1 pound (4 sticks) cold butter, cut into small pieces
1/2 cup cold buttermilk
1/2 cup pure maple syrup (or 1/2 cup maple syrup + 1 teaspoon maple extract)
4 eggs, lightly beaten
1 egg, lightly beaten with 1 tablespoon milk or water (for egg wash)
For the glaze…
1 1/4 cups powdered sugar
1 tablespoon cup maple syrup
2 teaspoons maple extract (or vanilla extract if you don’t have maple)
1 to 2 teaspoons water (to thin as needed) 
Preheat oven to 400 degrees.
Using an electric mixer (stand mixer works best, but a hand mixer will work too) in a large bowl, combine the flours, oats, baking powder, sugar, and salt. Now add the massive amount of cold butter!

Mix in the butter at the lowest speed until the butter and dry ingredients are in pea sized pieces (it should look like this picture).

In a small bowl, combine the buttermilk, maple syrup, and 4 eggs. Add the liquid mixture to the flour/butter mixture all at once. Mix on low speed until just combined. Do not over mix! The mixture will be quite sticky.
Turn the dough out onto a floured surface. The recipe in the Barefoot Contessa Cookbook says to use a floured rolling pin to roll the dough, but I found it much easier and effective to just flour my hands and use them to flatten the dough to an even thickness – about 3/4- to 1-inch thick.
Use a round cookie cutter or biscuit cutter (I actually used a round flower cookie cutter) to cut into 3-inch rounds. Place on a baking sheet lined with parchment paper.
Brush the tops of the scones with egg wash. Bake for 20 minutes or until the tops or crisp and golden brown.

To make the glaze, combine all ingredients in a small bowl. Add water one teaspoon at a time if needed to thin a little. When the scones have cooled, use a knife or small spatula to spread each scone with about 1 tablespoon of glaze. Sprinkle a little oatmeal on top if you like.
 
Enjoy!
TIP: This recipe makes a huge amount of scones. You can half the recipe or you can make the whole thing and just divide some to save for baking later. You can store them in a sealed container (I just used some parchment paper between the uncooked scones and placed them in a ziplock bag). You can refrigerate them uncooked for a few days or in the freezer for a couple of weeks. Just remove from freezer/refrigerator, place on a baking sheet lined with parchment paper as described above.


recipe from Ina Garten's The Barefoot Contessa Cookbook