Pages

Saturday, December 29, 2012

Coconut Macaroons

Need a quick cookie? These are so easy to make and so delicious! Crunchy coconut on the outside, moist and soft on the inside. Drizzling them with a little chocolate makes them just that much more decadent. These cookies made it to our Christmas cookie tray this season, but they are good any time of year (even in the summer).


Coconut Macaroons
1 (14-ounce) package sweetened shredded coconut
3 tablespoons sweetened condensed milk
pinch salt
1 teaspoon vanilla
4 large egg whites at room temperature
10 tablespoons granulated sugar
1 cup semisweet chocolate chips (optional)
1 tablespoon vegetable shortening (only if needed to thin the chocolate)

Preheat the oven to 325 degrees.

Combine the coconut with the sweetened condensed milk, salt and vanilla in a medium mixing bowl.

In the bowl of a stand mixer with a whisk attachment, beat the egg whites on medium speed until foamy. Gradually add the sugar and continue to whip the whites until stiff peaks form (about 6 to 7 minutes).

Gently fold the egg whites into the coconut mixture. Scoop tablespoon-sized mounds (I used my small cookie scoop) onto a parchment-lined baking sheet and bake for 20 to 25 minutes or until golden brown. Immediately transfer the parchment with the macaroons to a cooling rack. Cool completely before topping.

If desired, melt the chocolate chips either over a double boiler or in the microwave at half power in 30 second intervals. If the chocolate doesn't get thin enough to drizzle easily, add some vegetable shortening until you can drizzle the chocolate. Use a spoon or add you melted chocolate to a ziplock bag and cut a small hole in one corner, drizzle the cooled macaroons with the chocolate. Enjoy!

recipe slightly adapted from Alton Brown's Paradise Macaroons on foodnetwork.com

Monday, December 24, 2012

Merry Christmas

Wishing you a wonderful day! Enjoy this Christmas with family and friends... and some luscious treats.


Enjoy!

Saturday, December 22, 2012

Vanilla Marshmallows

If peppermint isn't your favorite flavor, try these vanilla marshmallows. The recipe is almost identical to the peppermind marshmallow recipe I posted recently. You can whip them up rather quickly and they will make your Christmas hot cocoa just a little bit more luscious. I bet Santa wouldn't complain if you left him a little on Christmas Eve with some cookies and hot cocoa.


Homemade Vanilla Marshmallows
1/2 cup powdered sugar
1/3 cup corn starch
2 envelopes unflavored gelatin
2/3 cup water
1 1/3 cups granulated sugar

2/3 cup light corn syrup
1/8 teaspoon salt
2 teaspoons vanilla extract
Into a small bowl, sift together the powdered sugar and cornstarch. Line a 13x9 pan with foil and coat with non-stick spray. Sift about 2 tablespoons of the sugar cornstarch mixture into the pan, tilting the pan to coat the sides. Leave any excess in the pan.

Place 2/3 cup of water in a large bowl (preferably the bowl of a stand mixer). Sprinkle with gelatin and let soften for about 5 minutes.

In a medium saucepan, heat sugar, corn syrup, and salt over medium heat until the sugar is melted and the temperature of the mixture reaches 240 degrees on a candy thermometer (about 7 minutes). Stir occasionally. Add the melted mixture to the bowl of the stand mixer in a slow steady stream with the mixer running on the lowest speed. Add the vanilla.

Then, switch to high speed and beat with the mixer until light and fluffy (about 10 to 15 minutes). Spread the mixture into the prepared pan and smooth top with a spatula. Dust the top with 2 tablespoons of the sugar cornstarch mixture. Let set at room temperature for at least 3 hours.

Lift the marshmallow from the pan using the foil. With a knife, cut into 1 inch pieces (you can also use a cookie cutter to cut shapes). Dip the knife or cookie cutters in some of the remaining cornstarch sugar mixture to prevent sticking.
Toss the cut marshmallows in the remaining cornstarch sugar mixture. Store covered at room temperature. Enjoy!!

Sunday, December 16, 2012

Homemade Peppermint Marshmallows

Christmas is quickly approaching. I love this time of year! I love all the yummy baked goods, fun flavors, and sweet Christmas treats. There are a few recipes that I make every year - this Peppermint Marshmallow recipe is one of them. Sometimes I send them off in packages to friends and family that don't live near by... and I always keep a few to enjoy with a little cup of hot cocoa. They are sweet, minty, and soft. The effort is worth it... they are much better than store-bought marshmallows.


Homemade Peppermint Marshmallows
1/2 cup powdered sugar
1/3 cup corn starch
2 envelopes unflavored gelatin
2/3 cup water
1 1/3 cups granulated sugar
2/3 cup light corn syrup
1/2 cup crushed candy canes
1/8 teaspoon salt

Into a small bowl, sift together the powdered sugar and cornstarch. Line a 13x9 pan with foil and coat with non-stick spray. Sift about 2 tablespoons of the sugar cornstarch mixture into the pan, tilting the pan to coat the sides. Leave any excess in the pan.

Place 2/3 cup of water in a large bowl (preferably the bowl of a stand mixer). Sprinkle with gelatin and let soften for about 5 minutes.

In a medium saucepan, heat sugar, corn syrup, candy cane pieces and salt over medium heat until the sugar and candy are melted (about 7 minutes). Stir occasionally. Add the melted mixture to the bowl of the stand mixer in a slow steady stream with the mixer running on the lowest speed.

Then, switch to high speed and beat with the mixer until light and fluffy (about 10 to 15 minutes). Spread the mixture into the prepared pan and smooth top with a spatula. Dust the top with 2 tablespoons of the sugar cornstarch mixture. Let set at room temperature for at least 3 hours.

Lift the marshmallow from the pan using the foil. With a knife, cut into 1 inch pieces (you can also use a cookie cutter to cut shapes). Dip the knife or cookie cutters in some of the remaining cornstarch sugar mixture to prevent sticking.

Toss the cut marshmallows in the remaining cornstarch sugar mixture. Store covered at room temperature.

Drop a few in a cup of hot cocoa or just pop them right in your mouth. Enjoy!

Thursday, December 13, 2012

Gluten-Free Cinnamon Rolls (take 2)

I tried my hand at gluten free cinnamon rolls earlier this year. Here's the recipe. They were yummy, but I wasn't completely satisfied... I always struggle with recipes that contain yeast - I can never get dough to rise enough. So this time I tried a "no-yeast" recipe. It was delicious. The texture was less like bread and more like a coffee cake texture. You should try it...


Gluten-Free Cinnamon Rolls (no yeast)
for the dough...
2 1/2 cups Pamela’s Baking  & Pancake Mix*, plus extra for the counter
2 tablespoons granulated sugar
1 1/4 teaspoons baking powder
1/2 teaspoon baking soda
1/2 teaspoon salt
1 1/4 cups buttermilk
2 tablespoons + 2 tablespoons butter, melted

for the cinnamon filling...
3/4 cup packed dark brown sugar
1/4 cup granulated sugar
4 teaspoons cinnamon
1/8 teaspoon salt
1 tablespoon + 2 tablespoons butter, melted 

for the frosting...
2 cups powdered sugar
1 tablespoon butter, melted
1 teaspoon vanilla
3 tablespoons milk or cream

*Pamela's Baking & Pancake Mix is a gluten-free/wheat-free mix that's widely available in many super markets in either the gluten-free section or baking aisle. It's also a delicious mix for pancakes and waffles (directions are on the bag).

make the cinnamon filling...
Melt the 1 tablespoon of butter in a medium bowl and stir in the sugars, cinnamon, and salt. Set aside.

make the dough...
In a large bowl, combine the Pamela's mix, sugar, baking powder, baking soda, and salt. In a small bowl, whisk 2 tablespoons of the melted butter with the buttermilk. Add the milk mixture to the dry ingredients and stir with a wooden spoon until combined. The dough will be quite sticky.

Flour a smooth, flat work surface very generously with some additional Pamela's mix. Turn the dough onto the work surface and gently pat the dough into a rectangle about 12 inches long and 8 inches wide.

Melt the remaining 2 tablespoons of butter from the filling ingredients in a small bowl. Brush the melted butter onto the rectangle of dough. Sprinkle the cinnamon mixture over the top, leaving 1/2 inch around the edges. Carefully begin rolling the dough into a log (be gentle with this step - the dough should hold together but it will be soft). Refrigerate the dough for 30 minutes (if you don't have time for this, you can skip it - it just makes it easier to cut).

Slice the log of dough into about 10 pieces. Place the cut rolls into a greased pie pan. Brush the top of the rolls with the remaining 2 tablespoons of melted butter from the dough ingredients. Bake at 425 degrees for 20 minutes or until golden brown.

make the frosting...
Melt the butter in a medium bowl. Stir in the powdered sugar, vanilla, and milk or cream until smooth.

Remove rolls from the oven and allow to cool for a few minutes. Spread frosting over the warm rolls. Enjoy!


Tuesday, December 11, 2012

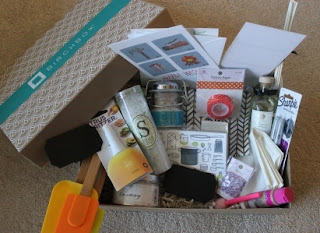
Gift Suggestion: Birchbox Home

I have to share this wonderful gift idea... if you're looking for a great gift for someone that loves trying new things in the kitchen, the Birchbox Home box is a great idea. If you haven't heard of Birchbox yet - go check it out at www.birchbox.com. A typical Birchbox subscription provides you with monthly samples tailored to the things you like - it's a great way to try new beauty products (which are also available for purchase in full-size versions on their website). But the company recently came out with this super cool Birchbox Home edition. I signed up to buy one for myself right away... I was so excited!

 It comes to your door in this pretty box. Seriously - I've never seen a plain cardboard box look so cute.

 It's filled with fun cards that explain exactly what's in the box and suggests uses for each one, directions for the cool do-it-yourself napkin designs included, recipes, trendy holiday cards... I love that they don't just send you "stuff," but they tell you how to use it. (they always do this with the sample beauty products they send in subscriptions each month)

Check out all the amazing things in this box! Cards, supplies for a fun DIY project, cute cocktail napkins, truffle sea salt, sugar sprinkles, rosemary from Dean& Deluca, recipe cards (with some recipes included), a citrus spitzer, and mini chalkboard placecards.

Buy for yourself or a friend - I hope you'll enjoy it as much as I did.

Monday, December 10, 2012

Gingerbread Cookies

Back up and running now! Thanks so much for your patience. Hopefully you'll enjoy all of the recipes I'll be sharing again. The holiday season is the best time for all things luscious!

And what better way to start my sharing of holiday recipes, than with gingerbread cookies?! These gingerbread cookies are my all-time favorite cookie. I could seriously eat the whole batch myself! The rest of my family prefers the traditional frosted sugar cookie (which I will also share soon), but I always choose these gingerbread cookies over sugar cookies. Gingerbread just screams "CHRISTMAS" to me! It's warm and cozy and perfect with a cup of tea in front of the fireplace with Christmas music playing in the background. You'll definitely want to add these to your Christmas baking list...

Gingerbread Cookies
3 cups all-purpose flour
2 teaspoons groung ginger
1 teaspoon baking soda
1 teaspoon ground cinnamon
1/2 teaspoon salt
1/4 teaspoon ground cloves
2/3 cup butter
3/4 cup packed brown sugar
1/2 cup molasses
1 egg

In a bowl, stir together the flour, ginger, baking soda, cinnamon, salt, and cloves. Set aside.

In a mixing bowl, beat butter with an electric mixer. Add the brown sugar and molasses; beat until combined. Add the egg and beat well. Add flour mixture and beat at low speed until just combined. Divide dough in half. Cover and chill the dough for 3 hours or until easy to handle.

On a well-floured surface, roll half of the dough at a time to 1/4 inch thickness. Cut into desired shapes (the picture above shows a classic gingerbread man and gingerbread girl with a tree... but i've also done candy canes, snowflakes... choose whatever shape you like). Place on a lightly greased cookie sheet.

Bake at 375 degrees for approximately 7 minutes or until edges are very lightly browned. Do not overbake these cookies or they won't keep their soft and chewy texture.

Enjoy!!! Enjoy these cookies and the entire holiday season!

Friday, November 30, 2012

Happy Birthday Deanna

Today's cake is for my sister Deanna on her birthday. She's a wonderful sister and friend - always supportive, always loving, always there when I need her. I miss her terribly living half-way across the country from her. But happy I could make this cake in her very favorite color. Happy Birthday!


Now for a little bad news... I'm having some technical difficulties with the Luscious Confections blog. So please don't be discouraged if you don't see any new posts for a week or so while I work out the "bugs." I promise to be back as soon as possible with lots of yummy recipes to share. Thanks for understanding! Check back often.

Monday, November 26, 2012

Pumpkin Cake for Emily

Today is a very special day - Happy 13th Birthday, Emily!!!!!! Emily's birthday is so close to Thanksgiving that we always include a little birthday celebration as part of Thanksgiving dinner with the family. It's quite fitting that one of Emily's favorite desserts is pumpkin pie (or just about anything pumpkin flavored). This cake is so moist and rich, it reminds me of a flourless cake - in pumpkin. Topped with cinnamon maple cream cheese frosting, it truly is luscious.


Pumpkin Cake with Cinnamon Maple Cream Cheese Frosting
for the cake...
1 1/2 cups flour
3/4 teaspoon baking soda
1/4 teaspoon salt
6 tablespoons butter, softened
1 cup sugar
2 eggs
1/2 tablespoon vanilla extract
1/2 (15 oz) can pumpkin
1 tablespoons vegetable oil
1/2 cup milk (I used almond milk)

for the frosting...
6 oz  cream cheese, softened
6 tablespoons butter, softened
1 1/2 tablespoons maple syrup
1 teaspoon vanilla extract
2 teaspoons cinnamon
3 cups powdered sugar

make the cake...
Preheat your oven to 350 degrees. Prepare two 6-inch round cake pans with non-stick cooking spray.

In a medium bowl, mix flour, baking soda, and salt.

In a large bowl using an electric mixer or stand mixer, cream butter and sugar together until light and fluffy. Beat in eggs, then add vanilla, pumpkin and vegetable oil. Beat in the flour mixture alternately with the milk.

Divide the batter evenly into prepared pans. Bake for 30 to 35 minutes, or until a toothpick inserted into the center of the cake comes out clean. Remove pans from oven and immediately place in freezer for 45 minutes. (Thenovicechefblog advises doing this. I believe this trick is what gives this cake is super moist texture.)

While the cakes are cooling, make the frosting...
In a large bowl, cream the butter and cream cheese until smooth. Beat in maple syrup, vanilla and cinnamon. Add powdered sugar and beat on low speed until combined, then on high until frosting is smooth.

Remove cakes from the freezer and from the pans. Place the first cake on a cake plate and top with a thick layer of the frosting. Top with the second cake and cover sides and top with remaining frosting. Decorate as desired. I added a "Happy Birthday" flag banner. It's easy to make - just take two wooden kitchen skewers, some string or twine, and some heavy card stock in your favorite color or colors. Cut small triangles from the card stock. String the triangles together using a large needle and the string or twine. Tie each end to the skewers and insert into the cake at an angle.


Store the cake in the refrigerator until ready to serve.

Enjoy every moment of being 13, Emily!!


recipe adapted from thenovicechefblog.com

Saturday, November 24, 2012

Basil Butter Shrimp

This shrimp has just been declared the best shrimp ever in our house. I kind of threw it together at the last minute loosely based on a grilled shrimp recipe from a Tyler Florence cookbook. It is so simple, but extremely delicious. You can prepare it in about 15 minutes, so it's a great weeknight protein paired with a simple salad and some crusty bread (for soaking up the left over basil butter). Yum!


Basil Butter Shrimp
10 to 12 large raw shrimp, peeled & tails removed
3 tablespoons butter, softened
juice of 1 lemon
large handful of basil leaves, chopped + additional for garnish
salt & pepper to taste
1 tablespoon white wine

In a medium bowl, combine the butter, lemon juice, basil leaves, and salt & pepper. Toss shrimp in the butter mixture to coat. Heat a large skillet over medium heat. Toss the shrimp and all of the butter mixture into the skillet. Cook shrimp, stirring occasionally and turning over half-way through cooking, for about 7 to 10 minutes or until pink in color and cooked through. Add white wine and cook for 1 minute longer. Remove from heat and transfer to a warm plate or shallow bowl. Sprinkle with chopped basil leaves for garnish.

Enjoy!

Sunday, November 18, 2012

Mini Almond Pies

I'm trying to get everything out of my refrigerator to make room for all the deliciousness of Thanksgiving (which we are hosting this year). I had an extra store-bought pie crust in the refrigerator, so I decided to experiment a little... the result was soooooo delicious and sooooo easy! I had to share it. Seriously, you can whip up these tasty little pies in just a few minutes. You could use any filling you like. I used almond (which remind me of little bear claws), but apple, strawberry, nutella, or even cinnamon & brown sugar would all be yummy.

Mini Almond Pies
1 store bought pie dough (or a home made pie dough)
1 egg
1 teaspoon water
1 can almond pie filling (or other filling of your choice)
1/4 cup slivered almonds
1/4 cup powdered sugar
1/2 teaspoon almond extract (or vanilla)
1 teaspoon water

Preheat your oven to 350 degrees.

Remove pie from the refrigerator and allow to rest at room temperature for about 15 minutes. Dust a flat work surface with flour and roll the pie crust to about 1/8 inch thickness on the prepared surface. Cut approximately 8 rectangles from the dough (making sure they are all about the same size). You could also use a cookie cutter to cut shapes - just make sure you have two of each (a top crust and a bottom crust).

Place one rectangle on a cookie sheet. Top with about a tablespoon (or more depending on the size of your rectangle) of pie filling. Top with another piece of dough, crimp the edges with a fork, and make a few small cuts in the top dough with a sharp knife. Repeat the process with the remaining dough and filling. Brush the tops of the mini pies with egg wash (1 egg mixed with 1 teaspoon water). Sprinkle with a few slivered almonds. Bake for 20 minutes or until golden brown.

Cool mini pies on a wire rack. While they cool, mix up a little glaze. Stir together the powdered sugar, almond extract, and water until smooth. Add more water as needed to thin. Drizzle cooled pies with the glaze. Enjoy!

Tuesday, November 13, 2012

Breakfast Crepes

The number one requested breakfast in our house is definitely breakfast crepes. If you haven't had crepes before, they are a traditional French recipe (kind of like a very, very thin pancake). Sometimes crepes are filled with savory items like chicken, mushrooms, cheese, or spinach. Our family's favorite would include some sweet fillings such as fruit, whipped cream, and chocolate. Creating different filling combinations is fun for everyone. We fill the center of our table with lots of different options, prepare the crepes in a large batch, and all sit down to enjoy them together. It takes a little work to put it all together, but your family will love it. Thanksgiving weekend provides the perfect long weekend to take the extra time and enjoy some crepes.

Breakfast Crepes
3 eggs
2/3 cup whole milk*
1/2 cup water*
3/4 cup flour
1 teaspoon sugar
1/2 teaspoon salt
1 tablespoon butter, melted, plus more for brushing
1 tablespoon canola oil
various fillings - Nutella, strawberries, orange slices, banana, slivered almonds, honey, sugar, cinnamon, etc... the possibilities are endless!

*If I don't have whole milk (and I usually don't), I use 2/3 + 1/2 cup of 1% or 2% milk, eliminating the water.

To make the batter, in a bowl, whisk together the eggs, milk, and water. Whisk in the flour, sugar, salt, 1 tablespoon melted butter, and canola oil, whisking to remove as many lumps as possible. Let the batter rest for 30 minutes at room temperature.


While the batter is resting, prepare your toppings in the middle of your table so that everyone has easy access to them.  

Place a small, nonstick frying pan with low sides over medium heat. Heat the pan until quite hot (I use two small pans so that I can make two crepes at the same time and get them to the table faster). Lightly brush the pan with melted butter. Ladle about 3 tablespoons (just shy of 1/4 cup) into the pan and immediately swirl the pan around so the batter spreads into a thin layer covering the bottom, then pour any excess back into the bowl. Cook until the bottom of the crepe is lightly browned in sponts and the edges pull away slightly from the pan sides, about 2 minutes. Using a spatula, carefully turn and cook for about 30 seconds on the second side. Turn the crepe out onto a plate.
     

Notes: The crepes are extremely thin so be extra careful when you're turning them to the second side. You may rip a few, but after a little practice, you'll be able to flip them without any trouble. I like to make all of the crepes before calling the family to the table. (That way we all get to enjoy them together). Put your oven on low and place a large plate on the middle rack. As you cook each crepe turn it out on the plate in the oven. Stack the crepes on the plate, keeping them covered with a damp paper towel so they don't dry out.

Repeat the whole process with the remaining batter, stacking the crepes as you go and brushing the hot pan with melted butter between crepes.


 Fill each crepe as desired and gently roll to contain fillings.


Favorite cominations in our house include butter sprinkled with granulated sugar, slivered almonds drizzled with honey, a squirt of lemon juice with a dusting of powdered sugar, sliced strawberries, Nutella, and whipped cream. You could even try crumbled bacon drizzled with maple syrup. Experiment with your favorites! Enjoy!


Basic recipe from Williams-Sonoma Paris cookbook

Monday, November 12, 2012

Brown Sugar Sauce

Today is my Dad's birthday and I've been traveling lately (so you've probably noticed I've been slacking a little on the Luscious Confections blog). I'd been thinking about what I could make to shrare for my Dad's birthday that he would enjoy and that also could be put together relatively easily since I didn't have much time in the kitchen. Ice cream! Of course! My Dad's favorite! I'm pretty sure he eats a little ice cream almost every day. And he makes the perfect scoops of ice cream for an ice cream cone. I don't, so I opted for a cute little dish.

Dad likes chocolate ice cream - the darker, the better. Today, for his birthday, I topped chocolate ice cream with a delicious brown sugar sauce and sprinkled on some toffee chips (like the middle of a Heath bar - which I know he likes). It's a simple, yet decadent dessert.

Brown Sugar Sauce
1/4 stick butter
3/4 cup brown sugar
2 teaspoons vanilla
2 teaspoons cinnamon

Combine all four ingredients in a small saucepan and melt over medium-low heat just until it starts to bubble. Drizzle over ice cream. Enjoy!

In the summer we often use this sauce on grilled pears or pineapple. Just grill half of a pear or a slice of cored pineapple over medium-high heat on the grill until you get nice grill marks. Top with vanilla ice cream, and drizzle with brown sugar sauce. Delicious!

I'd love to hear your ideas for other yummy desserts to drizzle with brown butter sauce.

Happy Birthday Dad!!!
Love this picture of my dad. He's having so much fun (me too obviously) - he loves dancing.

Wednesday, November 7, 2012

Soft Sugar Cookies with Vanilla Buttercream Frosting

So I was looking for a reason to use up some sour cream that was in our refrigerator. I didn't want it to go to waste and the expiration date was approaching. So, of course, I went searching for dessert that would use sour cream. I've never made a sour cream sugar cookie - I usually stick to my tried and true sugar cookie recipe. My go-to "Perfect Sugar Cookie" recipe is still my personal favorite. These sour cream sugar cookies are completely different, but still luscious and delicious. They are soft, light, and remind me a little bit of cake. Try them - you won't be disappointed. And look at how fun they are with all those sprinkles!


Sour Cream Sugar Cookiesfor the cookies...
5 1/2 cups flour plus more for work surface
1 teaspoon baking soda
1 teaspoon baking powder
2 sticks butter, at room temperature
2 cups sugar
3 eggs
1 teaspoon vanilla
1 1/2 cups sour cream


for the vanilla buttercream frosting...
1 stick butter, at room temperature
2 cups powdered sugar
1 teaspoon vanilla
1/2 tablespoon water or milk

In the bowl of an electric stand mixer (or you can use a hand mixer), cream together the butter and sugar until light and fluffy (about 4 minutes). Scrape down the sides of the bowl and add the eggs, one at a time, incorporating each one. Continue to scrape down the bowl as needed. Add the vanilla and sour cream and beat at low speed until incorporated.

Slowly add in the flour, baking soda, and baking powder. Mix at slow speed until just combined.

Divide the dough into two sections, flatten each into a disk, dust with flour, and wrap separately in plastic wrap. Refrigerate the dough for at least two hours or overnight.

Prepare a baking sheet with parchment paper. Dust a flat, smooth work surface and a rolling pin generously with flour. Preheat your oven to 425 degrees.

Working with one of the refrigerated disks, roll the dough to about 1/4 inch thickness. Use a round, square, or whatever shape you like to cut out cookies. NOTE: this dough puffs up - so detailed cut-outs will get distorted. I recommend round, square, or flower shapes. Place each cookie on the prepared baking sheet. Bake for about 7 minutes, until just golden on the bottom. Remove from the oven and cool completely on a wire rack. Repeat the process with the remaining dough.

Cream together the butter, powdered sugar, vanilla, and water or milk. Beat with an electric mixer until light and fluffy.

Use a knife or spatula to top each cooled cookie with a generous layer of frosting. Decorate with sprinkles as desired. Enjoy!

Wednesday, October 31, 2012

Angry Birds Cake for Tyson

Today is not just Halloween... it's Tyson's birthday! I made Tyson his first cake before he was even born. Tyson is three years old today and this is cake #4 (the first cake was for the baby shower we threw for his parents - Rachel and Justin). Being part of Tyson's life (and Justin's & Rachels' too) has been such a blessing. It's a joy to watch Tyson grow, learn, and have fun.

Tyson is really into Angry Birds these days. He asks for "Nette's phone" every time we're together to play Angry Birds. He also really, really likes the color blue. So I knew just exactly what kind of cake to make for him. I enjoy making cakes for this family so much. Here are some pictures of this year's cake and some from the past.

Happy 3rd Birthday Tyson!
even the inside is blue!
(white cake tinted with blue food coloring/almond buttercream frosting)


It all started with this cute little frog cake in anticipation of Tyson's birth...

Then we got to participate in his baptism - complete with a Noah's ark cake and little cross sugar cookies...


And Tyson's 1st birthday party was (appropriately) a big Halloween party with family in friends. Tyson's costume was a lion and the rest of the family joined in the theme. Rachel was Dorothy, Justin was the scarecrow, Tyson's grandparents played the Tin Man & Glinda the good witch, and his auntie was the wicked witch of the west. It was such a fun event (and one of my favorite cakes ever).

I'm already anticipating next year's birthday! But before that we'll get to celebrate the birth of the Young family's baby girl (coming soon), Rachel's birthday, and Justin's birthday.... all with cake of course!

Tuesday, October 30, 2012

Butternut Squash Gnocci

Butternut squash is one of my favorite fall flavors. I especially love butternut squash ravioli or gnocci because it feels so warm and cozy when you eat it. Served with a simple brown butter sauce and some sage, it's just so delicious. I decided to make this butternut squash gnocci with the squash I had left over after making this butternut squash tart. The tart was super simple. The gnocci not so much. It's a rather involved process, I have to say. The result was fantastic! But honestly, if you're not up for the process, there are some yummy butternut squash pastas out there that you can find at your local markets this time of year. You can prepare those and use the brown butter sauce and sage from this recipe and cut your prep time in half.


Butternut Squash Gnocci with Brown Butter and Sage
1 head of garlic, top third cut off
Extra-virgin olive oil, for rubbing
1 pound baking potatoes
One 2-pound butternut squash—peeled, seeded and cut into 2-inch pieces
2 large egg yolks, at room temperature
1/4 cup fresh ricotta cheese
2 tablespoons minced flat-leaf parsley
salt & pepper
1 1/4 cups flour, plus more for dusting
1 stick butter
10 fresh sage leaves, thinly sliced
1 tablespoon fresh thyme, finely chopped
Parmigiano-Reggiano shavings, for serving
Cooked Italian sausage for serving (optional)

Preheat the oven to 375ยบ. Place racks in the lower and middle thirds of the oven. Drizzle the garlic with olive oil, wrap it tightly in foil and roast on the bottom rack of the oven for 50 minutes. Lightly rub the potatoes with olive oil, prick them all over with a fork and bake on the lower rack for 45 minutes to 1 hour, until fork-tender. Line a large baking sheet with foil. Add the squash and rub with olive oil. Bake on the upper rack for about 30 minutes, stirring once, until soft.

Squeeze 3 or 4 of the roasted garlic cloves out of their skins into a food processor. Peel the hot potatoes and puree them with the garlic in a food processor. Transfer the potatoes and garlic to a large bowl. Add the hot squash to the food processor to puree, then add to the bowl with the potatoes. Let cool slightly. Add the egg yolks, ricotta, parsley, and 1 tablespoon of salt & teaspoon of pepper (or more to taste). Stir until combined. Sprinkle on the 1 1/4 cups of flour and gently stir it in. Scrape the dough onto a heavily floured surface and knead gently until smooth but still slightly sticky.

Line a baking sheet with wax paper and dust with flour. Cut the gnocchi dough into 5 pieces and roll each piece into a 3/4-inch-thick rope. Make sure you have your surface well-coated in flour or you'll have a sticky mess. Be gentle when rolling the dough into the rope.


Cut the ropes into 1/2-inch pieces and transfer the gnocchi to the baking sheet.

If you don't want to cook all of the gnocci right away, you can freeze it for a month. Just freeze the pieces on the baking sheet. When frozen, transfer them to a large ziplock bag. When you're ready to eat them, just cook the frozen gnocci as directed below.

Lightly oil another baking sheet or large plate. In a large, deep skillet of simmering salted water, cook half of the gnocchi until they rise to the surface, then simmer them for 1 to 2 minutes longer, until cooked through. Using a slotted spoon, transfer the gnocchi to the baking sheet. Repeat with the remaining gnocchi.
If using Italian sausage, cook the sausage in a skillet with some olive oil, or reheat if previously cooked. In a large nonstick skillet, melt the butter over moderate heat and cook until golden brown, about 2 minutes. Add the sage and thyme and cook for 20 seconds. Toss in the warm sausage (if using). Add the gnocchi and cook for 1 minute, tossing gently. Season with salt and serve, passing the cheese shavings at the table.

Enjoy!
recipe from Andrew Zimmern on foodandwine.com